
| Where this fits: Workflow Universe | For: Field, Admin | |
| Read first: The Workflow Universe: How the Guides Fit | Read next: Your First Week on UtilizeCore · The Field Guide |
Applies to: Vendor office staff: owners, office managers, accounts | Web
Download the printable guide (PDF)
The one idea. Signed up is not the same as ready. No W-9, no payment. No insurance on file, no work. The company that invited you cannot pay you without a W-9, and cannot send you work without a current certificate of insurance. Both have a Skip button. Nothing reminds you to come back.
Have these in front of you.
Gathering these first makes it one sitting instead of three.
| For | Have ready |
| Your company | Legal company name, DBA, legal address, state of registration, a business phone and email. |
| Tax | EIN and tax classification, for the W-9. |
| The signer | Your authorized signer's name and email. |
| Insurance | Your certificate of insurance, plus any other document the company that invited you asks for. |
| Your team | The email or mobile number of everyone who goes to a Site. |
Account first, then your company.
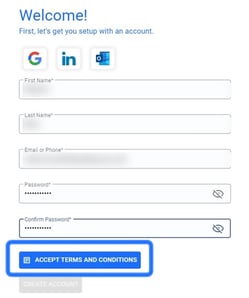
Creating your account. Create Account stays gray until the terms are accepted.
- Open the invitation and click Set Up Profile. It arrives by email and by text.
- Sign in with Google, LinkedIn or Outlook, or enter your name and set a password. Use your own email: everything is recorded against whoever is logged in.
- Click Accept Terms And Conditions and read the terms through to the end (see the note below).
- Click Create Account, then fill in Create Company Profile. Fields marked with an asterisk are required.
- Click Next to move to Select Trades.
If the buttons look broken, they are not. The terms open in a window you have to read through. Go to the ninth page, click the link there, then come back. Only then does Accept turn blue and Create Account become available.
Trades, documents and your team.
The last steps decide what work you are offered, whether you can be paid, and whether your crews can do anything in the field.
| Step | What to do | If you skip it |
| Select Trades | Pick every trade you actually perform, not just your main one. | You are offered less work than you can do. |
| Name your workspace | This becomes the web address you log in at from now on. Save it somewhere. | You cannot find your way back in. |
| W-9 | Fill it in and click Generate. Or Skip and finish it from your company profile. | You cannot be paid. |
| Compliance | Enter your insurance details. Or Skip and add them later. | You can be fully set up and still not receive work. |
| Invite Team | Add each person by email or phone number, give them a role, then Finish. A crew lead who prices extra work on mobile needs Operations or Admin. | Your crew ends up sharing one login. |
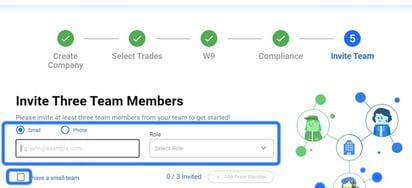
Inviting your team. Three invites are requested. The small team checkbox lets you finish without adding anyone.
The small team checkbox is how crews end up sharing one login. It is tempting at the end of setup. Add your field people here, or from your company profile the same week. Each person needs their own login to check in, take photos and check out, and that record is what backs up your invoice.
Three things the same day.
| Do this | Why |
| Upload anything you skipped | W-9 and insurance from your company profile. Check that each document reads Approved. |
| Send your technicians The Field Guide | The office account is half of it. The people who go to Sites work Trips on the mobile app. |
| Read Your First Week on UtilizeCore | What your office does once, and the three things it does every week. |
Questions? Call the company that invited you. Trouble with setup or the app: email support@utilizecore.com.