
| Where this fits: Workflow Universe | For: Field | |
| Read first: The Field Guide | Read next: Trip Status and Pin Legend |
Applies to: Technicians and crew leads on the UtilizeCore Mobile App | Mobile
Download the printable guide (PDF)
The one idea. On your phone you work Trips. A Trip is your visit to one Site, inside a Work Order. The Work Order is the record of what is being done and for whom. Everything you do in the field happens on the Trip: your check-in, your photos, your tasks, your check-out.
Your day, in seven parts.
| # | Part | What it covers |
| 1 | Opening the app | My Work Orders, and the four checks when a Trip is not there. |
| 2 | Set it up once | Location, your own login, and your settings. |
| 3 | Check in | Every control on the Trip screen, and checking in your crew. |
| 4 | Do the work | Actions, tasks, photos, forms and inspections. |
| 5 | Finishing the Trip | Check Out, Must Return or Pause Trip, and syncing. |
| 6 | Notes and Proposals | Telling the office, and pricing extra work. |
| 7 | Create work from the field | Route and snow work with no Trip waiting. |
When you open the app.
Log in with your own account and you land on My Work Orders: your Trips, nearest first. Every day starts here.
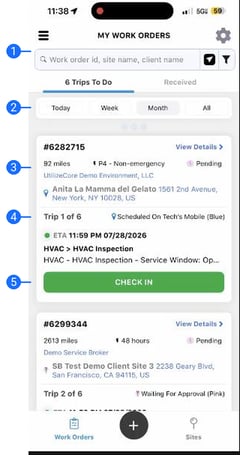
- Search and filter. Find a Trip by Work Order number, Site or Client. The funnel narrows the list.
- Timeframe. Today, Week, Month or All. Set your default once (Part 2).
- Distance. How far the Trip is from you. The list is sorted nearest first.
- Which Trip. Trip 1 of 6 means this is the first of six Trips on that Work Order.
- Check In. Starts the Trip once you are on Site (Part 3).
Tabs and bottom bar. Trips To Do are your Trips. Received holds new Trips to accept. The bottom bar switches between Work Orders and Sites; the + button creates work from the field (Part 7).
A Trip is not on the list? Four checks, in this order.
| # | Check | What to do |
| 1 | The timeframe | Set it to All and look again. Today hides tomorrow's work. |
| 2 | The Received tab | New Trips wait there until you accept them. |
| 3 | The company you are in | If you work for more than one company on UtilizeCore, switch company from your profile. |
| 4 | Whether it was sent to you | Ask your office or the company that sent the work whether the Trip is assigned to you. |
Set it up on day one.
A few settings make the app work the way you do. Set them once, then forget about them.
Turn on location services. Allow location for UtilizeCore, set to While Using the App. The app uses it to sort your Trips by distance and to confirm you are on Site at check-in, and only while the app is open.
Use your own account. Log in with your own email, using your password or a one-time code the app emails you. Never a shared login: your check-ins, photos and time are recorded against whoever is logged in. Cannot get in? Reset your password from the login screen, or ask your office to resend your invite.
Your settings: Profile, then User Settings.
| Setting | Set it to |
| Default Time Range | Week or Month, so upcoming work stays in view. |
| Distance | Miles or KM. |
| Language Options | English or Spanish. |
| Show Map | On, if you want a map on the Work Order or Site list. |
| Save Photos to Gallery | On, to keep a copy of your Trip photos on your phone. |
| Show Description | On, to see each photo's description while you take it. |
| NFC or QR Scan | On, if your work uses tags or codes on equipment. |
| If the app acts up | Clear Cache, check your version, or reset your password, all from the same screen. |
Check in, then work the Trip.
Tap a Trip and check in. The screen is headed by the Work Order number, but everything below it belongs to this Trip.
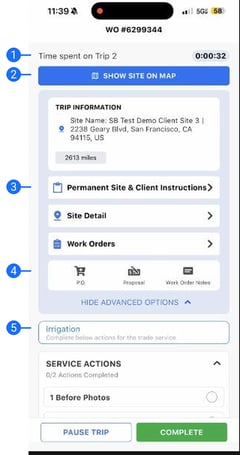
- Time on the Trip. A timer runs from check-in, so your time on Site is captured for you.
- Show Site on Map. Directions to the exact Site address.
- Instructions. Permanent Site & Client Instructions are standing notes for the Site. Read them before you start.
- P.O., Proposal, Work Order Notes. Open the purchase order, start a Proposal, or send a note with an attachment (Part 6).
- The trade Service. Here, Irrigation. It holds the actions and tasks for this Trip (Part 4).
Checking in: location and crew. Check-in is tied to the Site. If you are not on Site yet, the app shows Start Travel instead of Check In and waits until you arrive. Start Travel is not check-in. Working with others? Tap Check In, then Select Team Members, pick everyone on the Trip, and confirm, so the whole crew's time is tracked together.
What the Trip asks for.
Every Trip carries its own checklist, set by the company that sent you the work. Each item turns green when it is done.
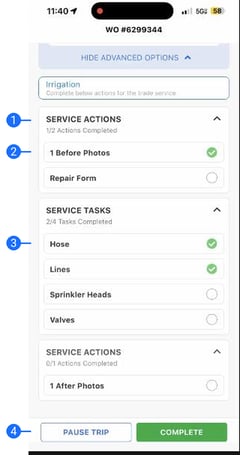
- Service Actions. The required steps. The counter, 1/2, shows how many are done.
- Photos and forms. Usually Before Photos, a Repair Form and After Photos. Tap one to complete it.
- Service Tasks. The checklist for the trade. Tick each one as you finish it.
- Pause Trip, Complete. Pause if you step away. Complete when every action and task is done (Part 5).
| A Trip may require | What it means |
| Photos | A set number of before and after photos, each stamped with location and time. |
| Materials | The parts you used. The Repair Form captures photos, notes and materials in one place. |
| Signature | A store or Site manager's signature, when the Trip asks for one. |
| Mandatory tasks | You cannot check out until every required item is done. |
When the Trip includes an inspection.
- Tap Perform Inspection to open the Site's asset list.
- Pick an asset and mark it pass, minor deficiency or fail, with photos. A fail asks for details.
- Wrong asset type? Open the asset's Attributes tab, tap Edit, choose the right Type, then Save.
- Tap Back and pull down to refresh.
Three ways to finish.
Tap Complete to reach the Service Overview. Check your photos and tasks there, then pick the way out that matches the job.
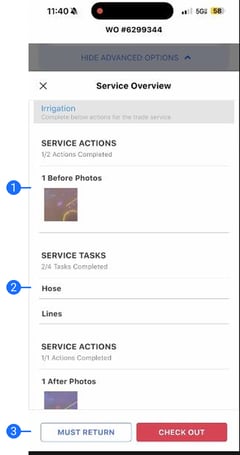
- Photo review. Your before and after photos, for a last look.
- Task review. Every task you ticked, in one place.
- Finish. Must Return on the left, Check Out on the right.
| Way out | Use it when | Where |
| Check Out | The work is finished. Capture a signature if asked, then check out. | Service Overview |
| Must Return | The work is not finished: parts, weather, a callback. A return Trip is created and the record shows why. | Service Overview |
| Pause Trip | You are stepping away but not leaving: lunch, moving equipment. Your timer and place are held. | Trip screen |
It syncs on its own. The app works without signal. When you are back in coverage it uploads by itself, and the cloud icon shows it working. If a Trip still shows Sync Data, tap it. Leave the app open until the upload finishes.
Always check out. A Trip you checked in to and never checked out of is not finished, and your work is not recorded. Reopen it and check out.
Notes and Proposals.
Why it matters. What you put in the app is what the company that sent you the work sees. Your notes, photos, and check-in and check-out times are the record behind your invoice. Put it in the app, not in a text or a call.
Send a note on a Trip.
- On the Trip, open Work Order Notes.
- Type the message and attach a photo or file if it helps.
- Turn on the email option when someone has to act on it. A note does not alert anyone on its own.
- Send. The note posts to the Trip, where the office can see it.
Price extra work with a Proposal.
Found work outside the scope? Price it and get it approved before you do it. Two ways in: the menu (the three lines, top left), then Proposals; or the Proposal shortcut on the Trip screen.
- Tap the green + to start a Proposal.
- Pick the Client. Link an existing Work Order to fill in its details.
- Continue, add the details and a message. You and the Client both see it.
- Add line items. Each needs Item Type, Item Name, Price and Quantity.
- Save & Exit to finish later, or review the overview and tap Send.
Who can create one. Creating a Proposal on mobile needs an Operations or Admin role. If you cannot see the option, ask your office to check your role.
No Trip waiting? Create the work on Site.
Route crews, snow crews most of all, often reach Sites with no Work Order waiting. Create it on Site: every stop gets its own Work Order, Trip, time and photos, which is what the event is billed from.
- Tap Sites in the bottom bar and choose the Site.
- Tap the green button to report a new service. Open the Trade, Service row, pick both, and wait for the green check.
- Tap the green Check In.
- Complete every mandatory task and field. Each turns green.
- Tap Complete to reach the Service Overview.
- Tap Check Out. A confirmation shows the new Work Order number.
It has to be turned on. Creating Work Orders on mobile is switched on per Site or per Vendor, and your account must be allowed to do it. If you do not see report a new service, ask your office.
What it is called. You may hear CIWO (created in the field) or TIWO (technician-initiated Work Order). Same thing: work you start on Site instead of waiting for a dispatch.
Questions? Call the company that sent you the Trip. App trouble: email support@utilizecore.com.