
| Where this fits: Workflow Universe › Layer 3 · Setup & Network | For: Admin, Operations Lead | |
| Read first: Onboarding a New Client | Read next: Invoicing: From Verified Trip to Paid |
Applies to: Account managers, operations leads, and administrators | Web
Download the printable guide (PDF)
Who this is for
Account managers, operations leads, and administrators at the service management company who want their Clients submitting Service Requests, tracking Work Orders, approving Proposals, and viewing Invoices through the Client Portal instead of over the phone. By the end you can configure a Client's portal access, invite their contacts, run the intake flow end to end, and run a rollout that sticks.
The whole flow at a glance
- Operations lead configures what the Client will see and who receives their requests.
- Account manager enables portal access and invites the Client's contacts.
- Client contact submits a Service Request from the portal; the dispatcher turns it into a dispatched Work Order.
- Account manager routes Proposals through the portal for Client approval.
- Finance points the Client at their Invoices and payment options in the portal.
- Operations lead runs the rollout: pilot Client, training, announcement, and a named owner for portal data.
Before you start
- The Client and their Sites must already exist in your account. See "How To Add A New Client" in Related articles.
- You need administrator access to Company Settings. Company Settings lives under the Settings gear, then More Company Settings.
- Rates, Trades, and Services for the Client should be set up, because the Service Request flow asks the Client to pick a Service.
- Have the Client Portal overview document from Reference documents ready to send with invitations.
Stage 1: Configure what the Client will see
Owner: Operations lead | Where: Settings gear > More Company Settings
Portal visibility is configuration, not default behavior. A Client contact who logs in before you configure access sees an empty portal with no "Service Request" button, which is a bad first impression. Do this stage before anyone is invited.
Step 1: Open the Access tab on the Client profile and enable Work Order visibility
Open the Client record and go to the Access tab. Three toggles live there: "Work order data" (show your Work Order data to this Client on their mobile app and web platform access), "Service requests" (allow this Client to submit Service Requests), and "WeatherWorks for the site event billing". Turn on the first two for every portal Client. Then check the company-wide companion setting in Step 4: with "Undispatched Trips" off, a Work Order with no Trip yet is invisible to the Client, and a Client's own brand-new Service Request is exactly that. They submit a request, look for it in the portal, and see nothing, which reads to them as a lost request.
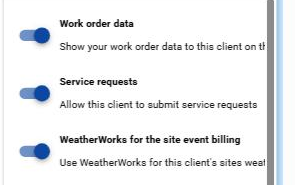
Client profile Access tab with the Work order data, Service requests, and WeatherWorks toggles
Step 2: Route new Service Request emails to your team
In Company Settings, open "Emails" in the left navigation and expand "Settings - Configurable Email Recipients". Add a row, pick a "Role", and optionally add "User Emails". If you select a Role and leave "User Emails" blank, every user with that role receives the email.
Step 3: Set the columns and default views the Client's roles will see
Portal columns and filters are configurable per role or per user. Decide whether site-level users get a reduced column set and whether admins get the full view, then set default filters so the Client does not build their own from scratch .
Step 4: Set the company-wide Client view settings, including Undispatched Trips
Open the Settings gear, choose More Company Settings, then Clients, and expand WORK ORDERS. The "General" section hides fields from the Client's Work Order view (Hide Billing Method, Hide Problem Type, Hide Work Order Report Download) and controls the Work Order Client/Site Contact Email Notification. The "Trips" section controls what Clients see on Trips: Check In and Check Out, Report Summary, Billable Hours, Trip Adjustments, Chat, Undispatched Trips ("show undispatched trips to your clients"), and Access Client Portal. Turn Undispatched Trips on before the first Client is invited; it is the setting that makes a fresh Service Request visible to the Client who submitted it. Map colors follow the Trip Status Reference Guide in Reference documents.
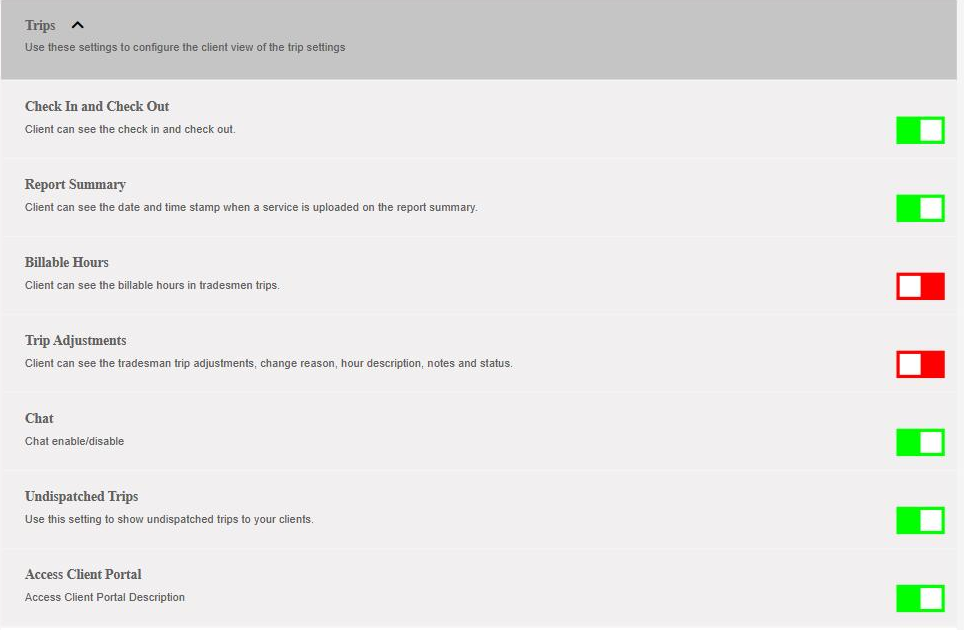
More Company Settings, Clients, Work Orders, Trips section with the Undispatched Trips toggle highlighted
Stage 2: Invite the Client's contacts
Owner: Account manager | Where: Main Menu > Network > Clients
Invitations go out only after Stage 1 is done. Start with the two or three people at the Client who will actually submit requests, not the whole org chart.
Step 1: Add contacts to the Client's Sites
Open the Client record and add each contact to the Site they cover. Contacts can be added one at a time or through bulk upload if the Client hands you a master list .
Step 2: Send portal invitations
Send each contact their portal invitation. Invitations can go out by email or by phone number as a text link. Logins persist when you add Sites later, so invite people once and adjust their Site visibility afterward.
Step 3: Show the Client admin how to invite their own team
A Client admin can self-serve from their portal: Network, then Employees, then the circular + button. They fill in "Email or Phone", pick a "Role", click ADD for each person, then click the blue SEND INVITATION button. Hand this task to the Client's admin so you are not the bottleneck for every new hire on their side.
Stage 3: Run the Service Request intake flow
Owner: Dispatcher | Where: Client Portal home; Main Menu > Operations > Work Orders
This is the core loop of the portal. The Client submits a request, it lands as a Work Order on your side, and every status change flows back to their list and map in real time.
Step 1: Have the Client submit a Service Request
In the portal, the Client clicks the blue Service Request button in the top left, searches for their Site, and clicks Continue. They pick the vendor and Service from dropdowns, describe the problem, attach photos or PDFs with "Add Attachment", review, and click Send. The same flow works on the mobile app with the same login.
Step 2: Receive the request on your side
The submission creates a Work Order immediately. It shows zero Trips because nothing is dispatched yet, and the recipients you configured in Stage 1 get the email. Everything the Client attached is already on the Work Order.
Step 3: Review and dispatch
Open the Work Order, confirm scope and pricing, add a Trip, and dispatch it to a Vendor. See "How To: Create and Dispatch a Work Order" rather than restating the steps here.
Step 4: Confirm the status flows back to the Client
As soon as you dispatch, the Client's list and map pin change to Scheduled without them refreshing or calling you. Walk the pilot Client through one full request so they see the status change happen live. Pin colors and status meanings match the Trip Status Reference Guide.
Good to know. Notes on a Work Order notify the designated dispatch or account management team even when the Client does not @mention anyone. Tell Clients to write the note and not worry about tagging the right person.
Stage 4: Route Proposals through the portal
Owner: Account manager | Where: Main Menu > Operations > Proposals
Work that needs Client sign-off should get approved in the portal, not in an email thread, so the approval is captured on the record.
Step 1: Forward the Proposal to the Client
Create the Client Proposal, or forward a Vendor Proposal with your markup applied. See "How To Forward A Vendor Proposal To Your Client With A Markup" in the knowledge base for the forwarding steps.
Step 2: Have the Client approve it in their portal
The Client goes to Operations, then Proposals, then the Received tab. They open the dropdown on the Proposal, select Accept, enter their reasoning, and click the blue Accept button. The Proposal status changes to "Accepted". Rejection follows the same path with a reason .
Step 3: Convert the accepted Proposal into work
Once accepted, convert the Proposal to a Work Order on your side so the approval, the scope, and the eventual Invoice stay linked.
Stage 5: Point the Client at Invoices
Owner: Finance | Where: Client Portal > Invoices
The portal shows the Client their Invoices with line items traced to verified visits: who was there, when, and what was done. Online payment is available .
Step 1: Show the Client their Invoice list
Walk the Client's accounts payable contact through the Invoices area of their portal and how each line item ties back to a completed Trip. The Accounts Receivable video walkthrough in Related articles covers this view.
Step 2: Agree on the payment path
Confirm with the Client whether they will pay through the portal or keep their existing payment process. Either way, the Invoice record in the portal is the shared reference when questions come up.
Stage 6: Roll it out and keep it clean
Owner: Operations lead | Where: No single screen; this stage is process
Do not announce the portal to every Client at once. Every Client on the portal is one fewer status call, but only while the portal shows the truth. A stale portal is worse than no portal, because a Client who catches the portal being wrong goes back to calling and does not return.
Step 1: Pick one pilot Client
Choose a Client with steady volume and an engaged admin contact. Run Stages 1 through 5 with them for two to three weeks before widening.
Step 2: Train the pilot Client live
Run one working session: submit a real request together, dispatch it, and let them watch the status change. Send the Client Portal overview document and the knowledge base links afterward. The in-portal help icon opens support chat and the knowledge base, so show them where it is.
Step 3: Announce to the rest of your Clients
Send the rollout announcement with the Client Portal overview document attached and offer each Client a short training call. Stagger invitations so your team can support each new Client's first requests.
Step 4: Name the portal data owner
Assign one named person, not a team, to own portal data quality: statuses current, ETAs real, stale Work Orders closed. If this owner is not named, nobody owns it and the portal decays. Put a weekly fifteen-minute review of open portal-visible Work Orders on their calendar.
Tip. Track status calls from pilot Clients before and after rollout. Falling call volume is the number that proves the portal is working.
Where this usually goes wrong
- The Client logs in and cannot find the Service Request button. The toggles from Stage 1 were never enabled for that Client. Enable them and have the Client refresh; no re-invite is needed.
- New Service Requests sit unseen for hours. No email recipients were configured, so nobody was notified. Set the Role-based recipients in Company Settings and leave "User Emails" blank so the whole role is covered when one person is out.
- The Client's Sites are lumped under one generic headquarters address, so requests come in against the wrong Site and users cannot be mapped to their locations. Split out real Sites and reassign contacts before rollout, using bulk upload for large lists.
- Proposal approvals keep happening over email, so the portal record shows Proposals stuck in Sent. Route approvers to the Received tab in their portal and stop accepting email approvals once the pilot ends.
- The portal goes stale after a strong start. Trips sit in Scheduled after the work is done, and the Client stops trusting the list. This is the data owner's job from Stage 6; if it keeps happening, the owner is not doing the weekly review or was never actually named.
What good looks like
The pilot Client submits requests through the portal without calling first. On your side, each request arrives as a Work Order with attachments already in place, gets dispatched the same day, and the Client watches the pin move from Scheduled to In Progress to Complete on their map without asking anyone. Proposals show Accepted with the approver's reasoning captured, Invoices trace to verified Trips, and the portal data owner's weekly review finds nothing stale. Status call volume from portal Clients is measurably down.
Questions? Contact your Customer Success team or email support@utilizecore.com.