
| Where this fits: Workflow Universe › Layer 3 · Setup & Network | For: Admin, Operations Lead | |
| Read first: Setting Up Your Company · Pricing Setup | Read next: Client Portal Rollout |
Applies to: Account managers, operations leads, administrators | Web
Download the printable guide (PDF)
The order. Client, then Sites, then rates, then the intake path, then one test Work Order. The Client is told the account is live when step ten passes, and not before.
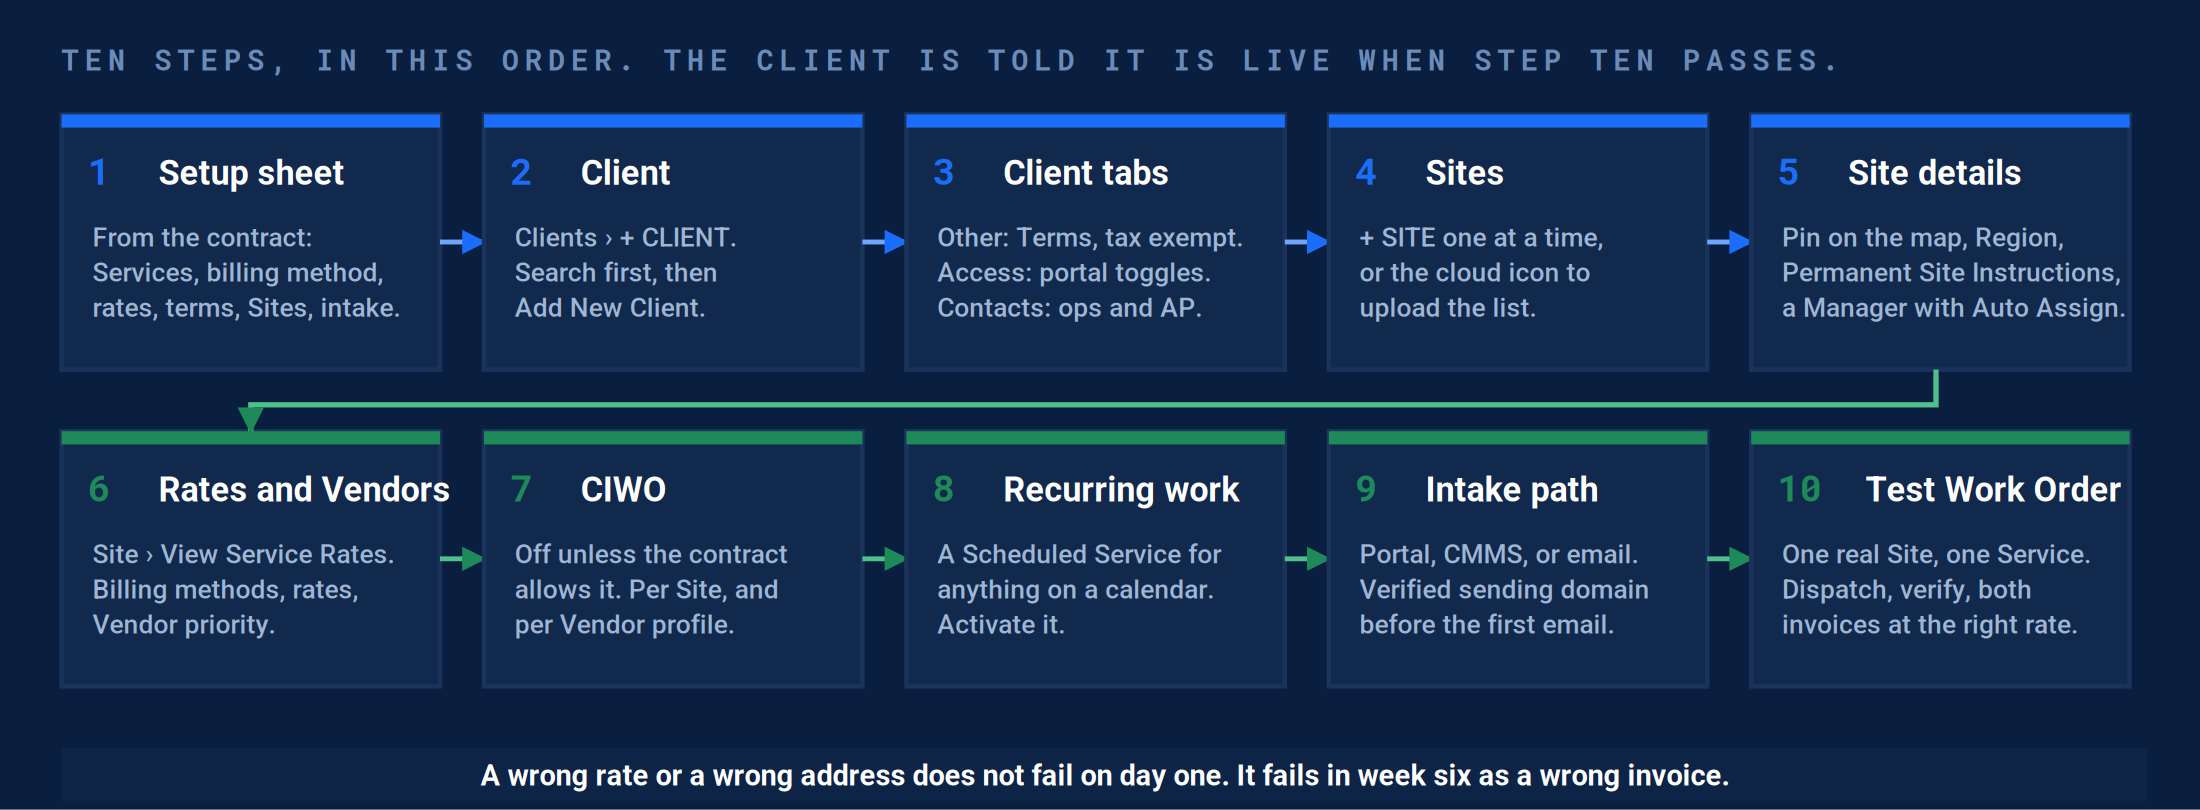
The checklist. Each box is a screen in the system tour below.
The checklist.
| # | Do this | Where | The clicks | Done when |
|---|---|---|---|---|
| 1 | Write the setup sheet | The contract | One row per Service: Trade and Service, billing method, Client rate, Vendor rate, invoice trigger. Plus terms, tax status, the Site list, and the intake path. | Every later step is checked against it. |
| 2 | Create the Client | Clients › + CLIENT | Type the name. Pick it if it is already on the platform; Add New Client if not. Legal Address, Tax exempt, Credit Hold, Permanent client instructions, then the contacts. | The Client is in the list, Active. |
| 3 | Finish the Client tabs | The Client › Profile | Other: Payment Terms and Tax exempt from the sheet. Access: Work order data and Service requests on if the Client will use the portal. Contacts: the operations contact and the accounts payable contact. | Terms match the contract. Two contacts. |
| 4 | Load the Sites | Sites › + SITE, or the cloud icon | One at a time: Client Owner, then search the address. A list: download the sample template, fill it, upload. Client Name in the file must match the Client exactly, including punctuation. | Filter Sites by the Client: every Site in the contract is there. |
| 5 | Finish each Site | The Site › Profile, Managers | The pin on the map in the right place. Region if you use them. Permanent Site Instructions with the dispatch toggle on. A Manager with Auto Assign, Trade blank. | A dispatch email for this Site would carry the instructions and land with a named person. |
| 6 | Load rates and Vendor priority | The Site › View Service Rates | Billing method at the Work Order and Trip level, both sides, from the sheet. Client and Vendor rates. Vendor priority 1. Load at the Client level where every Site is the same. See Pricing Setup. | No Service on the sheet is without a rate. |
| 7 | Decide CIWO | The Site’s View Service Rates, and the Vendor’s Settings tab | Off unless the contract allows unrequested work. A Vendor also needs Enable contractor initiated work orders (CIWO) on their own profile before they can open one. | Written on the sheet, either way. |
| 8 | Set up recurring work | Products and Services › Scheduled Services | Anything on a calendar is a Scheduled Service, with its own invoice schedule. See Running Recurring Work. | The Scheduled Service is Active. |
| 9 | Open the intake path | The Client’s Access tab; Company Settings; your UtilizeCore contact | Portal: the Access toggles, then invite the contacts. CMMS: see Managing an Integrated Client. Email: your sending domain verified in Company Settings before the first dispatch email goes out. | A test request arrives by the intended path. |
| 10 | Run one test Work Order | Work Orders | One real Site, one Service from the sheet. Dispatch to the priority Vendor, check in and out, verify, generate both invoices. Fix anything wrong in the step that owns it, then run it again. | Both invoices at the sheet’s rate, with no hand edits. |
Every screen on the checklist.
The system tour
Read the callouts; the numbers match the boxes on each capture.
Step 2. Create the Client.

- + CLIENT opens Add Client.
- The filter funnel.
- Client Name, the filter you will use most.
The Clients page. Filters across the top, + CLIENT on the right.
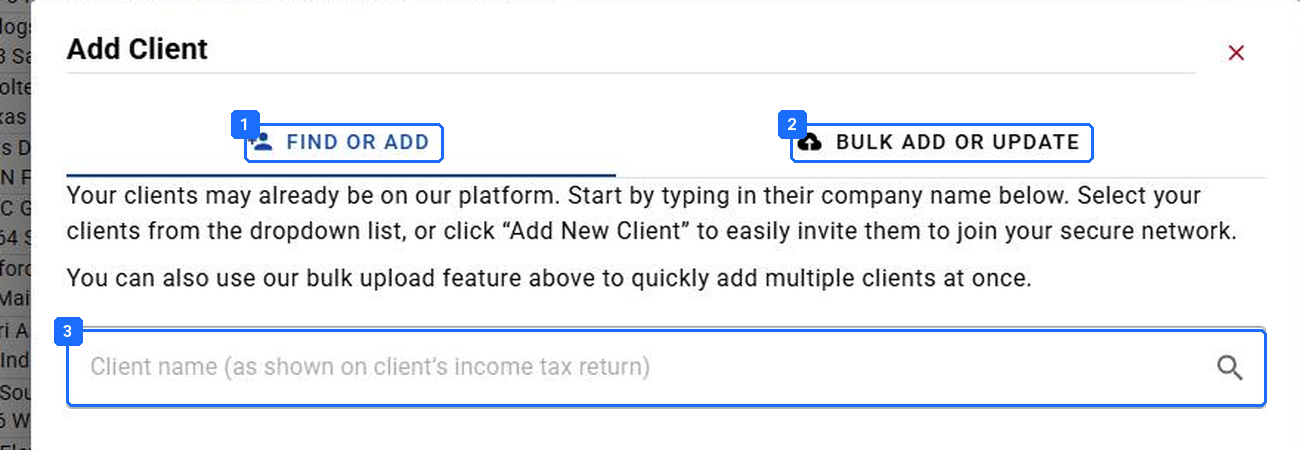
- FIND OR ADD for one Client.
- BULK ADD OR UPDATE for a list, from a template.
- The name as it appears on the Client’s tax return.
Add Client. Search first. The Client may already be on the platform.
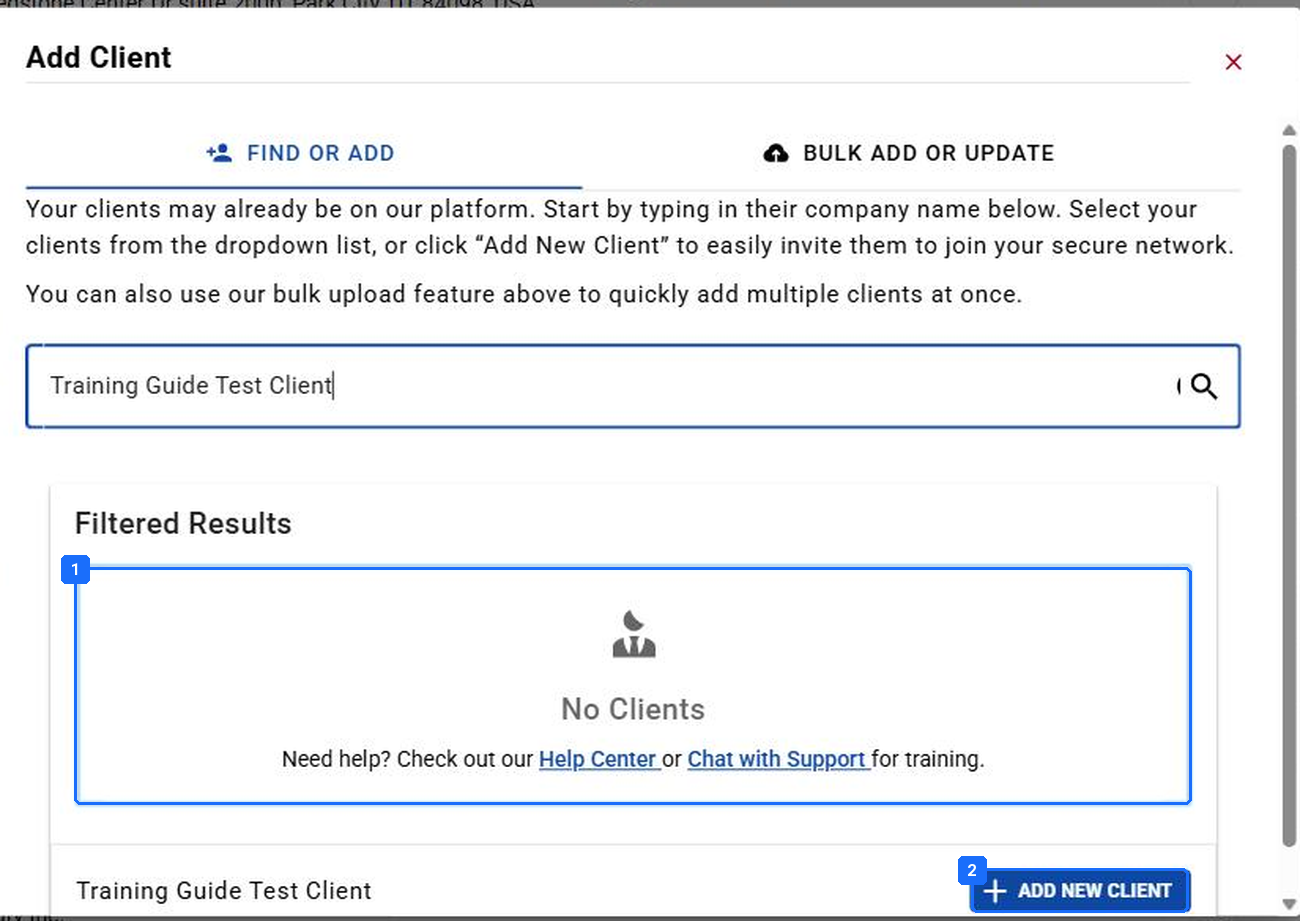
- No Clients found under that name.
- ADD NEW CLIENT.
No match. Then, and only then, Add New Client.
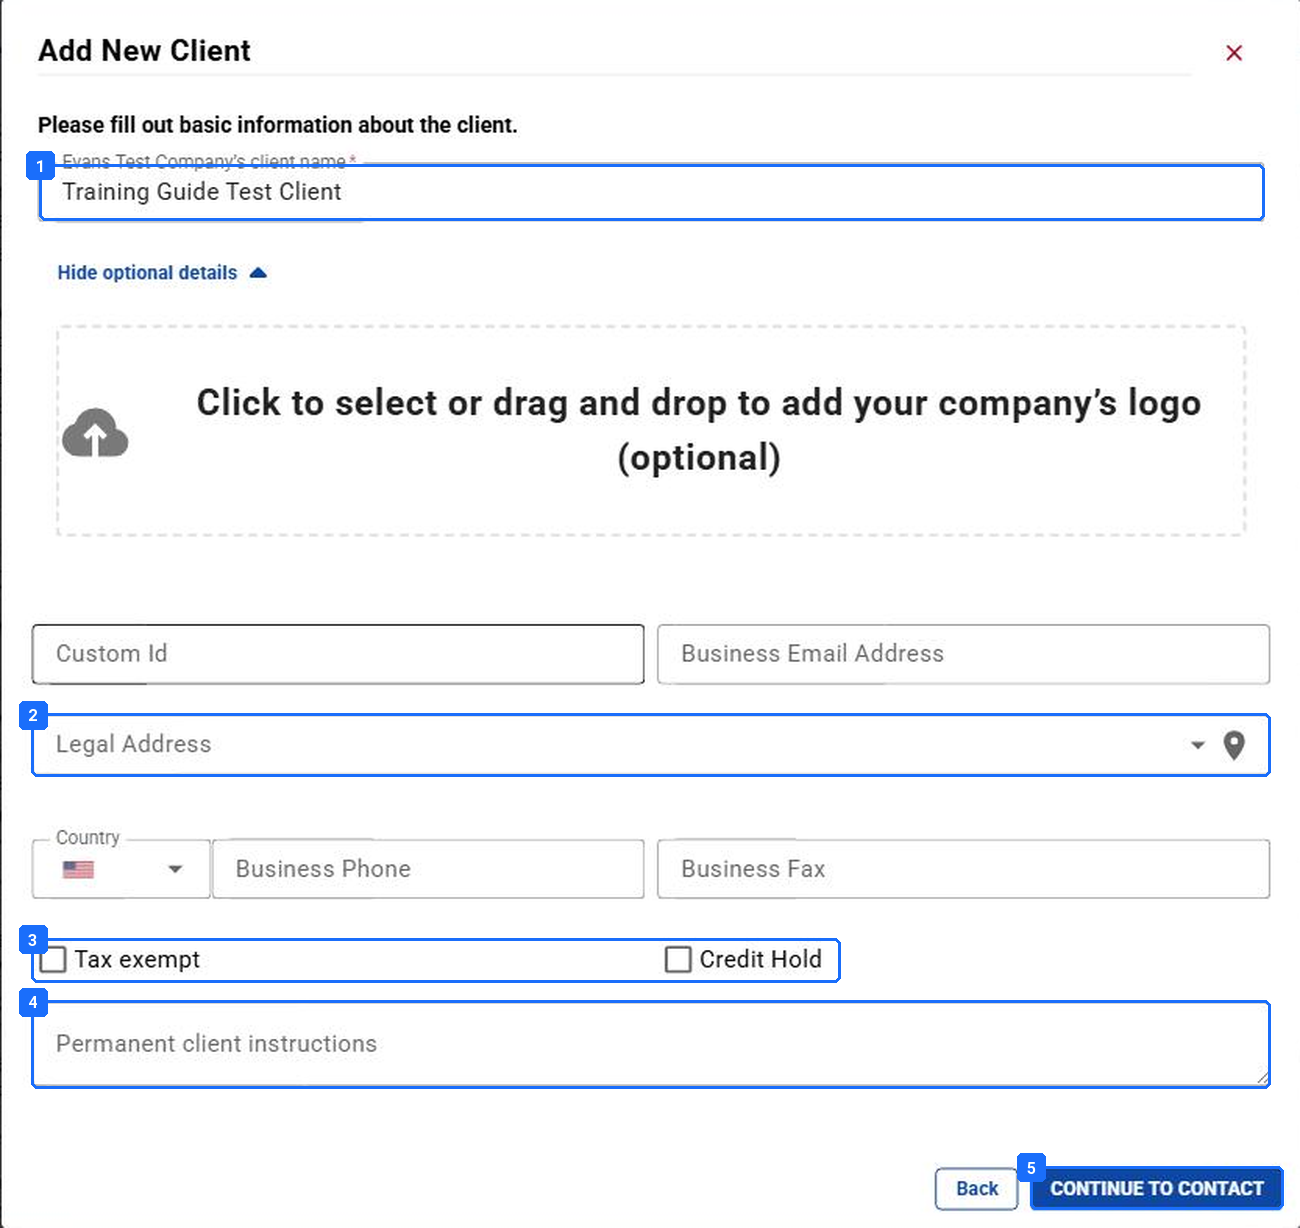
- The Client name. Copy it into every upload template later, punctuation included.
- Legal Address. Pick it from the lookup so city, state and zip fill themselves.
- Tax exempt and Credit Hold, from the sheet.
- Permanent client instructions. They can ride on every dispatch email.
- CONTINUE TO CONTACT.
Add New Client. Optional details are the ones that matter later.
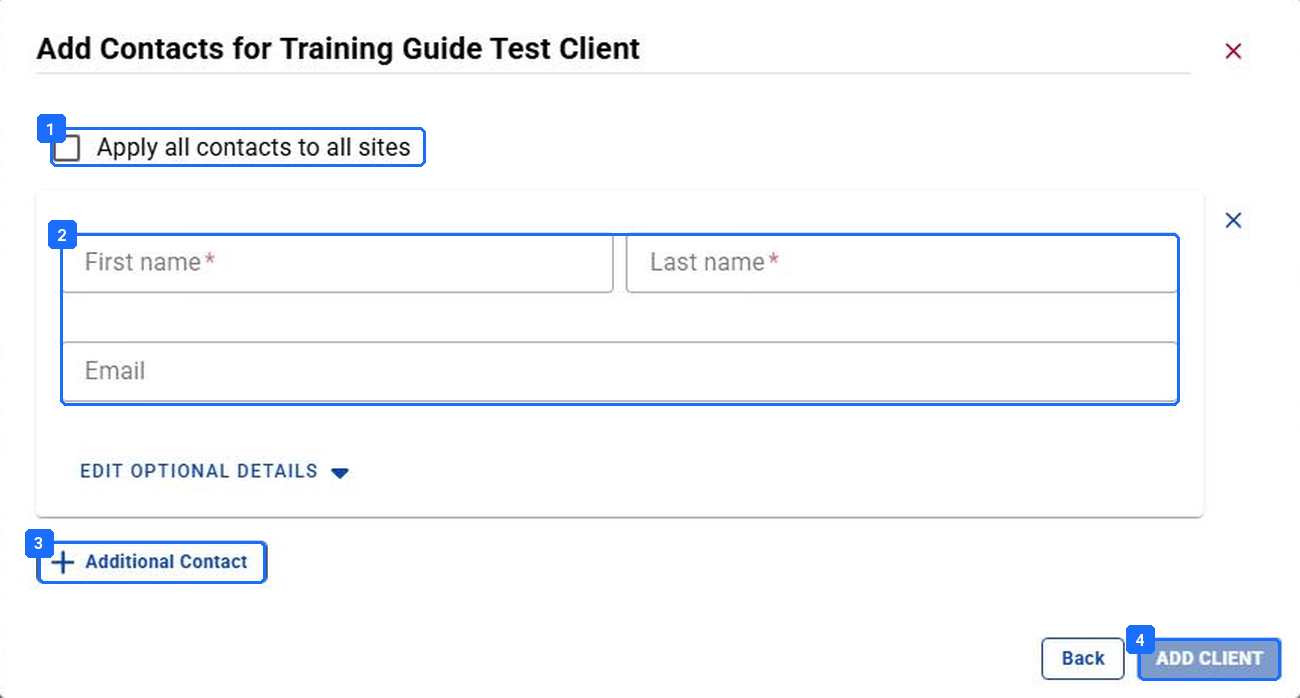
- Apply all contacts to all sites, when the same people cover every Site.
- Name and email. Email is where invoices and portal invites go.
- Additional Contact.
- ADD CLIENT saves the record.
Add Contacts. The operations contact and the accounts payable contact. Not the org chart.
Step 3. Finish the Client tabs.

- Profile, Contacts, Notes, Work Orders, Trips, Photos, Receivables.
- Addresses, Additional, IVR-Web, Access, Other. Other and Access are the two you finish now.
The Client record. Two rows of tabs. The top row is the Client’s history; the second row is its setup.
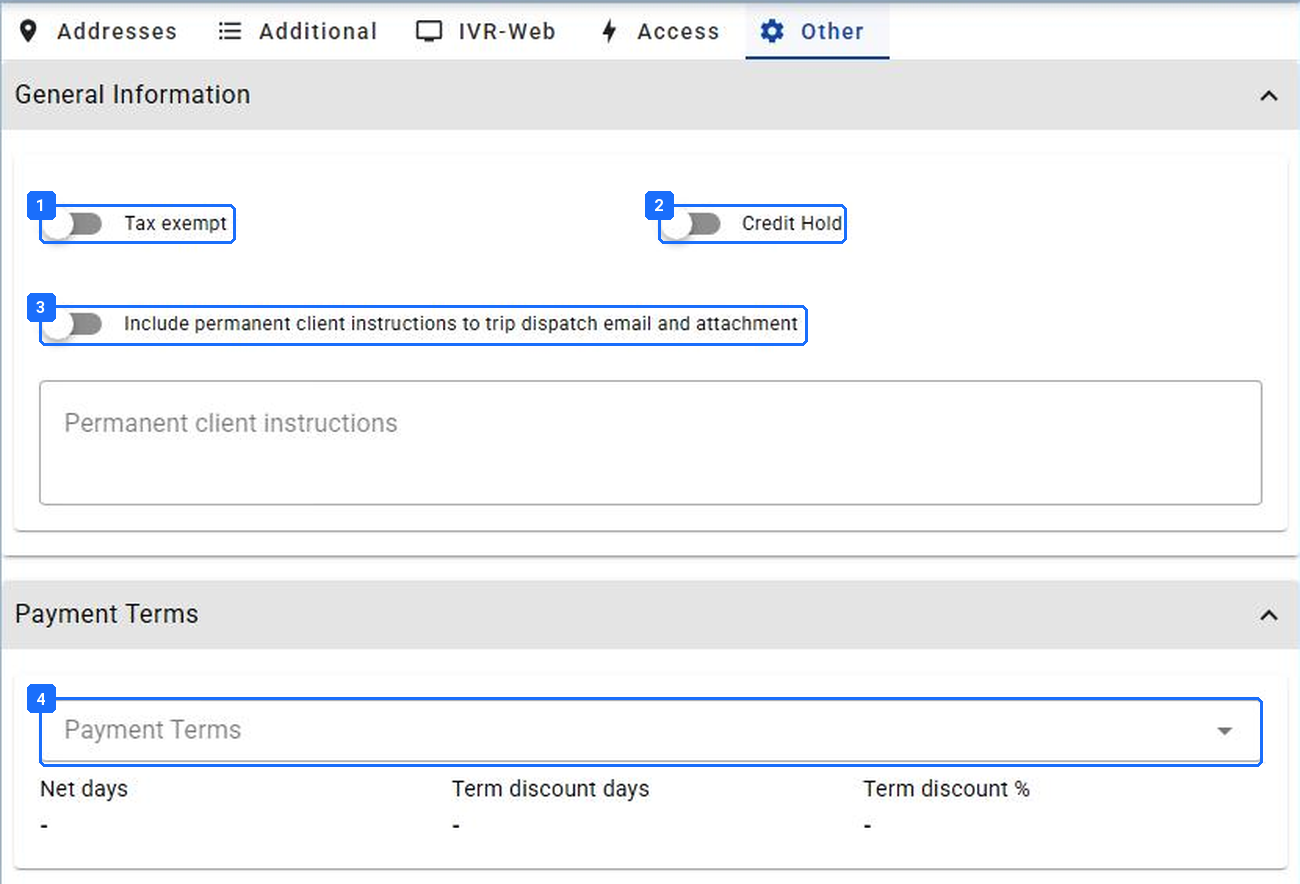
- Tax exempt.
- Credit Hold. Off for a new Client.
- Include permanent client instructions to trip dispatch email and attachment.
- Payment Terms. The Net days on every invoice come from here.
Other. Terms and tax status, from the sheet.
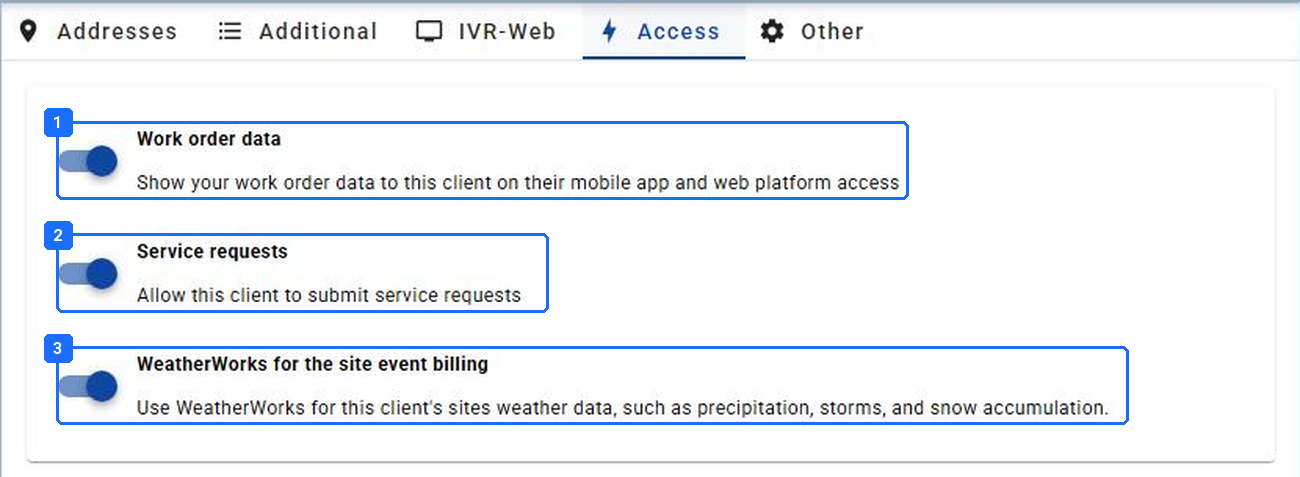
- Work order data. The Client can see their Work Orders in the portal and the app.
- Service requests. The Client can submit requests. Invite the contacts after this is on.
- WeatherWorks for the site event billing. Snow Clients only.
Access. This is how the Client Portal is turned on for one Client.
Portal Clients. Both toggles on, then invite the contacts. Undispatched Trips must also be on in Company Settings, or a new request is invisible to the Client who sent it.
Steps 4 and 5. Sites.

- + SITE.
- Upload. The Site Upload / Update dialog.
- The filter funnel. Filter by Client to check the load.
The Sites page. One at a time on the right, a list through the cloud icon.
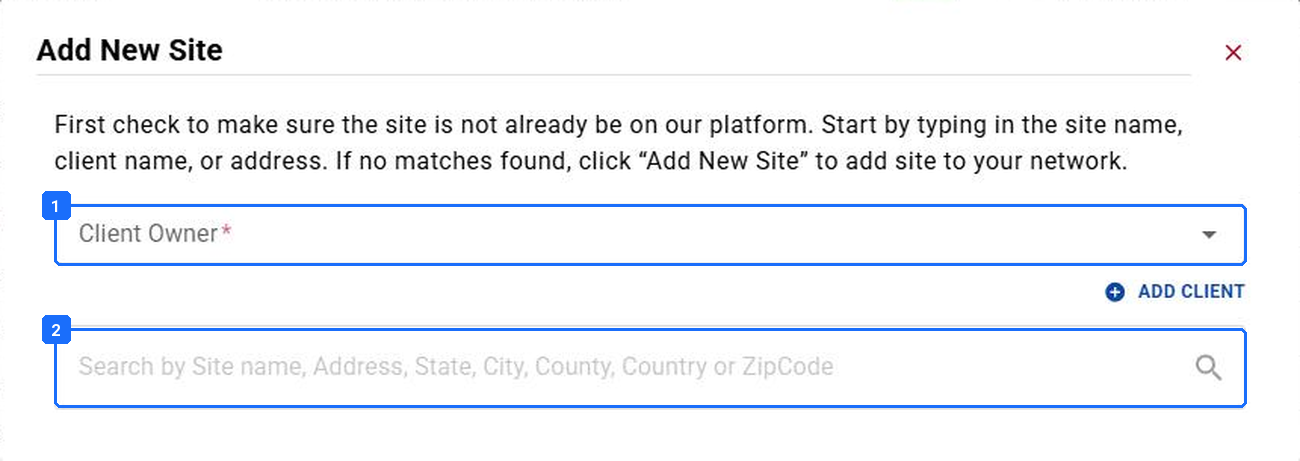
- Client Owner. The Client you created in step 2.
- Search by name or address. Pick the match so the pin lands where the building is.
Add New Site. Client Owner first, then the address lookup.
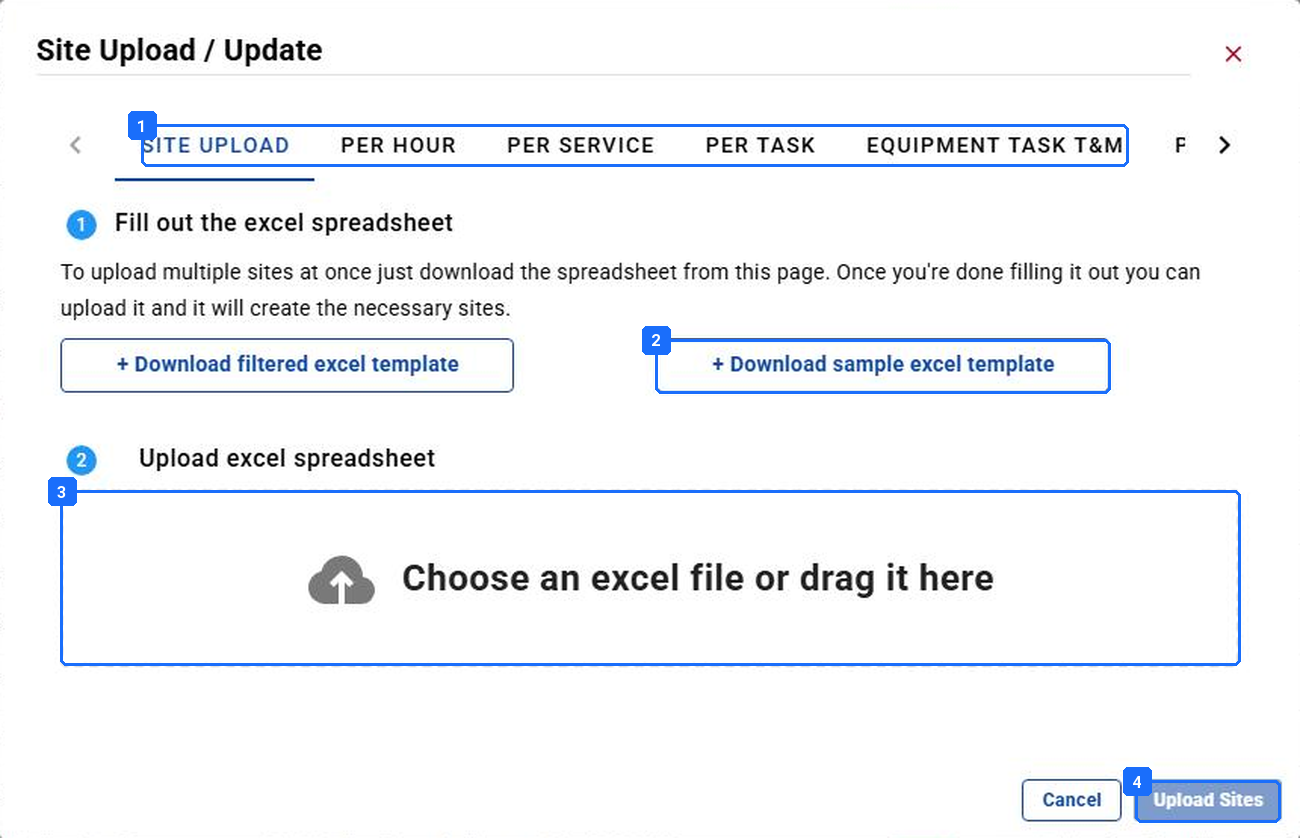
- SITE UPLOAD, and the rate tabs beside it for later.
- Download sample excel template. Client Name, Site Name, Address, City, State, Country, Zip are mandatory.
- Drop the file here.
- Upload Sites. Background Tasks shows the result and any error file.
Site Upload / Update. The template, then the file.
Another way in: Client Sites. A newly won Site may already be on the Client. Check Client Sites before you build it. Open Clients, then the Client. Client Sites lists locations linked to the Client and active, but not yet won. When the RFP comes through, click Associate on that row and it becomes one of the Client’s Sites. Then finish it with step 5.
| Client tab | What is in it | What you do |
|---|---|---|
| Sites | The Client’s active Sites, associated to the Client. Work Orders, rates and Vendors run here. | Steps 5 to 7 on each. |
| Client Sites | Sites linked and active for the Client that you have not won yet, ready to associate. | Associate when won, then steps 5 to 7. |
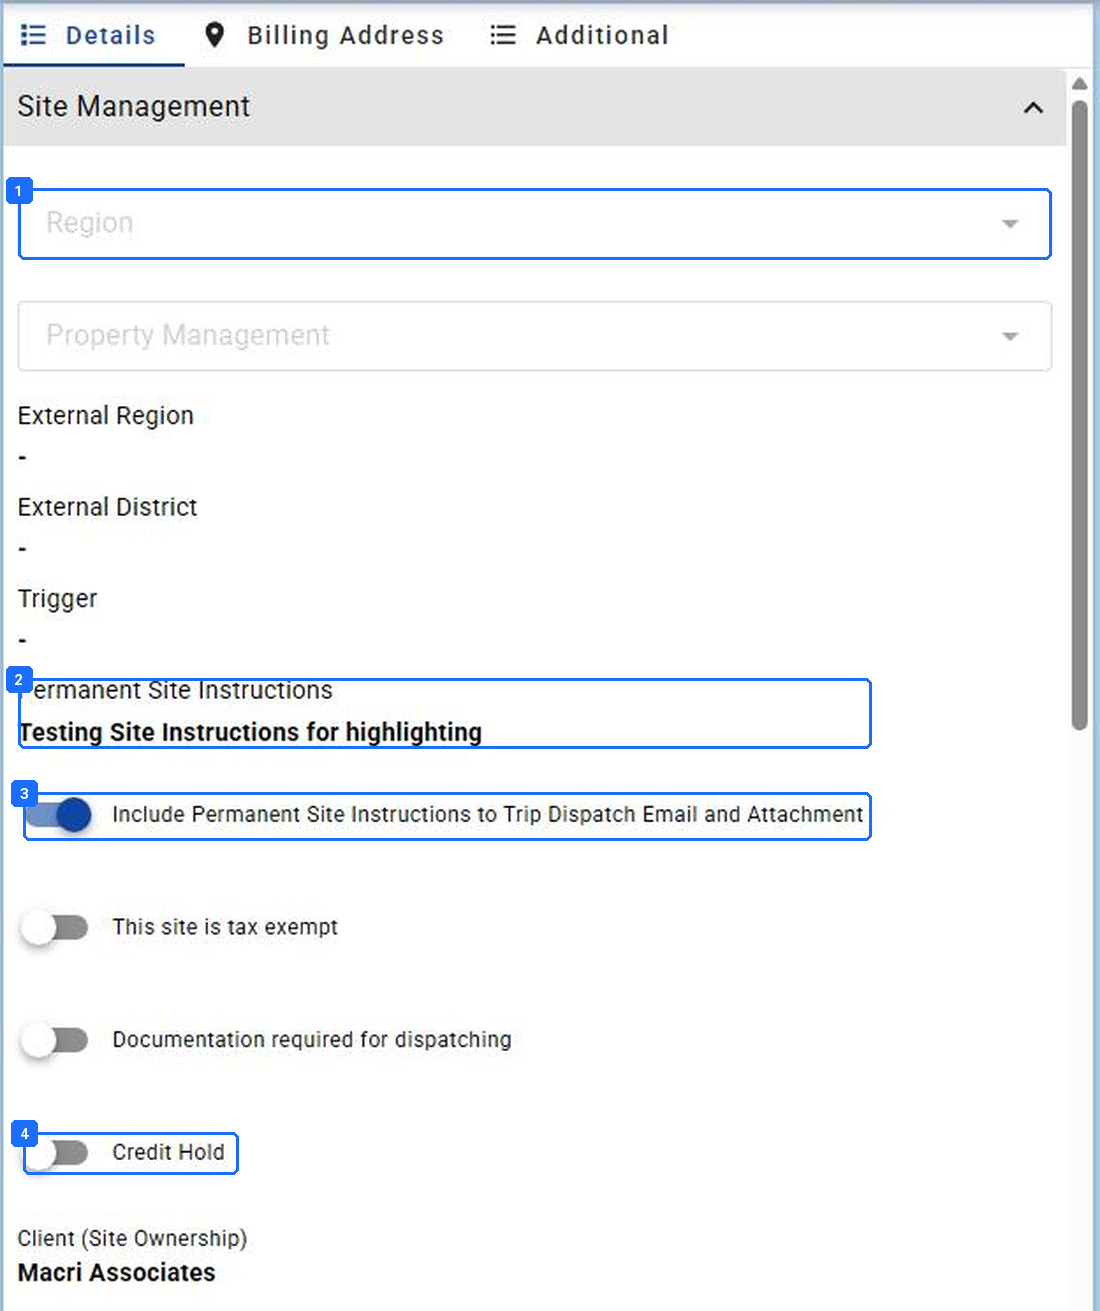
- Region, if you use Regions to restrict what Team Members see.
- Permanent Site Instructions. Gate codes, hours, parking, who to call.
- Include Permanent Site Instructions to Trip Dispatch Email and Attachment. On.
- Credit Hold. Off for a new Site.
The Site record, Site Management. What the dispatch email and the geofence read.

- The Managers tab on the Site.
- + MANAGERS.
- Auto Assign: Yes, with Trade blank, so every Work Order at the Site lands with this person.
Managers. The Team Member who owns this Site’s Work Orders.
Steps 6 and 7. Rates, Vendors, CIWO.
Rates. Rates are their own guide. Pricing Setup has the levels and the upload. From the Site: View Service Rates. Billing method both sides, Client rate, Vendor rate, Vendor priority 1.
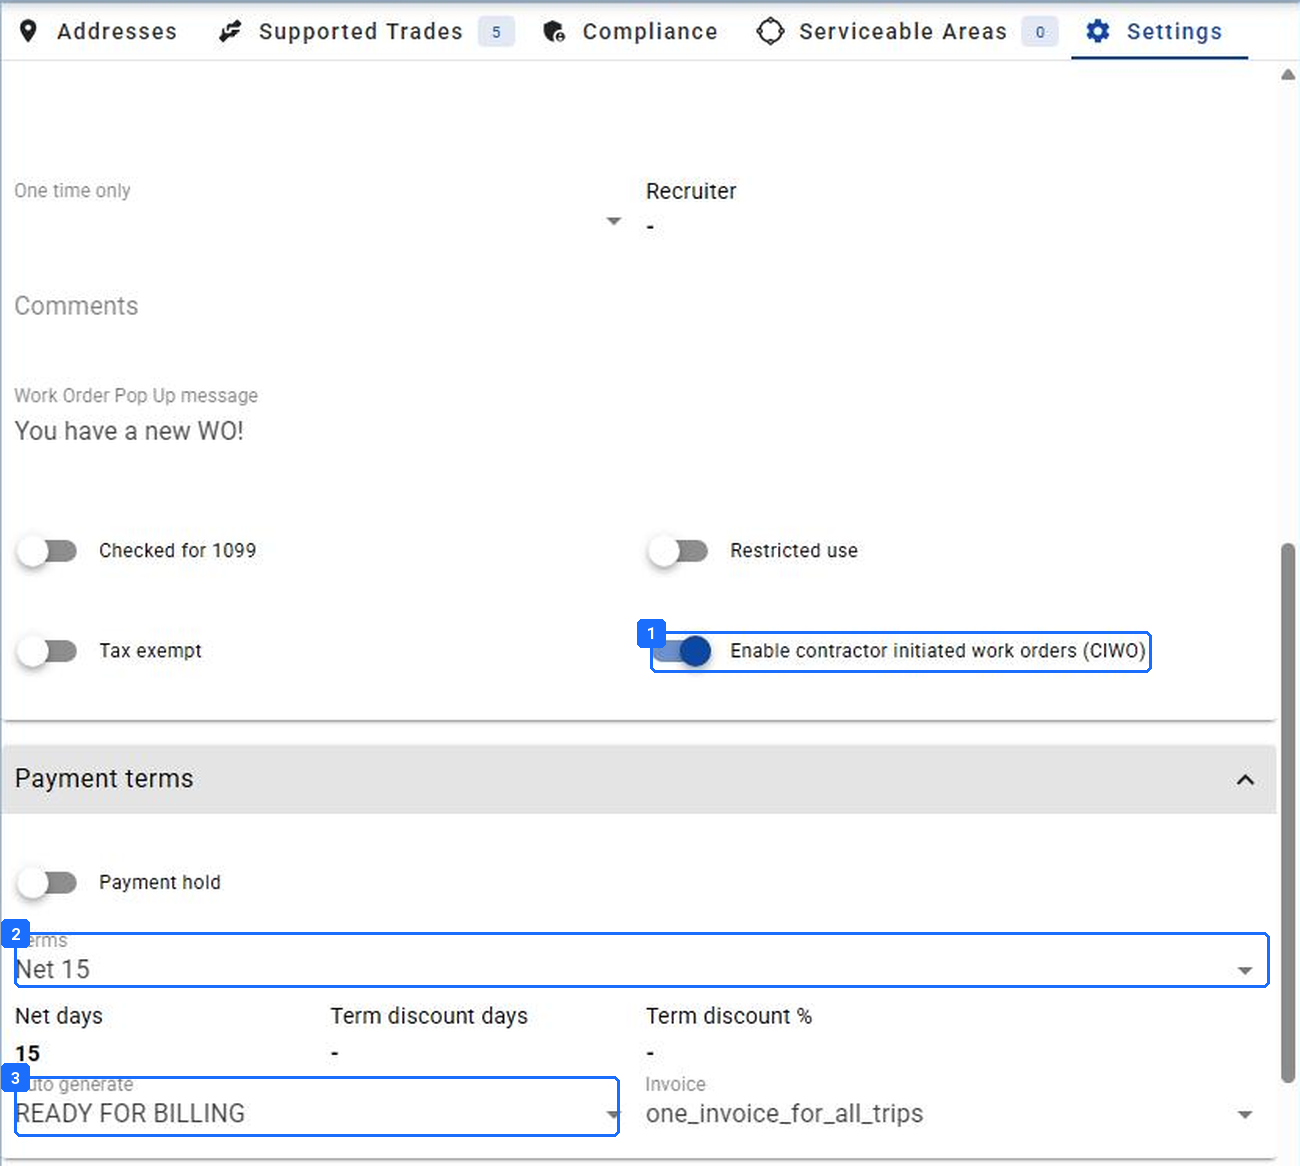
- Enable contractor initiated work orders (CIWO). Off unless the contract allows the Vendor to open work.
- Payment terms. The Vendor’s Net days.
- Auto generate: READY FOR BILLING. When the Vendor’s Payable is created for them.
The Vendor’s Settings tab. CIWO is enabled per Vendor here, and per Site in View Service Rates.
Steps 8 to 10. Recurring work, intake, the test.
| Step | Where | Pass when |
|---|---|---|
| 8. Recurring work | Products and Services › Scheduled Services. Running Recurring Work is the guide. | The Scheduled Service is Active and its first Work Orders are on the calendar. |
| 9. Intake path | Portal: step 3. CMMS: Managing an Integrated Client. Email: Company Settings › Emails, the domain verified. | A test request arrives by the intended path, and the reply comes from your domain. |
| 10. Test Work Order | Work Orders › + WORK ORDER on one of the Client’s Sites. How a Work Order Moves is the guide. | Dispatched to the priority Vendor, verified, and both invoices at the sheet’s rate with no hand edits. |
The test. Fix a wrong result in the step that owns it, never on the test invoice. A hand-corrected test invoice hides the defect until the first real one.
Where this goes wrong.
| # | What you hear | What happened | What to do |
|---|---|---|---|
| 1 | “The Site upload made a second Client.” | The Client Name column did not match the saved Client exactly. | Copy the name from the Client record into the template. Delete the duplicate before anything attaches to it. |
| 2 | “The first invoice is zero.” | No rate at the level the Trip resolves to, or the billing method on the Site does not match the rate type loaded. | Site › View Service Rates. Fix the method or the rate, void the draft, generate again. |
| 3 | “The Client submitted a request and sees nothing.” | The Access toggles are off for this Client, or Undispatched Trips is off in Company Settings. | Turn them on. No re-invite is needed. |
| 4 | “The dispatch email came from a no-reply address.” | The sending domain was never verified. | Company Settings › Emails. Verify the domain, then send again. |
| 5 | “The Vendor cannot check in.” | The pin is in the wrong place, so the geofence is too. | Open the Site, search the address again, save. |
| 6 | “Nobody can say who set this up.” | No setup sheet. | Write it now, from the record, and attach it to the Client. |
What good looks like.
| Open this | You see this |
|---|---|
| The Client record | Terms and tax status match the sheet. Two contacts. Access toggles on if it is a portal Client. |
| Sites, filtered by the Client | Every Site in the contract. Each with a pin in the right place, instructions, and a Manager with Auto Assign. |
| Any Site › View Service Rates | A billing method both sides, a Client rate, a Vendor rate, a priority 1 Vendor, for every Service on the sheet. |
| The test Work Order | Dispatched from your domain with the Site instructions, verified, both invoices at the sheet’s rate. |
| Thirty days later | Every request arrived by the intended path and no invoice needed a hand edit. Anything else goes back to its step. |
Questions? Contact your Customer Success team or email support@utilizecore.com.