
| Where this fits: Workflow Universe › Layer 4 · Snow & Ice | For: Dispatcher, Biller, Operations Lead | |
| Read first: Snow Season Setup · Invoicing: From Verified Trip to Paid | Read next: Back to The Workflow Universe: How the Guides Fit |
Applies to: Operations leads, dispatchers, finance | Web
Download the printable guide (PDF)
What is different about snow.
What changes in snow. A storm is still a Work Order with Trips. Three things change. You create and dispatch in bulk. You watch the Trips page filtered to one storm. Per Event Trips wait for the weather report before they can be priced.
| Word | What it means |
|---|---|
| Weather Event | The storm record for a Site: certified snow total, start and end, narrative. |
| Associate | Attach the Weather Event to a Trip so the total can price it. |
| Override | A total you type when there is no report, or the report is wrong. |
| Must Return | The check-out choice that closes this Trip and creates the next one. |
| Storm name | What you put in the Work Order name. Every filter in Part B keys on it. |
Season setup, in the order the platform needs it.
Part A · For the department head
Eight steps between August and mid-October. Two depend on an earlier one in a way the screen does not tell you. Each card: where, the exception it prevents, what proves it.
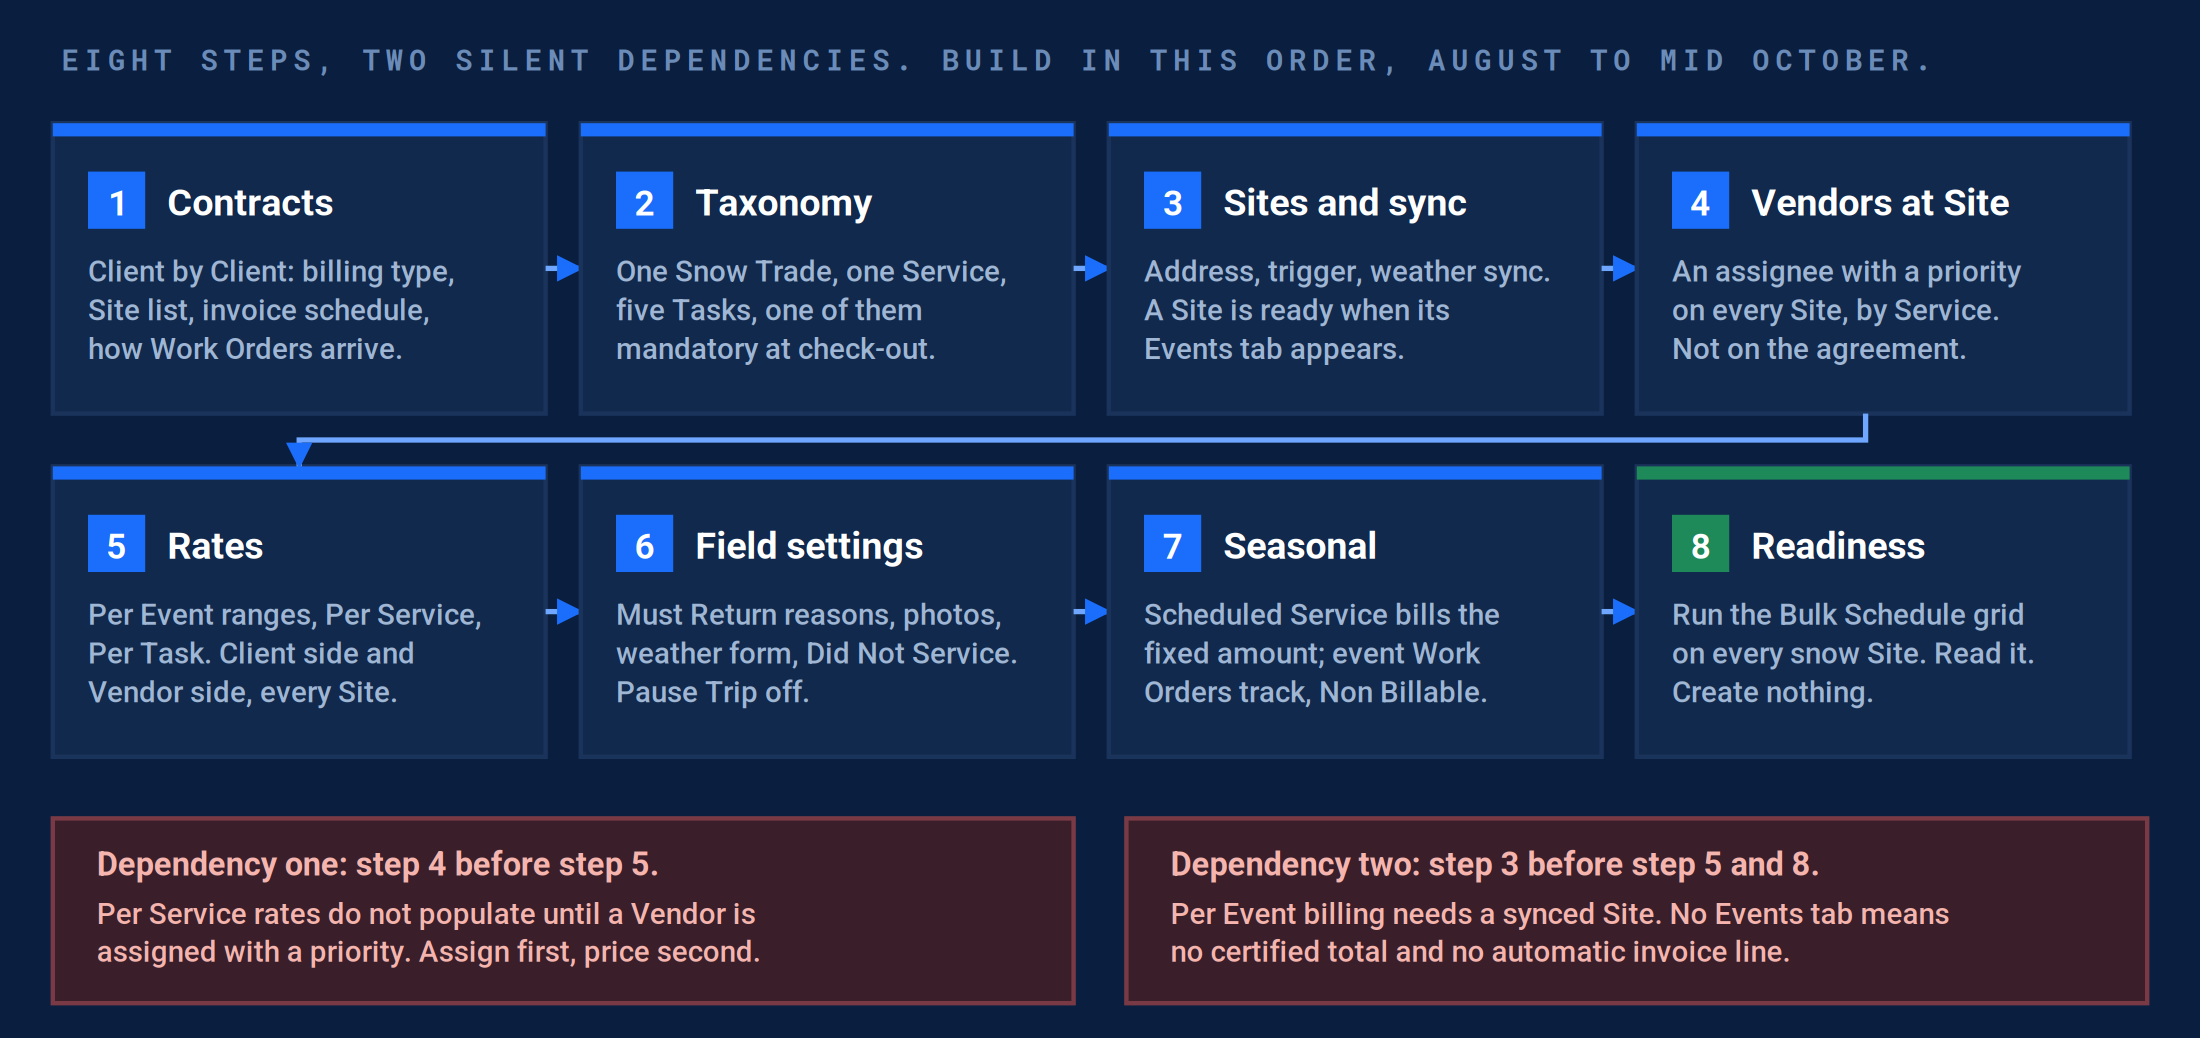
Build in this order. Steps 3 and 4 break silently: Per Service rates need a priority Vendor on the Site, and Per Event needs an Events tab.
Step 1. Read the contracts into a matrix.
One sheet first. The most expensive snow mistake is a contract word mapped to the wrong billing method. List every Client and Site with the billing words from the contract, then translate them with the table below before you touch a rate.
| Your contract says | UtilizeCore calls it | What that means for setup |
|---|---|---|
| “Per push”, “each time we plow” | Per Task | Each push is a Task ticked at check-out, at that Task’s rate. The most common snow line. |
| “Per visit”, one flat amount each time the truck comes, whatever it does | Per Service | One flat line for the Service per Trip. Not per push: a Trip with three pushes still bills once. |
| “Snow range dependent”: a price tiered by inches (2 to 4 in., 4 to 8 in.) | Per Event | Range pricing against the official snow total. The only method that reads the weather report. Task add-ons sit on top; see the next table. |
| A set price every time the service is done, however much falls | Per Service | Not Per Event. The price is set, not read from the official snow totals. Loading a set price as Per Event blocks invoicing. |
| “Per inch” | Per Event, with one-inch ranges | There is no per-inch method. Depth pricing lives inside Per Event. |
| “Plus a rate per inch over 12 in.” | Per Event, with an excess rate | Every N inches past the top band adds the excess price. Client and Vendor set their own. |
| “Snow range dependent, plus a set price per salt application” | Per Event, salt Task on Per Task Flat | Plowing prices from the range; each application adds its set price on the same Work Order and invoice. |
| “Per application”, “salt app”, “per lot”, “per sidewalk” | Per Task | Each Task carries its own price. Tasks the Service Provider does not tick do not bill. |
| “Seasonal”, “fixed monthly”, “flat rate November to March” | Scheduled Service agreement | Not a billing method. The agreement bills the fixed amount; the event Work Orders carry Non Billable. |
| “Time and materials”, “hourly plus salt” | Per Hour (T&M), with a Client NTE | Hours and materials against a ceiling. Rare in snow; common in cleanup. |
| “Seasonal, plus per push over N inches” | Scheduled Service, plus Per Event on the event Work Orders | A hybrid. The Per Event ranges below the threshold carry a zero rate so the visit is on record and bills nothing. |
Inside Per Event: how each Task prices.
The ranges price the snow removal against the official snow total. Each Task on the Service then takes one Task Rate Type, set in Task Rates on the same event rate, Client side and Vendor side.
| Task rate type | What it bills | Typical snow Task |
|---|---|---|
| Per Service Range | Nothing of its own. The Task is inside the range price: one amount for the Service, set by the official snow total. | Plowing, the Task the Service is sold on. |
| Per Task Flat | A set amount every time the Task is done, on top of the range price. | Ice melt at $200 per application. |
| Per Task Range | Its own ranges against the official snow total, on top of the range price. | Sidewalk shoveling priced by depth. |
| Non Billable | Nothing. The Task is on the record and does not bill. | Did Not Service. |
Past the top band, the excess rule adds a price for every N inches over it, for example every 1 in. past 12 in. Client and Vendor set their own excess.
When the main line goes missing. The Per Service Range Task must be the Site’s mandatory default Task. Without the flag, Per Event invoices drop the snow removal line while the add-on Tasks still bill. Check the flag after every bulk upload.
When the contract mixes two of these. Build the base method first and put the exception in writing to your Customer Success Manager before loading rates. A hybrid built wrong is rebuilt mid-season, and rebuilding rates in January is how a whole month goes unbilled.
1. One Snow Trade, one Service, five Tasks, one of them mandatory.
Where: Products and Services › Services & Rates › Services tab. Expand the Trade to see its Services and their Tasks.
Exception: A Service per pricing variation, or a Task per contract line, produced twenty thousand rate rows and blocked invoicing for a season.
Correction: The Snow Trade shows one Service with Tasks like plow, shovel, lot salt, sidewalk salt, and Did Not Service, and “Require at least one task before checking out” is on.
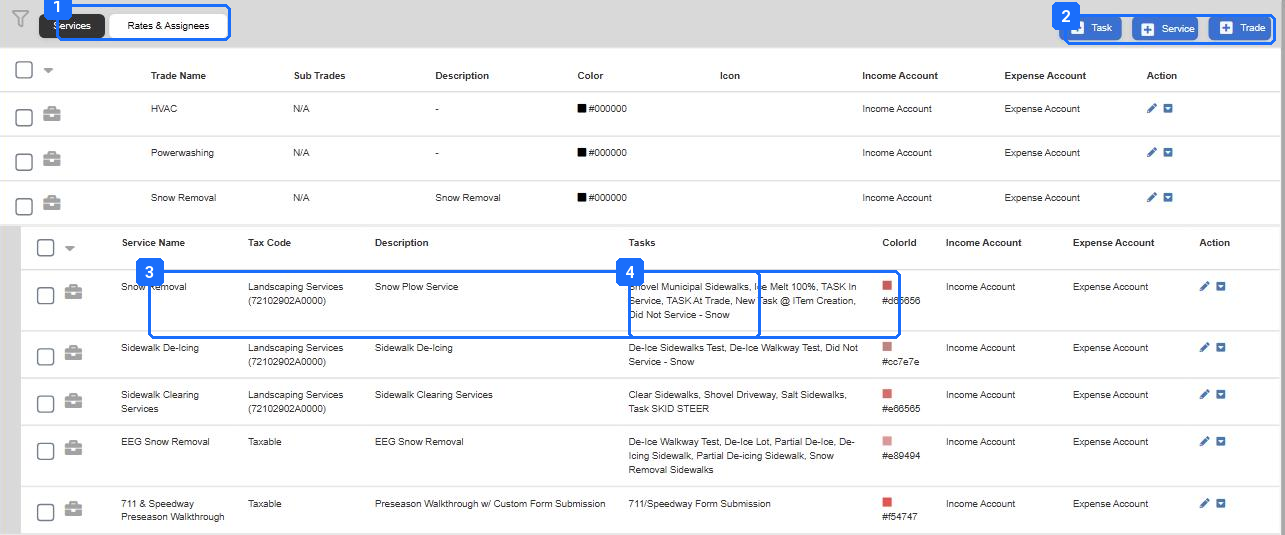
- Services and Rates & Assignees tabs. Setup happens on the left one; rates and priority Vendors on the right.
- + Task, + Service, + Trade. Build the Trade first, then the Service under it, then the Tasks.
- The Tasks on the Service. Did Not Service - Snow is on the list on purpose: it is the record you hand a claims adjuster.
- The pencil opens the Service, which is where every field-side rule in steps 6 and 7 lives.
Services & Rates, Snow Removal expanded. Tasks live on the Service, not on the Trade. Several test Services are visible here; a production account wants one.
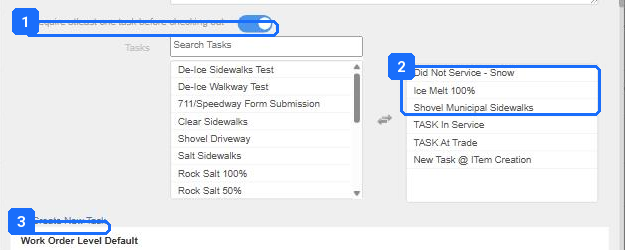
- “Require atleast one task before checking out”. On. The technician cannot check out without ticking something, so a Site that needed nothing still gets a Did Not Service record.
- The Tasks on this Service. Move the five in; leave the rest out. Every Task here is a Task the app will show the Service Provider during a storm.
- + Create New Task, for the one that is missing.
Edit Trade Service. The top of the Service dialog: taxonomy on the left, Tasks in the dual list.
2. The Service carries the billing defaults and the verification rule.
Where: The same Service dialog, scrolled to Work Order Level Default and Trip Level Default.
Exception: A Site set to Per Task on the Client side while the Vendor picked an accumulation range returned a $0 line. Both sides of every Site must agree with the contract matrix.
Correction: Default Client Billing Method and Default Vendor Billing Method match the matrix for this Service, and Verification Required is ticked on both sides.
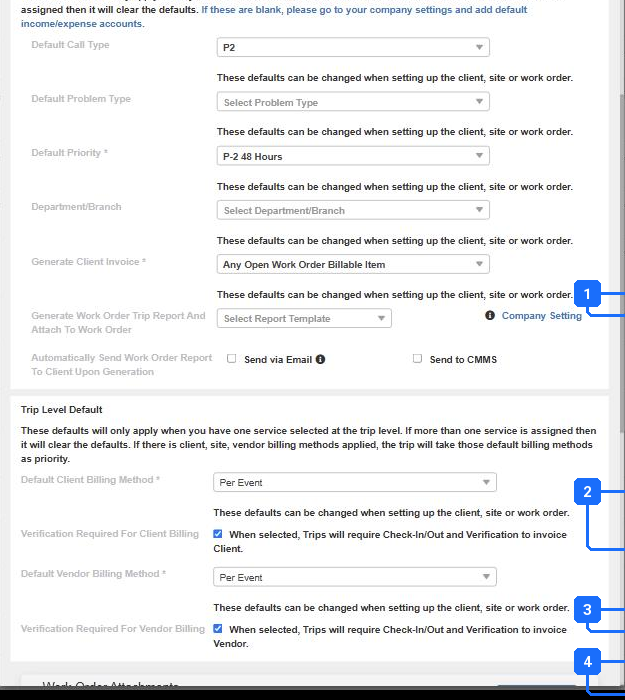
- Generate Client Invoice: “Any Open Work Order Billable Item”. Snow invoices per billable item, so one Work Order can carry several storms’ invoices.
- Automatically Send Work Order Report To Client Upon Generation: Send via Email, Send to CMMS. Leave off until the report template is set.
- Default Client Billing Method for Trips on this Service: Per Event here. This is where a seasonal contract’s event Service gets Non Billable (step 7).
- Verification Required For Client Billing and For Vendor Billing. Both on: no check-in and verification, no invoice.
Service defaults. These populate every Work Order and Trip on this Service unless the Site or the Work Order overrides them.
3. Every snow Site is synced to the weather service and carries a trigger.
Where: Network › Sites › the Site › Details › Site Management. Company Settings › Sites › Site Weather Integrations to sync.
Exception: A Site with no weather id gets no report, so a Per Event Trip on it can never price itself. It is found at invoicing, in January, one Site at a time.
Correction: Every snow Site shows a Weather Works id under Site Management and an Events tab in its tab strip. Do this in September; the sync can take half an hour to show.
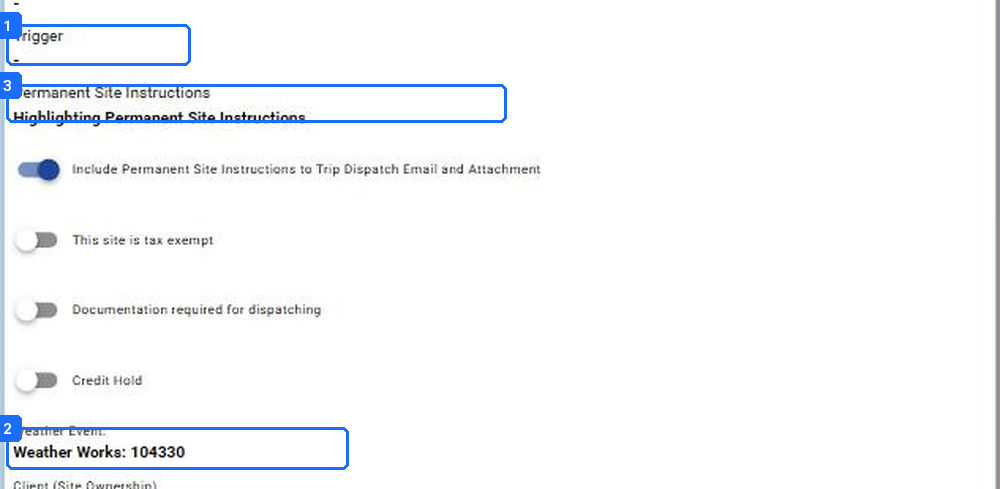
- Trigger. The accumulation depth that activates service at this Site. Blank means the Site services on every event.
- “Weather Event: Weather Works: 104330”. The weather service’s id for this Site. No id, no reports.
- Permanent Site Instructions. Gate codes, stacking rules, where not to pile snow. They ride on every dispatch email.
Site › Details › Site Management on a synced Site. The weather id and the trigger are both here.
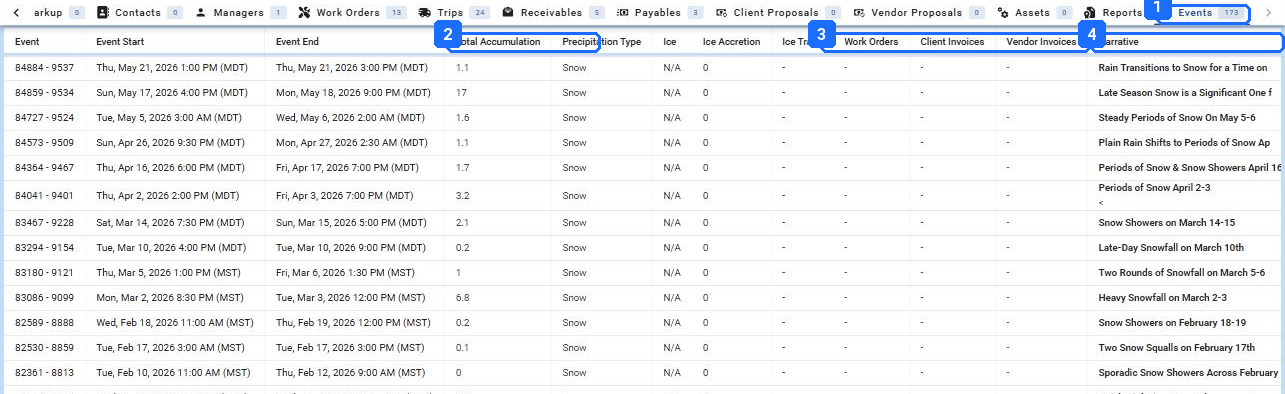
- Events, with the count. The tab only exists on a synced Site, which makes it the fastest readiness check on the platform.
- Total Accumulation. The certified total for that event at this Site. This is the number Per Event prices against.
- Work Orders, Client Invoices, Vendor Invoices. Which records used this event.
- Narrative. The weather service’s description of the event. It attaches to the Per Event invoice.
The Events tab on a synced Site. One row per weather event with the certified total, the type, and the narrative. The Work Orders and invoice columns fill in as Trips are associated and billed.
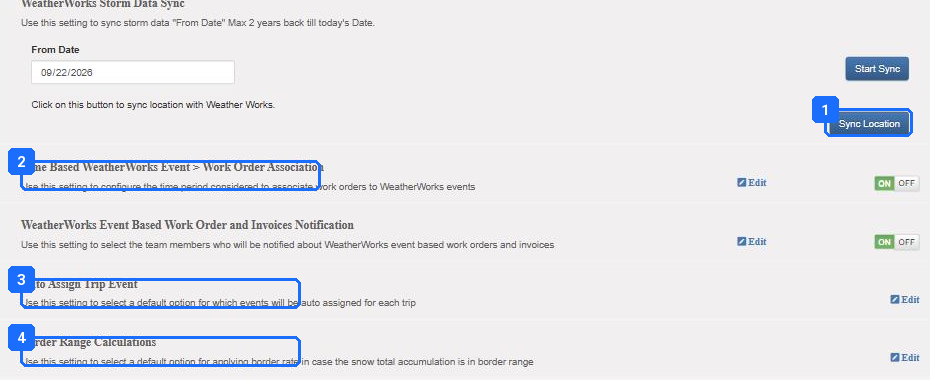
- Sync Location. Run it after adding Sites. Start Sync pulls storm data from a date, up to two years back.
- Time Based WeatherWorks Event > Work Order Association. On, with the window in step 8.
- Auto Assign Trip Event. Which event wins when two qualify: the larger snow total, or the one whose start is closest.
- Border Range Calculations. Client High, Vendor Low: a total landing on a range boundary rounds up for the Client and down for the Vendor.
Company Settings › Sites › Site Weather Integrations › WeatherWorks Certified Snow Totals. The sync and the four rules that decide how events attach to Trips. This is a legacy settings frame: scroll with the scrollbar.
4. Every awarded Site has a Vendor assigned with a priority, by Service.
Where: Network › Sites › the Site › View Service Rates › the Service’s billing row › + Assignee Rates.
Exception: Vendors assigned on the agreement only. Bulk creation reads Site and Task assignments, not agreement assignments, so every storm Work Order came out with no Vendor. Vendor pins were invisible on the map for the same reason.
Correction: The Bulk Schedule grid (step 8) shows a Vendor name on every row. At dispatch, the priority Vendor appears first with its number on the avatar.
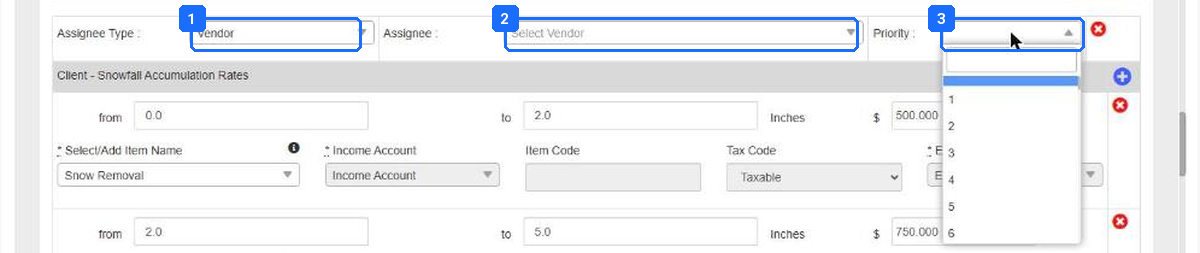
- Assignee Type: Vendor, or a team member for self-performed Sites.
- Assignee. Search the Vendor. The Vendor must already be active and compliant.
- Priority. 1 is first. Ten slots. At dispatch and in bulk creation the priority 1 Vendor is pulled without anyone searching.
+ Assignee Rates on a Site’s Per Event row. The assignee row that makes a Vendor the Site’s Vendor for this Service.
5. Rates are loaded on both sides for every Site, in the method the matrix says.
Where: Site › View Service Rates › Per Event, Per Service, or Per Task row › Client rates and Vendor rates. Bulk upload from Services & Rates › Rates & Assignees.
Exception: Accumulation bands with a gap, or short of the storm total. And Per Service rows that never took because step 4 was skipped.
Correction: A test Work Order on each Site type shows both billing methods populated without editing, and a test Payable has no $0 line.
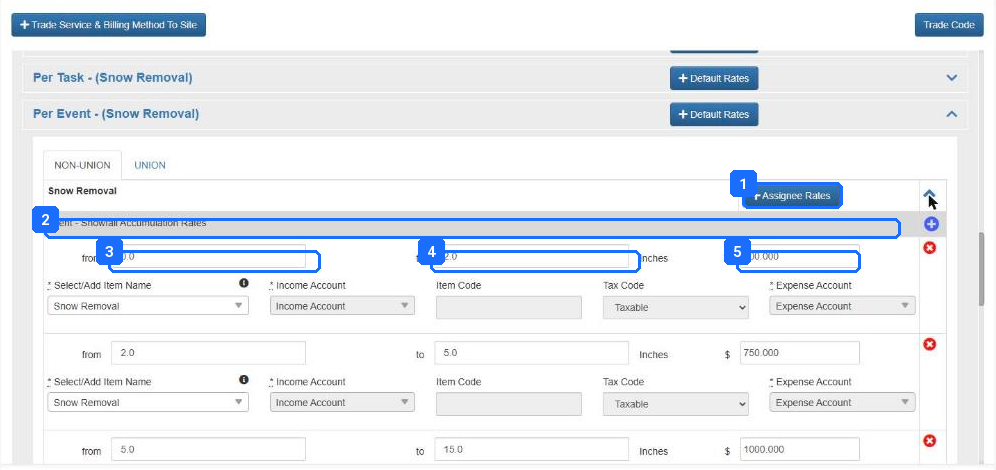
- + Assignee Rates adds the priority Vendor (step 4). NON-UNION and UNION tabs carry separate rate sets.
- Client - Snowfall Accumulation Rates. One row per range.
- from / to, in inches. Leave no gaps between bands. A boundary or gap total takes the higher band unless the border range setting says otherwise.
- Item Name, Income Account, Tax Code, Expense Account. Snow taxability varies by state and by material; check the code.
- The price for that range. The Vendor table below it is the cost.
Per Event on the Site, Client side. Accumulation ranges in inches and a price per range. The Vendor side is the same table further down.
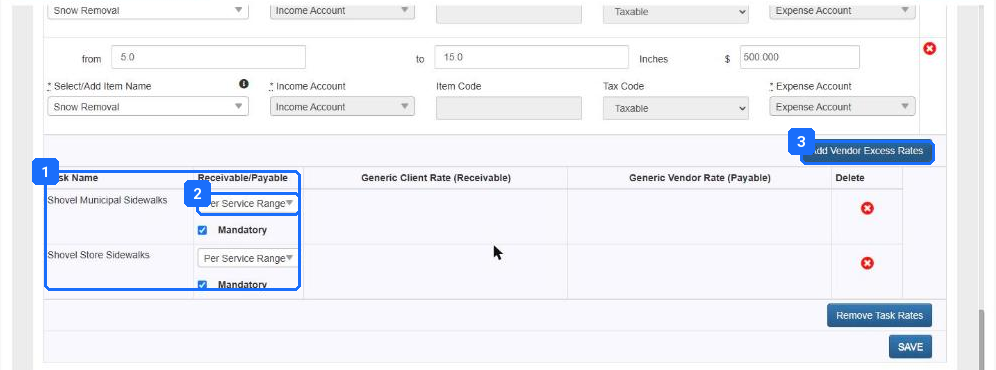
- The Task table. Each Task the Service Provider can tick, with its Receivable/Payable rule and whether it is mandatory.
- Per Service Range means the Task is inside the Per Event price. A Task billed on its own would carry a Generic Client Rate here.
- Add Vendor Excess Rates. The over-the-top range for a storm beyond your last band.
Task rates on the same Site. Below the ranges, each Task on the Service and how it prices.
6. The field rules are on the Service: Must Return, photos, weather, Pause Trip off.
Where: Services & Rates › the Service › Service Actions › Advanced Settings, Photos, Weather Conditions.
Exception: A Service Provider used Pause Trip instead of Must Return and the Work Order looked stalled for days. A 24-hour Must Return window expired before the return push and the Trips fell off phones.
Correction: At check-out the app offers Complete, Must Return with your reasons, or Unable to Service, and nothing else. Before and after photos are mandatory. The weather form asks for snowfall.
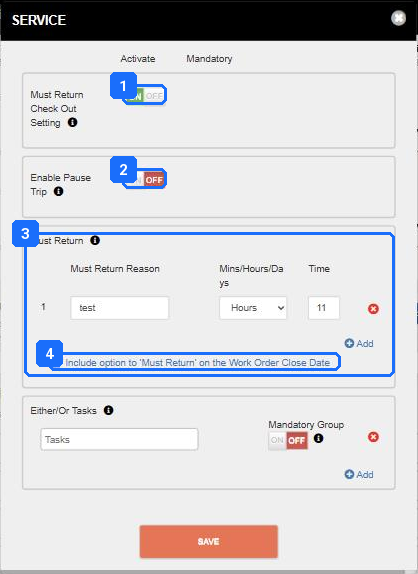
- Must Return Check Out Setting: ON. The Service Provider can leave with work remaining and the platform creates the return Trip.
- Enable Pause Trip: OFF. Pause leaves the Trip checked in with nobody on site. Must Return is the right tool.
- The Must Return reasons, each with a window in minutes, hours, or days. The reason the Service Provider picks decides when the return Trip expires.
- “Include option to Must Return on the Work Order Close Date”. On. The return Trip then lives as long as the Work Order, which is what keeps a three-day storm on one Work Order.
Advanced Settings on the snow Service. Where Must Return and Pause Trip live.
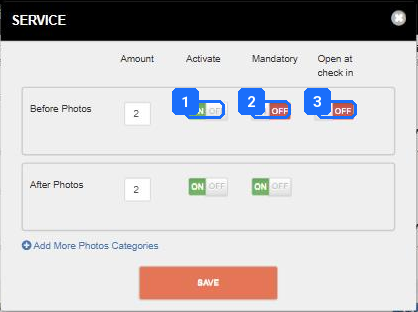
- Activate: ON for both. Off means the app never asks.
- Mandatory: ON for After at least. This is the evidence on the invoice and in a slip-and-fall claim.
- Open at check in: ON for Before, so the lot is photographed before the plow touches it.
Photos on the snow Service. Two before, two after.
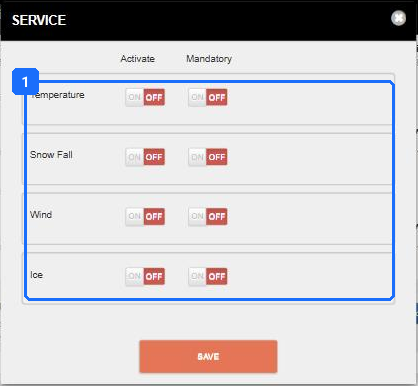
- Activate and Mandatory per field. Snow Fall mandatory gives you the Service Provider’s own reading beside the certified total; the two together settle most disputes.
Weather Conditions on the snow Service. Temperature, Snow Fall, Wind, Ice.
7. Seasonal contracts are two objects: the agreement bills, the event Work Orders track.
Where: Products and Services › Scheduled Services for the agreement. The snow Service’s Trip Level Default for the event side.
Exception: The seasonal invoice and the event Work Orders both reached accounting, and the Client was billed twice. Elsewhere a Vendor change on the Site never reached the agreement.
Correction: The agreement is Current with its Site list matching the contract. The event Service’s Default Client Billing Method reads Non Billable. A Vendor change is made in two places: the Site, then the agreement.
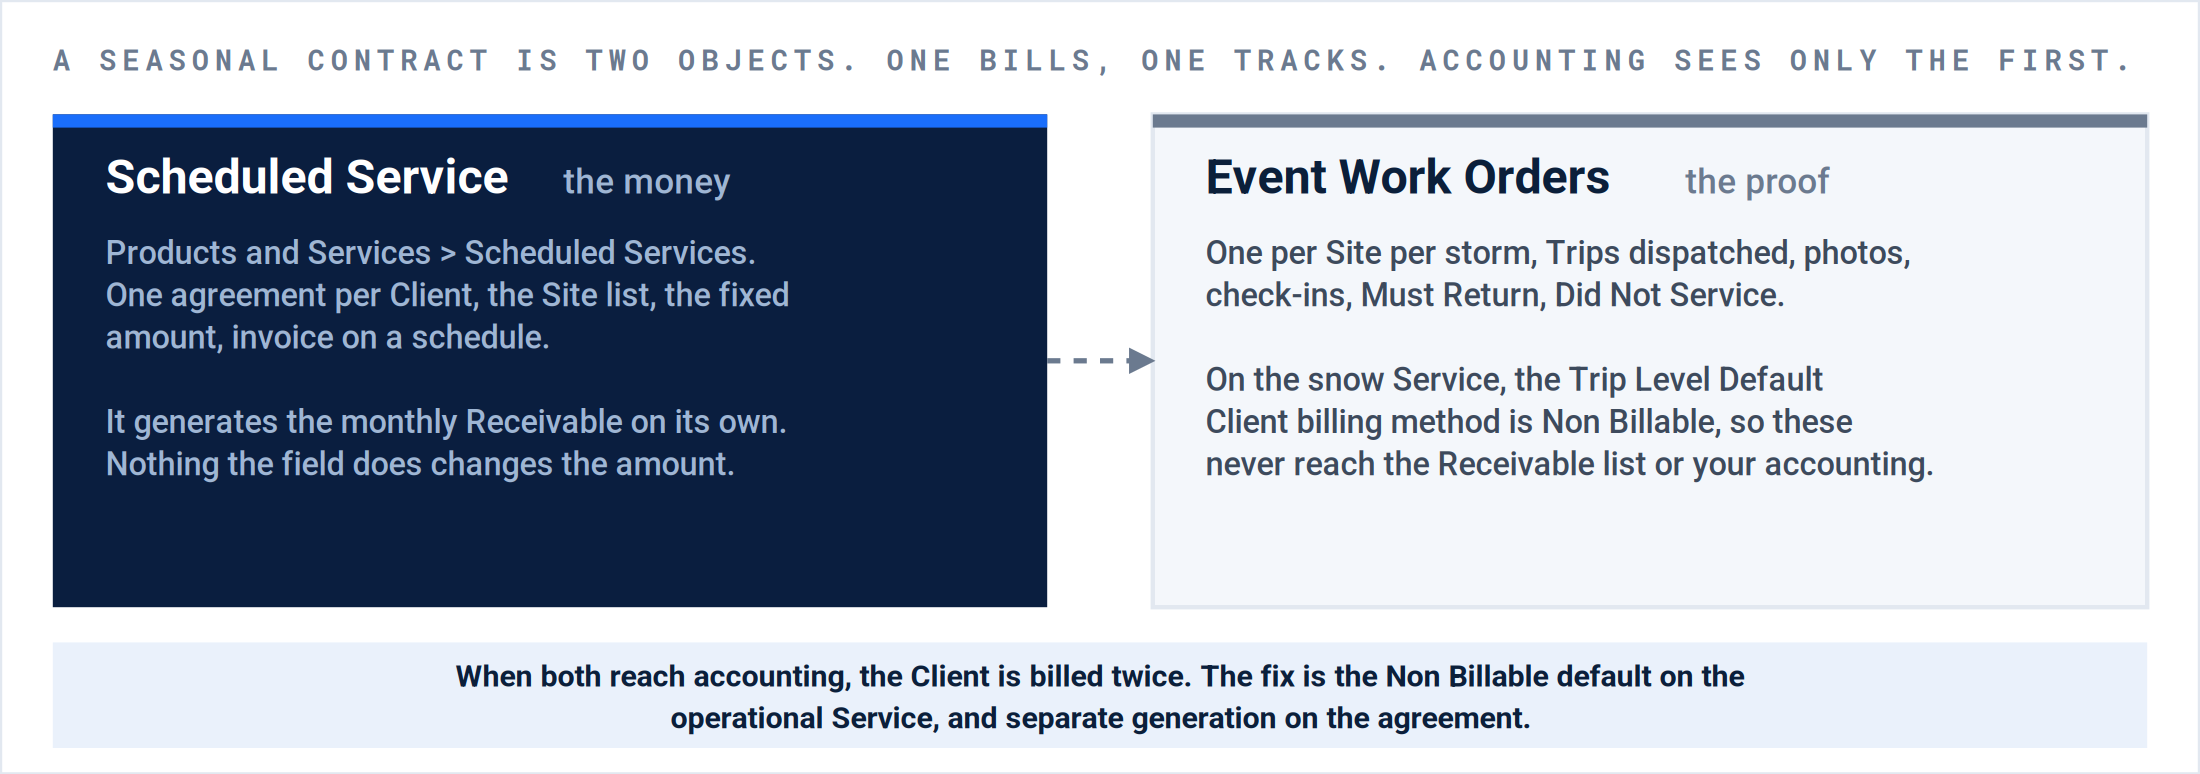
The seasonal dual setup. The agreement carries the money. The Work Orders carry the proof. Nothing on the right reaches an invoice.
8. Run the readiness test: the Bulk Schedule grid across every snow Site, creating nothing.
Where: Network › Sites › select all snow Sites › the Bulk Schedule icon beside the count › fill the header › Apply › read the grid › close without scheduling.
Exception: Every setup gap from steps 1 to 7 shows up here as a blank Vendor, a wrong billing method or a missing Task. Found in October it is an afternoon; found in the first storm it is a lost invoice cycle.
Correction: Every row shows a Vendor, the matrix billing method on both sides, and the five Tasks. Then one storm Work Order on your test Site runs end to end and both invoices show real lines.
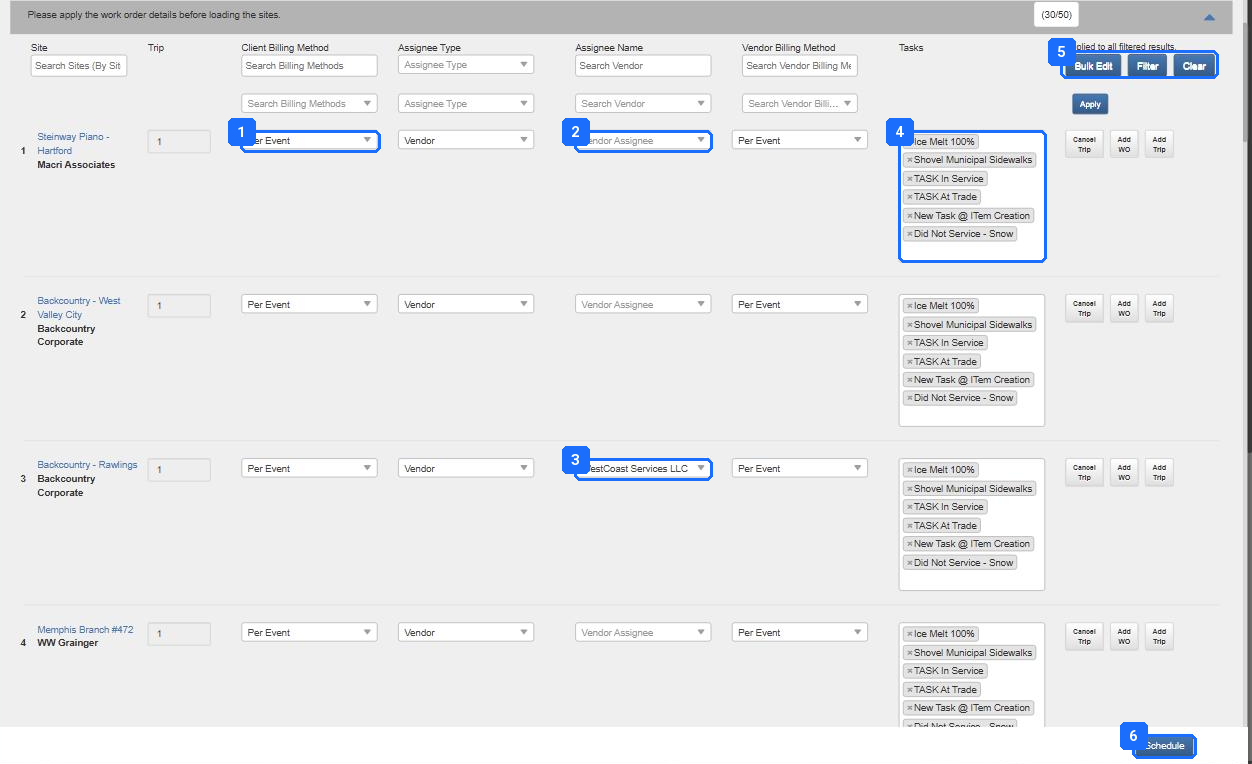
- Client Billing Method per Site, from the Site’s Service defaults. Every row should read what the contract matrix says.
- Assignee Name pulled from the Site’s priority Vendor. A blank here is step 4 undone for that Site.
- A row that is right: the priority Vendor came through on its own.
- The Tasks that will be on every Trip. A missing Task here is a Task the Service Provider can never tick and you can never bill.
- Bulk Edit, Filter, Clear, and Apply act on every filtered row at once; use them to fix a whole Client in one pass.
- Schedule creates everything. For the readiness test, close the dialog instead.
The review grid as a readiness test. Rows 1, 2 and 4 have no Vendor. Three of these four Sites would have gone out unassigned.
Running a storm.
Part B · For dispatchers and operations
From the forecast to the invoices. One flowchart with three branch points, then the day in order: before, during, after, bill, close out.
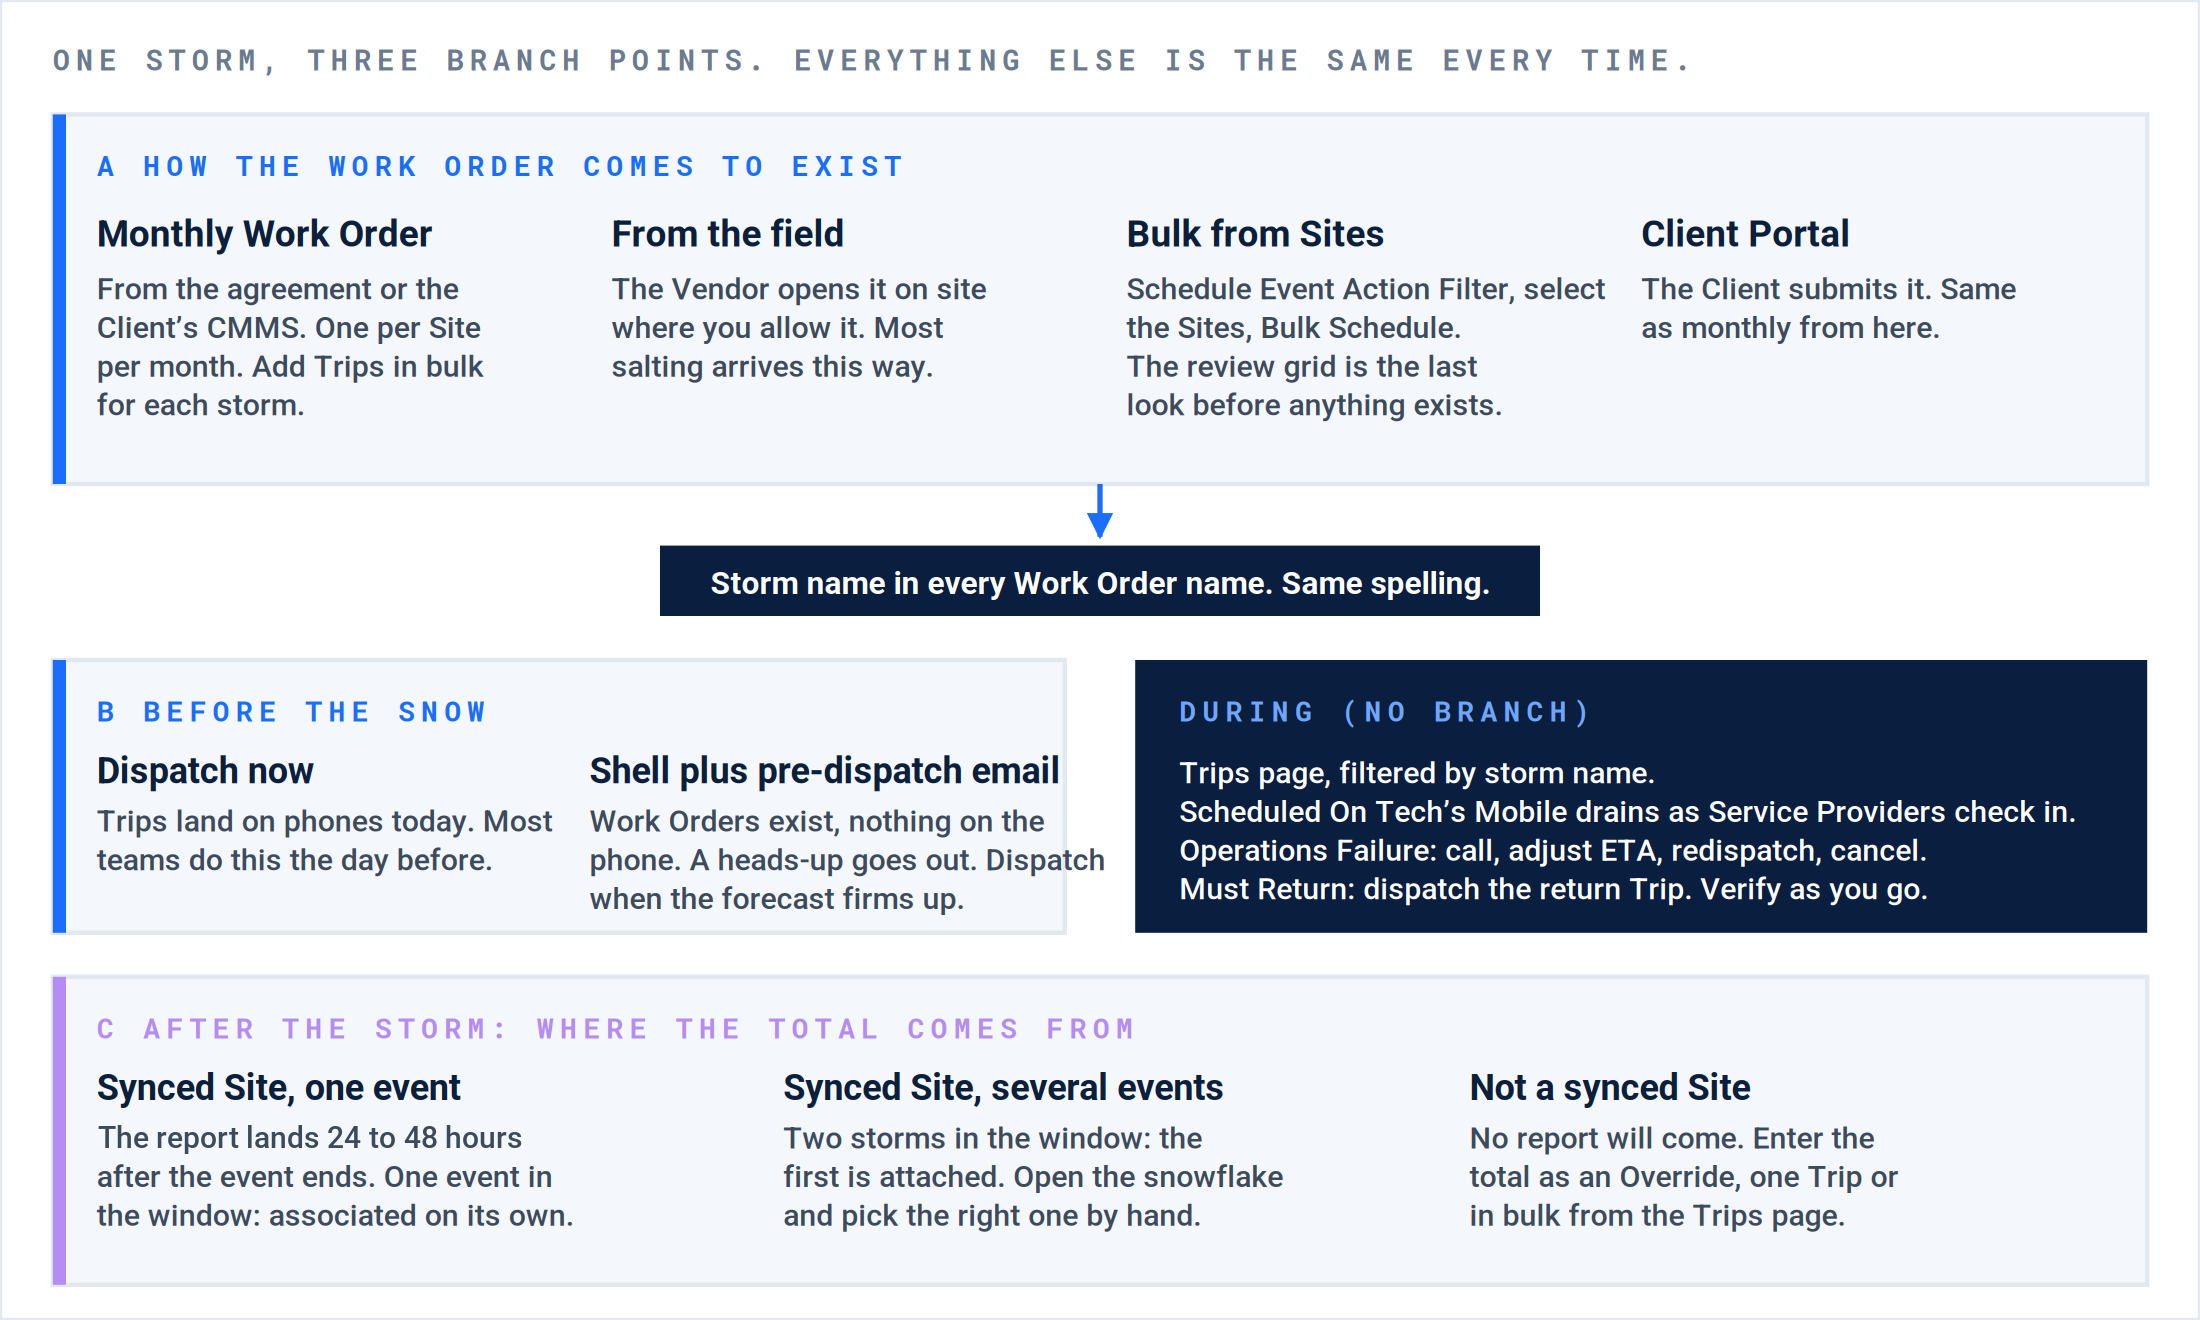
The storm, end to end. Branch A decides how the Work Order exists, B whether it is on a phone before the snow, C where the total comes from. Everything between is the same for every storm and every Client.
P1 · Work Initiation. Before the snow: name it, find the Sites, create in bulk.
Storm work begins a day or two out, in this order: name the storm, find the Sites in its path, create Work Orders and Trips for all of them at once, then decide on dispatch. The Schedule Event Action Filter does the finding.
Name the storm first.
Name the storm first. A storm with three spellings is three storms to the platform. Put the same name in the Work Order name field every time. A date-first convention sorts itself: 2026-01-12 Nor’easter.
Find the Sites in the path.

- Schedule Event. Sites with a Snow Trade assignment and forecast snow or ice above zero in the windows you choose.
- Select all. The count beside it is how many the selection holds.
- Bulk Schedule. Appears once Sites are selected, beside Summary Report Export and Scheduled Site Report.
The Sites page Action Filters. Schedule Event on the Sites page returns Sites, which is where bulk creation starts.

- Schedule Event, with its count.
- Work Order Trade: Snow. Only Sites and Work Orders on the Snow Trade qualify.
- Site Forecast. Open it to change the precipitation type, the threshold, and the forecast windows.
The same Action Filter on the Work Orders page. It pins three editable filter chips, so it is a starting point, not a fixed list.
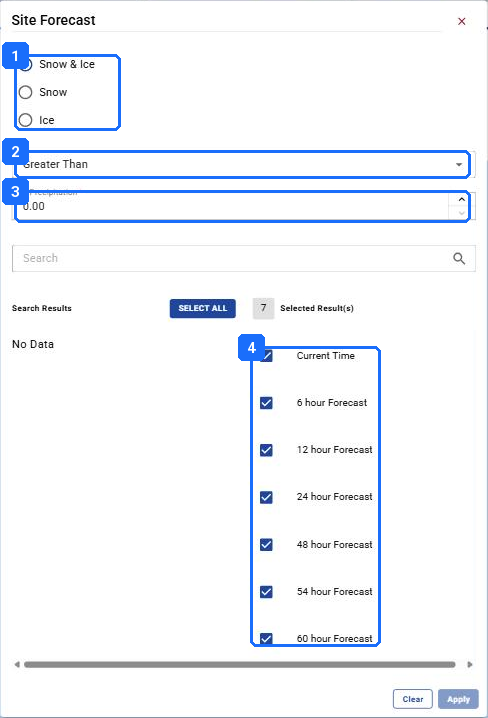
- Snow & Ice, Snow, or Ice. The Action Filter defaults to Snow & Ice.
- Greater Than, and the Precipitation threshold in inches. Zero means any forecast at all.
- Precipitation. Raise it to your lowest trigger to drop the Sites that will not need service.
- The forecast windows: Current Time, 6, 12, 24, 48, 54, and 60 hour. All seven are selected by default; narrow them to the storm’s arrival.
The Site Forecast filter. The forecast is planning data from the weather feed. The certified total after the storm is a different number from a different source.
Create in bulk from the Sites list.
Never create storm Work Orders one at a time. Select the Sites, open Bulk Schedule, fill the header once, Apply, read the grid, Schedule.
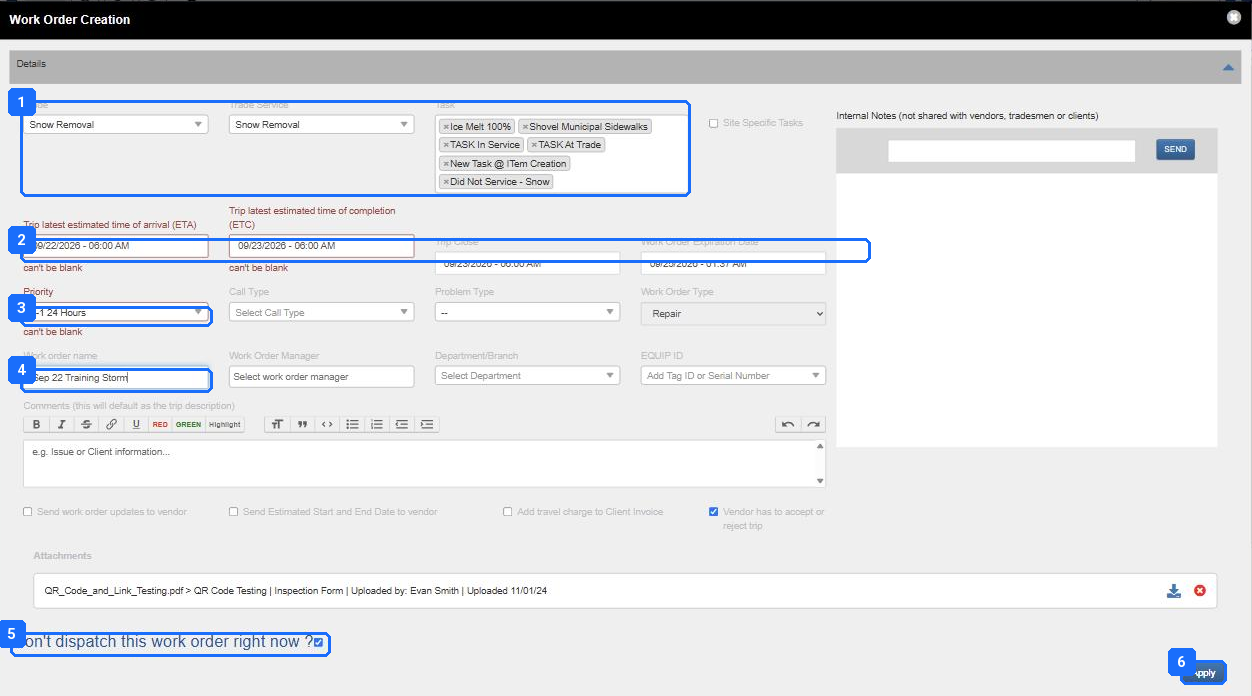
- Trade, Trade Service, Task. Snow Removal, Snow Removal, and the Tasks the Service Providers will perform. Site Specific Tasks pulls each Site’s own Task list instead.
- ETA, ETC, Trip Expiration (labeled Trip Close in this dialog), Work Order Close (labeled Work Order Expiration Date here). The priority fills them; set the Work Order Close first if you change them by hand.
- Priority. Sets the four dates in one move.
- Work order name. The storm name. This is the most important field on the screen.
- “Vendor has to accept or reject trip”. On means dispatched Trips sit at Waiting For Approval until the Vendor accepts. Decide this deliberately for storms.
- “Don’t dispatch this work order right now?” Ticked by default. Ticked, the Work Orders are created as shells. Unticked, they dispatch as they are created.
Bulk Schedule, the header. Everything typed here is written onto every Work Order and Trip in the selection.
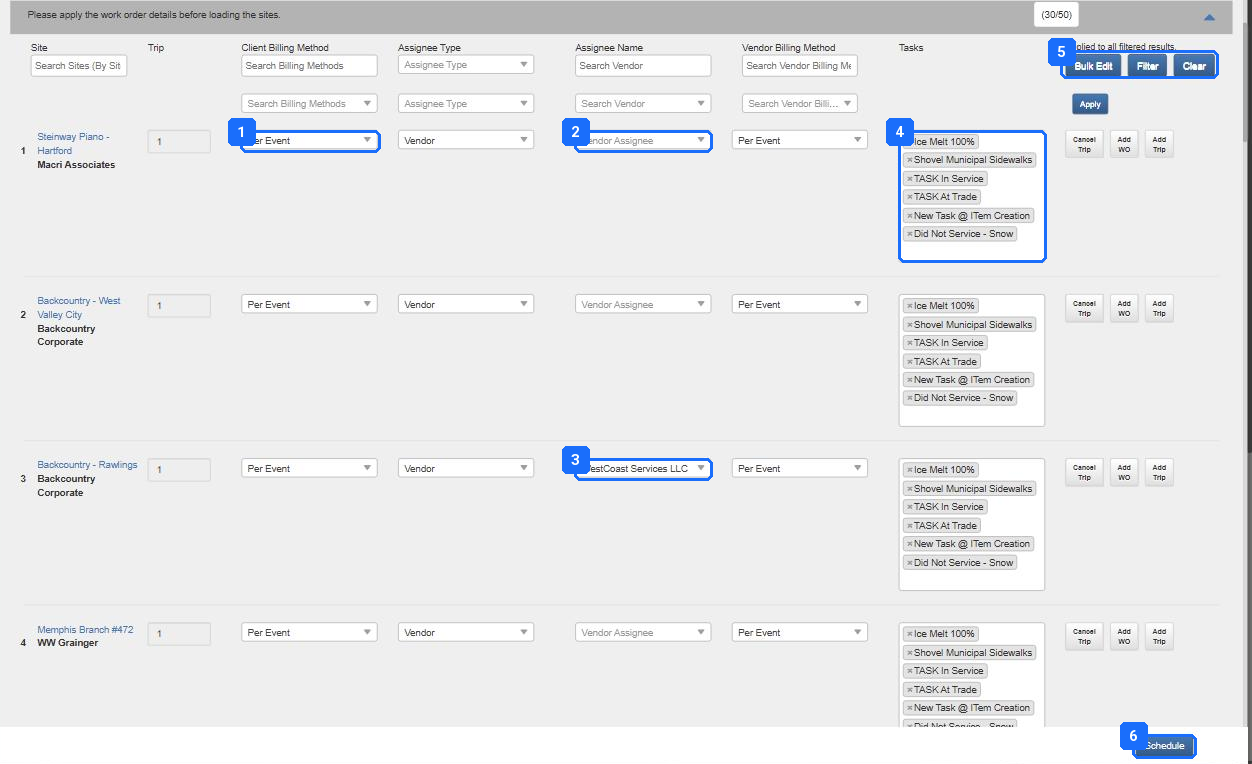
- Client Billing Method for this Site. Wrong here means wrong on the invoice.
- Assignee Name. Blank means no priority Vendor on the Site: assign it now from the dropdown, or fix the Site and re-run.
- A row with its Vendor pulled from the Site. This is what every row should look like.
- Tasks. Remove any that do not apply to this Site; a Task the Service Provider does not perform still bills if it is ticked.
- Bulk Edit and Filter. Change the Vendor or the billing method for every filtered row at once.
- Schedule. Creates the Work Orders and Trips. The count beside the header shows how many were loaded of the selection.
Bulk Schedule, the grid. One row per Site with what will be created. Read it before Schedule; it is the last look before Work Orders exist.
Monthly Work Orders and Work Orders from the field. On a seasonal Client the month’s Work Order already exists for each Site. Do not bulk create over it: add the storm’s Trips to it. A Work Order a Vendor opened from the field only needs the storm name added.
Result: Every Site in the storm’s path has a Work Order carrying the storm name, one Trip each, a Vendor, and the right billing method on both sides. The Schedule Action Filter on the Trips page holds them all if you chose shells.
P3 · Assignment and Dispatch. Dispatch: now, or a shell with a heads-up.
Branch B. Most teams dispatch the day before, so the Trips are on phones at dawn. The alternative: shells plus a pre-dispatch email, then dispatch from the Trips page when the forecast firms up. Undispatched Trips wait in Schedule.
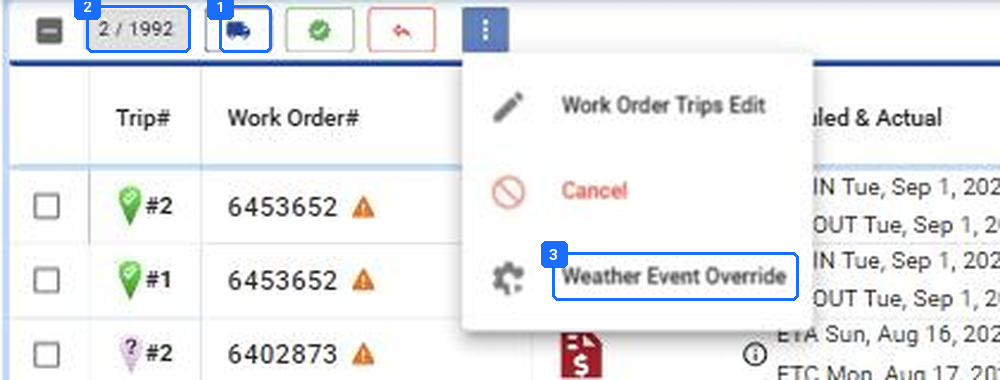
- Dispatch. Sends every selected Trip to its Vendor in one pass. Verify and Unverify are the next two icons.
- The count of selected rows against the list.
- The three-dot menu: Work Order Trips Edit, Cancel, Weather Event Override. The last one is Branch C.
The Trips page with rows selected. The bulk controls appear beside the count.
[Screen: The pre-dispatch email dialog.]
Mobile app before the storm. Every Service Provider updates the app and opens it once on wifi the night before, so the Trips are on the device before the lot has no signal. A Trip that never synced is a Never Arrived at dawn.
Result: Every storm Trip shows the blue Scheduled On Tech’s Mobile pin, or pink Waiting For Approval if acceptance is required, and the Schedule Action Filter filtered to the storm name is empty.
P4 · Service Execution. During the storm: drain the Trips page.
The storm is run on the Trips page, filtered to the storm name. Not the Work Orders page, not the map. Three filters in a loop are the whole job; the storm list, the exceptions and the Must Returns open side by side.
| Filter | What you want to see | What you do |
|---|---|---|
| Trip Status: Scheduled On Tech’s Mobile | The count going down as Service Providers check in. | Nothing. This is the happy path. A count that is not moving an hour after the ETA is a Service Provider that has not started. |
| Operations Failure Action Filter | Empty. | Call the Vendor first. Then adjust the ETA, redispatch, Edit Visit, or cancel and add a Trip. The full pattern is in How a Work Order Moves, Phase 4. |
| Trip Status: Must Return | Every purple Trip has a dispatched return Trip beside it. | The platform created the return Trip; it did not dispatch it. It sits in Schedule as Not Dispatched until you do. On a long event a Site cycles through this three or four times. |
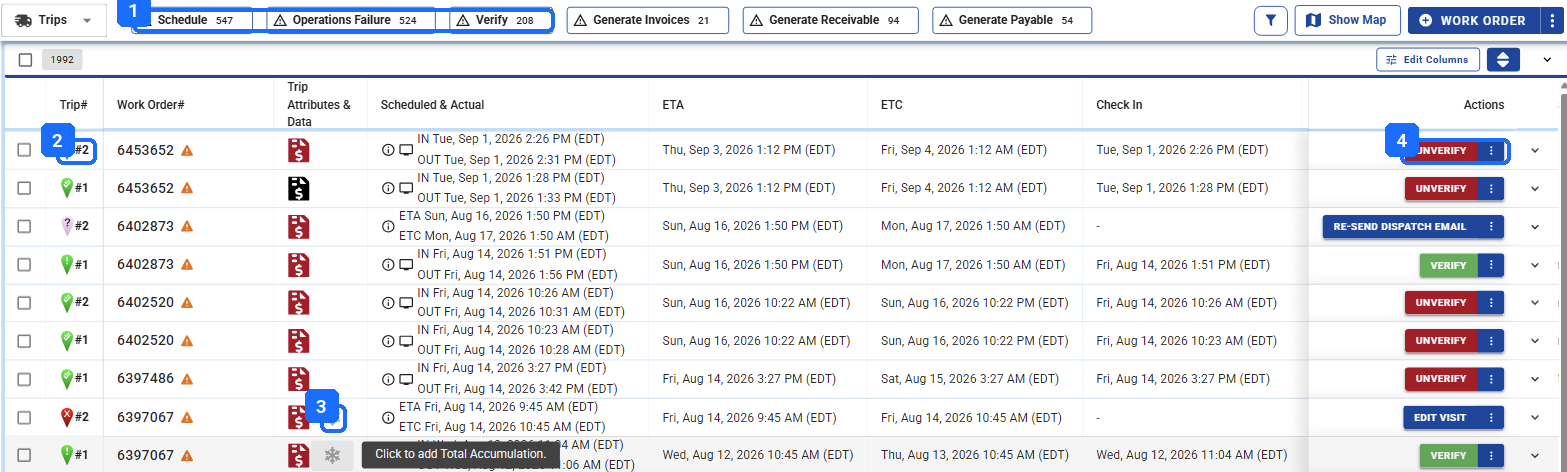
- The Action Filters. Schedule, Operations Failure, Verify. Add the storm name filter and these three counts are your storm.
- The pin. Blue is on the phone, green is Verification Required, red is Never Arrived, purple is Must Return. The full set is in the Pin Legend.
- The snowflake. Hover to see the event or override on this Trip; click to type a total. Branch C.
- Actions. Verify, Edit Visit, Assign, Re-send Dispatch Email, whichever the status calls for.
The Trips page during a storm. Pins carry the state, the snowflake carries the weather data, and the Actions column suggests the next click.
Verify as you go. Verify during the storm: a Trip verified at noon can be re-sent to the same Site at four. Bulk verify a route of identical pushes; open the photos on any Did Not Service or Must Return.
Complete instead of Must Return. If a Service Provider taps Complete after the first push and the snow keeps falling, they cannot check in again. Add a Trip from the Work Order and dispatch it, then repeat the rule in the pre-storm email: Must Return while it is still snowing.
Result: Scheduled On Tech’s Mobile is at zero for the storm name. Operations Failure is empty or every row has a note. Every Must Return has a dispatched return Trip. Verify Trips is being drained as Service Providers finish.
P5 · Validation and Resolution. After the storm: put a total on every Per Event Trip.
This phase applies only where the contract is Per Event. Per Service and Per Task Trips bill from the visit and the Tasks, with no total, and go straight to P6.
Branch C. A Per Event Trip has no price until it carries a certified total. That total comes from one of three places, and the snowflake on the Trip row tells you which one you are looking at.
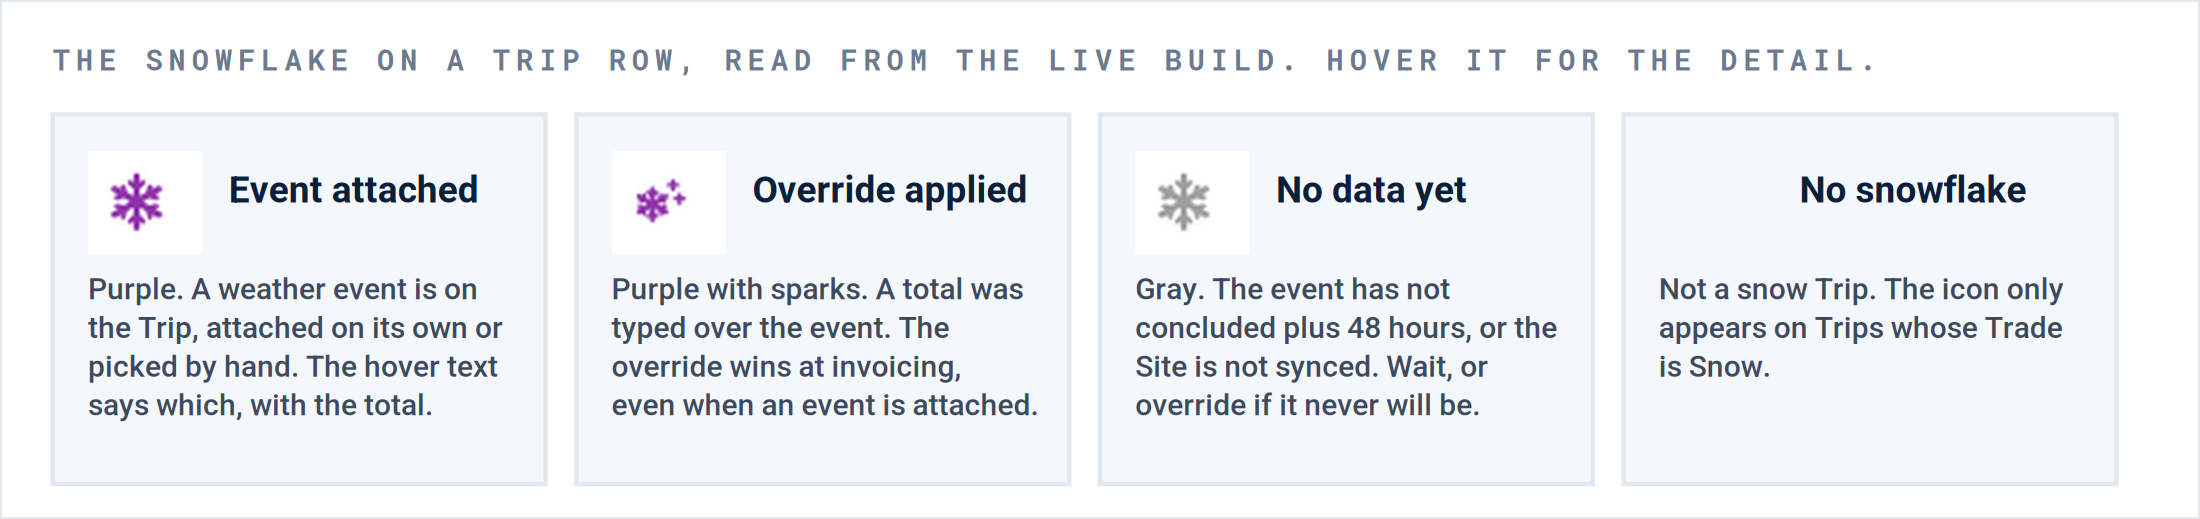
The snowflake, read from the live build. Hover it on any Trip for the event id, the dates, the total, and whether an override is applied.
| The Site is | What happens | What you do |
|---|---|---|
| Synced, one event in the window | 24 to 48 hours after the event ends the report lands and the platform attaches it to every Trip whose check-in falls inside the event plus your window. The snowflake turns purple. | Nothing. Read the total on a few and move on. |
| Synced, two events in the window | The event your Auto Assign Trip Event rule prefers is attached. The hover text shows which. | Open the snowflake, pick the right event from the Weather Event ID list, Save. If every Trip is asking for this, the association window in Company Settings is too wide. |
| Not synced | The snowflake stays gray. No total will arrive. | Override. One Trip: click the snowflake and type the total. Many: select the rows on the Trips page and choose Weather Event Override from the three-dot menu. |
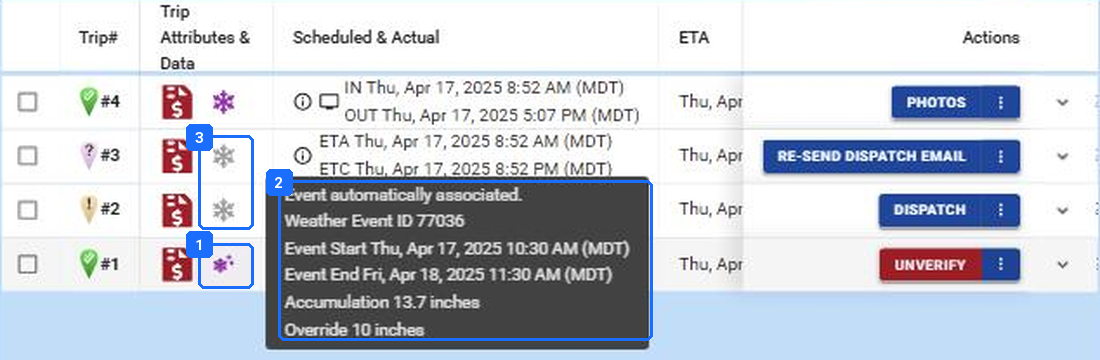
- A purple snowflake with sparks: an event is attached and an override of 10 inches sits on top of its 13.7.
- The hover text: how it was associated, the event id, the start and end, the accumulation, and the override if there is one.
- A gray snowflake: “Weather Event data is unavailable until 48 hours after the conclusion of the event.”
The Trips list on a storm Work Order, with the hover text open. Four Trips on one Work Order: two associated, two waiting on data.
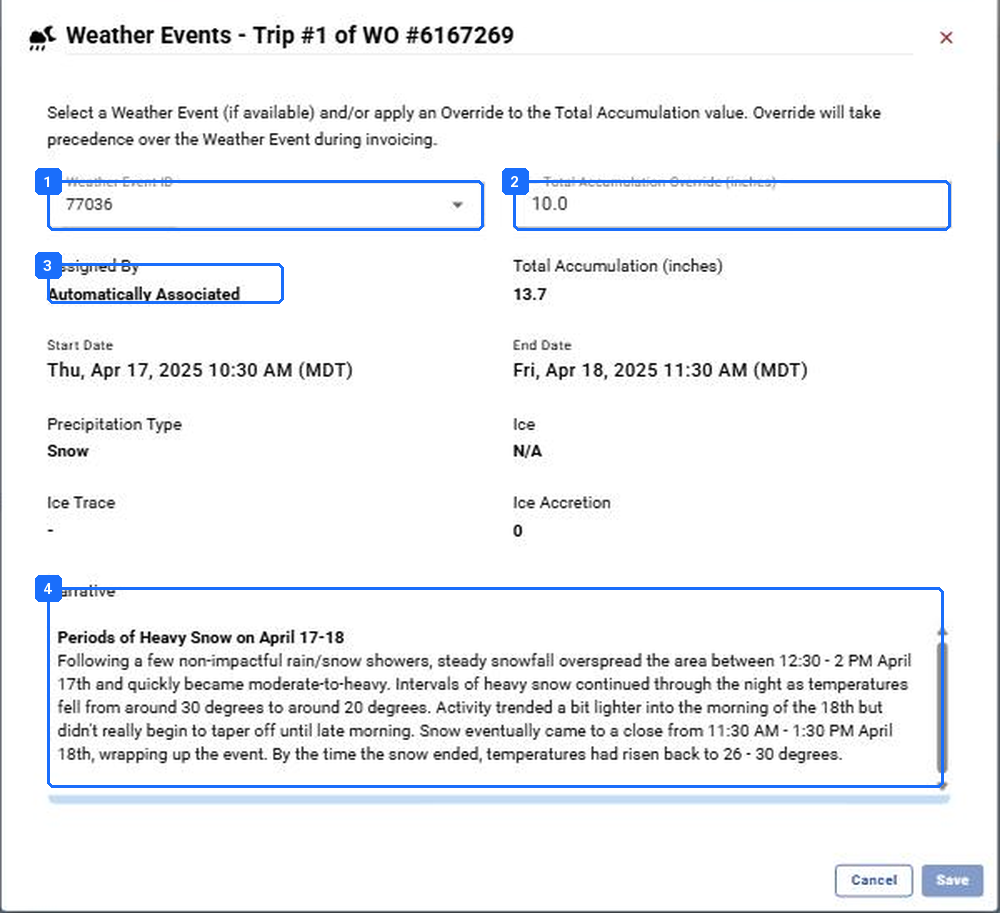
- Weather Event ID. The list of events at this Site in the window. Pick by hand when two overlap.
- Total Accumulation Override (inches). Type a total here and it wins at invoicing, whatever the event says.
- Assigned By: Automatically Associated, or the name of the person who picked it.
- The narrative. The weather service’s own account of the event; it attaches to a Per Event invoice.
Weather Events for one Trip. Click the snowflake on the Work Order’s Trips list to open it.
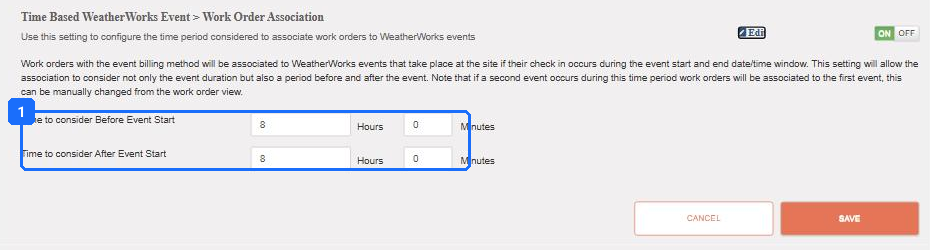
- Ten hours either side is a common setting. Too wide and two storms qualify for every Trip; too narrow and a pre-treat at dawn misses the event that starts at nine.
Company Settings › Sites › Time Based WeatherWorks Event > Work Order Association. Hours before the event start and after it that still count as “during the event” for a check-in.

- A certified total that lands exactly on a range boundary rounds up for the Client price.
- And down for the Vendor cost. Set once; it applies to every Per Event Site.
Border Range Calculations. Client High, Vendor Low.
Associate Weather Events, the Action Filter. A seventh Action Filter, Associate Weather Events, appears on the Trips page only when Trips sit at Available to Associate. When it shows, it is your list. The Weather Event Relation filter holds the same three values: Associated, Auto Associated, Available to Associate.
Result: Filtered to the storm name, every Per Event Trip shows a purple snowflake, and the Weather Event Relation filter set to Available to Associate returns nothing. Every override has a note that says where the number came from.
P6 · Financial Processing. Bill the storm in one pass.
Everything above exists so that billing is one filtered batch and not a hunt through Work Orders. The mechanics are the same as any other invoice and live in The Invoicing Process. What is different about a storm is scope and order.
| Do this | Where | Why |
|---|---|---|
| Filter to the storm, then to the Clients that bill per storm. | Trips page › Generate Invoices Action Filter › storm name › Client. | Seasonal Clients bill from the agreement, not from here. Their event Trips are Non Billable and will not appear. |
| Generate the Payables first, then the Receivables. | Generate Payable, then Generate Receivable, or Generate Invoices for both. | Cost before margin. On a Per Event Trip both sides read the same certified total, so a $0 Vendor line means a missing Vendor range, not a free push. |
| Read the lines before anything is sent. | The draft Receivable. | A thin margin on a storm almost always means a wrong range or an unticked Task, not a bad job. The certificate and the narrative attach to Per Event invoices on their own. |
| Set the billing trigger status. | The Work Order’s custom status. | Ready for Billing, or the name you chose, is what your accounting sync and the billing filter look for. Complete is not it. |
[Screen: Generate Invoices from the Trips page for a storm, with the Assign Weather Events step.]
Result: The storm’s Receivables exist as one batch per Client, the Payables are approved, and the Generate Invoices Action Filter filtered to the storm name is empty.
P7 · Reconciliation and Closure. Close out, and fix the setup before the next one.
Close-out catches what the storm missed and pushes the fixes back into Part A, so the same gap does not cost the same money next week.
| Check | Where | Pass when |
|---|---|---|
| Missed Sites | Sites page › Schedule Event as it was, against Work Orders with the storm name | Every Site in the path has a Work Order with at least one verified Trip, or a Did Not Service record. |
| Open Trips | Trips page › storm name › Trip Status not Trip Verified | None, or each has a note and a Follow Up Date. |
| Overrides | Trips page › storm name › hover the sparked snowflakes | Each override has a source written in a note. If most Trips needed one, the Sites are not synced. |
| Manual associations | Same list, Assigned By on the Weather Events dialog | Few. If most needed a hand pick, narrow the association window. |
| Setup gaps | Part A, cards 3, 4, 5, 6 | Every blank Vendor, missing range, and unsynced Site found during the storm is fixed on the Site record now. |
Result: The storm’s Work Orders carry the billing status. The gaps list is empty. The next storm starts from a clean grid.
Where this usually goes wrong.
Ranked by how often it happens.
| # | What you see | What happened | The fix |
|---|---|---|---|
| 1 | Invoicing blocked for weeks; lines at $0 or wildly wrong. | A set-price rate was loaded as Per Event, and everything else as Per Task. The contract word and the platform word did not match. | Rebuild to one Service with five Tasks and the method the matrix says. The table in Part A, step 1. |
| 2 | Bulk creation produced Work Orders with no Vendor. | Vendors were assigned on the agreement only. Bulk creation reads Site and Task assignments. | Site › View Service Rates › + Assignee Rates with priority 1, on every Site (card 4). |
| 3 | The Vendor’s pins are invisible on the map. | The Site had no assignment and no prior check-in from that Vendor. | Same fix as row 2. |
| 4 | A Site cannot be billed Per Event; the snowflake never turns purple. | No weather id on the Site, so no report. Or the report is not due yet: 24 to 48 hours after the event ends. | Sync Location in Company Settings, confirm the Events tab. Override this storm. |
| 5 | Every Trip asks for a manual event pick. | Two storms qualify for each check-in because the association window is too wide. | Narrow the hours before and after in Company Settings › Sites. |
| 6 | Service Providers tap Complete after the first push and cannot come back. | Complete cannot be disabled; the Service Provider did not use Must Return. | + TRIP on the Work Order for this storm. Say it in every pre-storm email. |
| 7 | Return Trips fell off phones mid-storm. | The Must Return window was 24 hours and the storm was longer. | Tick “Include option to Must Return on the Work Order Close Date” on the Service. Add Trips for this storm. |
| 8 | The seasonal Client was billed twice. | The agreement invoiced and the event Work Orders invoiced. | Non Billable as the Trip Level Default on the event Service; separate generation on the agreement (card 7). |
| 9 | The old Vendor keeps getting the generated Work Orders. | The Vendor was changed on the Site but not on the agreement. | Two steps every time: the Site, then the Scheduled Service. |
| 10 | Storm Trips drew Service Providers away from a routine inspection, or the reverse. | A recurring inspection Work Order was open at the same Sites; Service Providers checked into the wrong one. | Bulk dispatch storm Trips once, and pause routine Work Orders at snow Sites during an event. |
| 11 | The Trips page shows 999+ in every Action Filter. | Old Trips with no check-in data were verified and never cleaned up. | Ask your Customer Success Manager for the lookback setting and a purge of the prior season. |
| 12 | “WeatherWorks should have created the Work Orders.” | It does not, by design. The weather feed finds Sites and prices Trips; you create the work. | Schedule Event, then Bulk Schedule. Part B, Phase 1. |
What good looks like.
| Checkpoint | Evidence |
|---|---|
| Every snow Site is synced | Each shows an Events tab and a Weather Works id under Site Management. |
| The grid is clean | The Bulk Schedule grid across every snow Site shows no blank Vendor and no billing method that disagrees with the contract matrix. |
| A test storm ran end to end | A Work Order on your test Site with the storm name, a Trip checked in and out on the app with Must Return, a second Trip dispatched, one event associated, both invoices generated with non-zero lines. |
| The storm filter works | The Trips page filtered by the storm name shows every Trip for the storm and nothing else. |
| Nothing left to associate | Weather Event Relation: Available to Associate returns zero before invoices are generated. |
| One batch per Client | The storm’s Receivables exist as one batch per Client, dated as the contract says. |
Questions? Contact your Customer Success team or email support@utilizecore.com.