
Applies to: Dispatchers, account managers, operations leads | Web
Download the printable guide (PDF)
Before anything else. A Work Order is the problem. A Trip is sending someone to solve it, once or as many times as it takes. A Visit is what happened on site during one Trip. The Work Order is the parent; its Trips are the children, and everything on a Trip rolls up to the Work Order.
In this guide.
| # | Part | You will be able to |
|---|---|---|
| 1 | The list | Read the Work Orders list, expand Trips, and sort. |
| 2 | Filters | Filter the list and save it as a template you load in one click. |
| 3 | Columns | Show, hide and order the columns you need. |
| 4 | The Work Order | Find everything on the Work Order page. |
| 5 | Assign and dispatch | Put a Vendor on the Trip and send it. |
| 6 | Record the Visit | Enter check-in, check-out, photos and notes for a Vendor not on the app. |
| 7 | Photos and attachments | File proof on the right Trip. |
| 8 | Send the Vendor back | Add a return Trip two ways. |
| 9 | Notes and Activity | Communicate on the record and read its history. |
Part 1 · The Work Orders list.
Open Work Orders from the main menu. Everything you need to find and act on a Work Order is on this screen.

1 Action Filters: one per stage, with a live count 2 Filter 3 Edit Columns, Sort, and Expand 4 Actions: the next step for that row
The top of the list.
The Actions column. The action on each row is the next thing that Work Order needs. Create Trip, Assign Trip, Verify Trip, Generate Invoice. Click it and the system takes you to the right screen.
Sort the list.
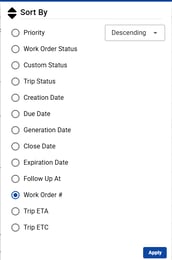
Sort. The up-and-down arrow beside Edit Columns.
- Click the Sort button.
- Pick the field, such as Priority, Trip ETA or Follow Up At.
- Choose Ascending or Descending, then Apply.
Tip. Sort by Trip ETA in the morning to see who is due on site first.
See every Trip without opening anything.
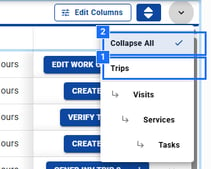
1 Trips 2 Collapse All
Expand. The arrow at the right of the toolbar.
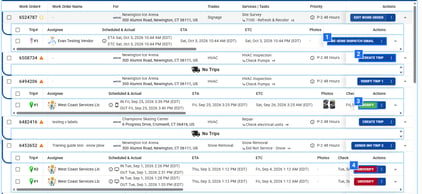
1 Re-send Dispatch Email: dispatched, not accepted 2 Create Trip: no Trip yet 3 Verify: the Vendor checked out 4 Unverify: already verified
Trips expanded. Each Work Order opens to show its Trips, the Vendor, check-in and check-out.
- Click the arrow at the right end of the toolbar.
- Choose Trips to open every row at once, or Visits, Services or Tasks for more detail.
- Choose Collapse All to close them again. It works the same for 10 rows or 1,000.
What the Actions column is telling you.
| Button | Where the Work Order is | What to do |
|---|---|---|
| Create Trip | No Trip yet. | Add a Trip and assign a Vendor (Part 5). |
| Assign Trip | A Trip exists with no Vendor. | Choose the Vendor, then dispatch (Part 5). |
| Re-send Dispatch Email | Dispatched, not yet accepted. | Wait for the Vendor, or call. Re-sending only repeats the email. |
| Edit Trip | Accepted, the Vendor is due on site. | Watch the ETA. Change dates or the Vendor if plans move. |
| Verify Trip | The Vendor has checked out. | Review the times and photos, then verify. |
| Gener Inv Trip | Verified, not yet billed. | Generate the invoice. |
Part 2 · Filter once, save it, reuse it.
Build the view you use every day once, save it as a template, and load it in one click instead of rebuilding it each morning.
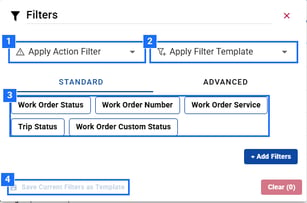
1 Apply Action Filter 2 Apply Filter Template 3 Standard filters 4 Save Current Filters as Template
Filters. Click the funnel icon above the list.
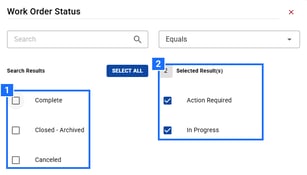
1 Values to pick 2 Selected
Pick the values. Ticked values move to Selected Result(s).
- Click the Filter icon.
- Click a filter, for example Work Order Status. Use + Add Filters for Client Name, Trade or Service.
- Tick the values (here Action Required and In Progress), then click Apply.
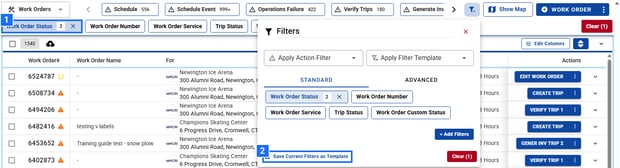
1 Applied filter chip 2 Save Current Filters as Template
The applied filter. It shows as a chip above the list with the number of values. The x removes it; Clear removes them all.
Save it as a template.
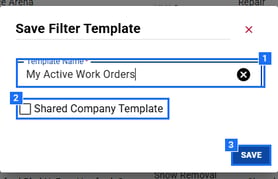
1 Template name 2 Shared Company Template 3 SAVE
Save Filter Template.
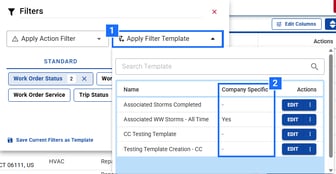
1 Apply Filter Template 2 Company Specific
Apply Filter Template. Your saved templates. Company Specific shows the ones shared with everyone.
- With your filters applied, click Save Current Filters as Template.
- Name it so a colleague would know what it shows, for example Client name · Active.
- Leave Shared Company Template unticked for yourself. Tick it to give the template to the whole team.
- Next time: Filter › Apply Filter Template, then click the name.
A good set to start with. One template per Client, plus one for everything active. Start at the highest level (Client, Service, Trade), then narrow. When a template proves itself, share it so a new teammate starts with it on day one.
Part 3 · Show the columns you use.
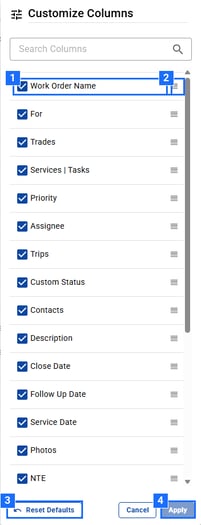
1 Tick to show, untick to hide 2 Drag to reorder 3 Reset Defaults 4 Apply
Customize Columns.
- Click Edit Columns above the list.
- Untick what you never read. Fewer columns means less scrolling.
- Drag the handle at the right of a column to move it.
- Click Apply. Reset Defaults puts everything back.
Set it and forget it. Your columns are saved for you on that screen. The Trip table inside a Work Order has its own Edit Columns; set it once there too, for example to bring the Assignee column forward.
Can't see the Vendor? If the Vendor or Assignee column is off to the right, it has been pushed over by other columns. Drag it forward in Edit Columns instead of scrolling every time.
Part 4 · One page, three panels.
Click a Work Order number to open it.
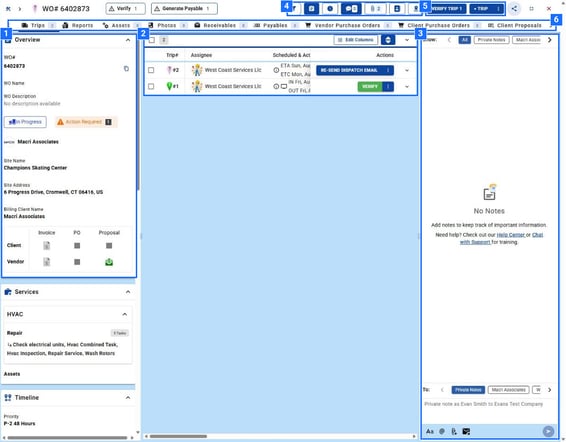
1 Overview: Client, Site, status, Services 2 Trips, with the next action at the right 3 Notes, Activity or Attachments 4 Filter, Overview, Activity, Notes, Attachments, Contacts, Map 5 The next action and + TRIP 6 Tabs: Photos, Proposals, Invoices and more
The Work Order page.
| Header icon | Opens | Use it to |
|---|---|---|
| Clock | Activity | See who did what and when. Your first stop when something went wrong. |
| Speech bubble | Notes | Write to your team, the Client or the Vendor on the record. |
| Paperclip | Attachments | Documents on the Work Order: quotes, forms, PDFs. |
| Pin | Map | Where the Site is, and where the Vendor checked in. |
Part 5 · Put a Vendor on the Trip.

1 + TRIP: top of the Work Order 2 The Trip line: right side
Two places to start. + TRIP at the top of the Work Order adds a Trip. The action at the right of the Trip line acts on that Trip.
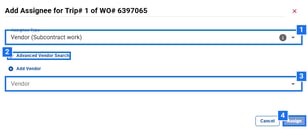
1 Assignee Type 2 Advanced Vendor Search 3 Vendor 4 Assign
Add Assignee.
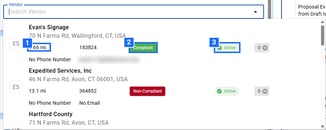
1 Distance 2 Compliant or Non-Compliant 3 Active
Pick the Vendor. Each Vendor shows distance from the Site, compliance and status.
- Select + TRIP at the top of the Work Order, or Assign at the right of the Trip line.
- Leave Assignee Type on Vendor (Subcontract work).
- Open Vendor and pick one. Advanced Vendor Search searches by Trade and distance.
- Click Assign, then Dispatch. The Trip goes to the Vendor's mobile app and email.
Accepting. Let the Vendor accept it themselves. The point is that the Vendor uses the app. Accept on their behalf only when they confirm by phone, and add a note saying who confirmed and when.
Re-send Dispatch Email. Sends the dispatch email and Work Order PDF again, for a Vendor who lost it or needs it in the field. It does not create a new Trip or change the Trip in any way.
Part 6 · No app? You are the app.
When a Vendor does not use the mobile app, the times and photos still belong on the Trip. Enter them from the Vendor's phone call, email or text so the Work Order stays the record.
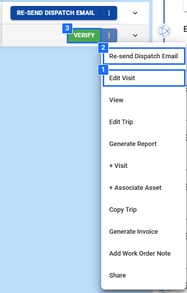
1 Edit Visit 2 Re-send Dispatch Email 3 Verify
Trip menu. The three dots on a Trip row.
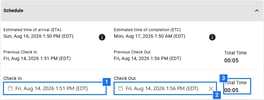
1 Check In 2 Check Out 3 Total Time
Edit Visit: the times. Previous times show above.
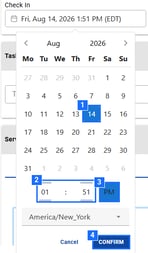
1 Day 2 Hour : minute 3 AM or PM 4 CONFIRM
Date picker.
- On the Trip, click ⋮ › Edit Visit.
- Click Check In. Pick the day, set the hour and minute, and check AM or PM.
- Click CONFIRM. The time is not kept without it.
- Do the same for Check Out.
- Read Total Time. If it looks wrong, one of the times is wrong.
Check AM and PM. The picker can default to PM. If a check-out will not save, or Total Time is negative, a check-out is earlier than its check-in: one side has the wrong AM or PM.
You can change it. Edit Visit can be opened and saved again as often as needed. Every change is recorded in Activity, so the history is never lost.
Add the photos and say where the times came from.
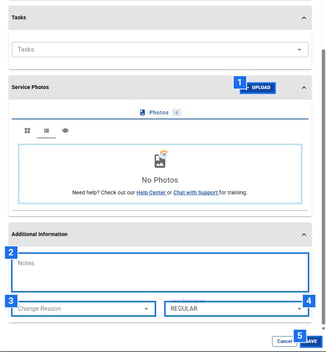
1 UPLOAD the Vendor's photos 2 Notes: who gave you the times 3 Change Reason 4 Hour Description 5 SAVE
Edit Visit: photos and notes. Scroll down in the same window.
- Under Service Photos, click UPLOAD and add the photos the Vendor sent.
- In Notes, write where the times came from, for example Per Vendor email, 10/6.
- Pick a Change Reason and Hour Description if your company uses them.
- Click SAVE.
Result: The Trip shows the check-in and check-out with a computer icon (entered in the office, not from the phone), and the photos sit on that Trip.
When to use Edit Visit.
| Situation | What to enter |
|---|---|
| The Vendor does not use the app | Check-in, check-out and photos for every visit, from what the Vendor sends you. |
| Parts are needed, a return is coming | Record the first visit now so Trip 1 is complete, then add Trip 2 (Part 8). |
| The Vendor forgot to check out | The real check-out time, with a note saying who confirmed it. |
Part 7 · Put proof on the Trip.
Parent and child. Photos added on a Trip roll up to the Work Order. Attachments added to the Work Order stay general. Both are visible on the Work Order. Only Trip photos tell you which visit they came from.
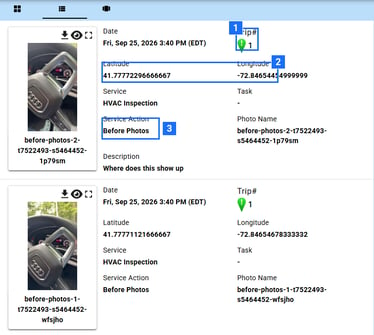
1 Trip number 2 Where it was taken 3 Service Action
Photos tab. Every photo is stamped with its Trip.
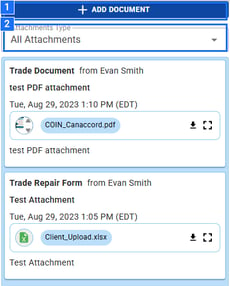
1 ADD DOCUMENT 2 Attachments Type
Attachments. The paperclip. General documents for the Work Order.
| Put it | When | Why |
|---|---|---|
| On the Trip | Photos and checklists from a visit: before, during, after. | You can tell Trip 1 photos from Trip 2 photos. For integrated Clients (ServiceChannel, Corrigo, Fexa and others) Trip photos go across in the right category with their details. |
| On the Work Order | Quotes, signed forms, Client documents that are not about one visit. | They belong to the problem, not to one visit. |
Part 8 · Same Work Order, new Trip.
The rule. A return visit is a new Trip on the same Work Order. Never a new Work Order. A second Work Order splits the notes, photos and Client reference across two records.
Example: the Vendor visited, found the part was needed, and left. First record Trip 1 with Edit Visit (Part 6). When the part arrives, add Trip 2 one of two ways.
A. No Proposal: + TRIP.
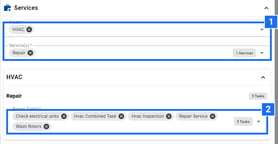
1 Trade and Service 2 Tasks
New Trip: what carries over. From the Work Order, already filled in.
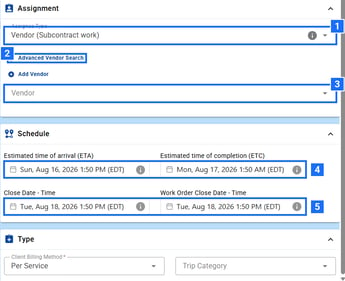
1 Assignee Type 2 Advanced Vendor Search 3 Vendor 4 ETA and ETC 5 Close dates
New Trip: assign and schedule.
- Click + TRIP in the Work Order header. If there is no Trip yet, the button reads Create Trip; it opens the same form.
- Check the Trade, Service and Tasks, which come from the Work Order.
- Choose the Vendor, set the ETA and ETC, then SAVE and dispatch.
B. Approved Vendor Proposal: Create Trip.
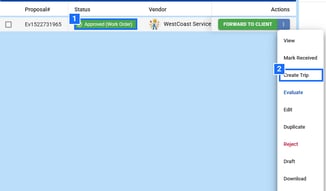
1 Approved 2 Create Trip
Create Trip from the Proposal.
- Approve the Client Proposal, then the Vendor Proposal.
- Open the Vendor Proposals tab.
- Click ⋮ › Create Trip on the approved Proposal.
- Review the Trip and dispatch.
Why this way. The Vendor and the approved amount as the Vendor NTE are filled in for you. + TRIP would make you enter both.
Part 9 · Talk on the record. Read the history.
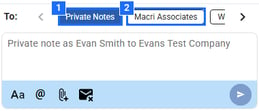
1 Private Notes: your team only 2 The Client
Notes. The To chips set who sees the note.
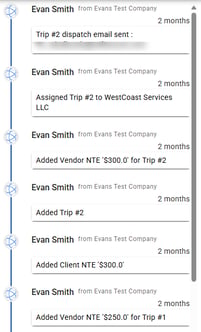
Activity. The clock icon. Every action, by whom, newest first.
When to open Activity. When something went wrong and you need who did what and when. It is the history, not a to-do list.
- Open the Notes panel (speech bubble).
- Choose who sees it with the To chips. Private Notes stays inside your company.
- Type and send. Use @ to mention a teammate.
What you see, and the fix.
| # | What you see | What happened | The fix |
|---|---|---|---|
| 1 | Check-out will not save, or Total Time is negative. | AM or PM is wrong on one side. | Open the picker again and check AM or PM on both times. |
| 2 | Times entered, but nothing changed. | CONFIRM was not clicked in the picker, or SAVE was not clicked. | Edit Visit again: CONFIRM each time, then SAVE. |
| 3 | The return visit is a second Work Order. | A new Work Order was created instead of a Trip. | Use + TRIP or Create Trip on the original Work Order. |
| 4 | Photos are on the Work Order, not the visit. | They were added through Attachments. | Add visit photos through Edit Visit › UPLOAD. |
| 5 | Re-sent the dispatch, still one Trip. | Re-send Dispatch Email only sends the email again. | Add a Trip for a new visit. |
| 6 | Rebuilding the same filters every morning. | No saved template. | Save Current Filters as Template; share the good ones. |
| 7 | The Vendor's name is missing from the Trip row. | The column is pushed off to the right. | Edit Columns on the Trip table; drag Assignee forward. |
| 8 | The Vendor never uses the app. | Someone accepts and checks in for them every time. | Accept for them only on a verbal yes, with a note. Ask your Customer Success team about Vendor training. |
Four checks before you call it done.
| Checkpoint | Evidence |
|---|---|
| A dispatched Trip | A Vendor on the Trip, accepted by the Vendor in the app. |
| A recorded Visit | Check-in and check-out that add up, photos on the Trip, and a note saying where office-entered times came from. |
| One Work Order per problem | Return visits are Trip 2 and Trip 3, never a second Work Order. |
| A one-click morning | Your saved filter template loads your list. |
Questions? Contact your Customer Success team or email support@utilizecore.com.