
| Where this fits: Workflow Universe › Layer 1 · Foundation | For: Dispatcher | |
| Read first: How a Work Order Moves | Read next: Trip Status and Pin Legend |
Applies to: Dispatchers, operations leads, account managers | Web
Download the printable guide (PDF)
Before anything else. A Work Order is a problem that needs to be solved. A Trip is sending someone to solve it, once or as many times as it takes. Everything on the platform follows from those two sentences. If a Work Order is open, the problem is not solved yet. If a Trip is open, someone still has to go.
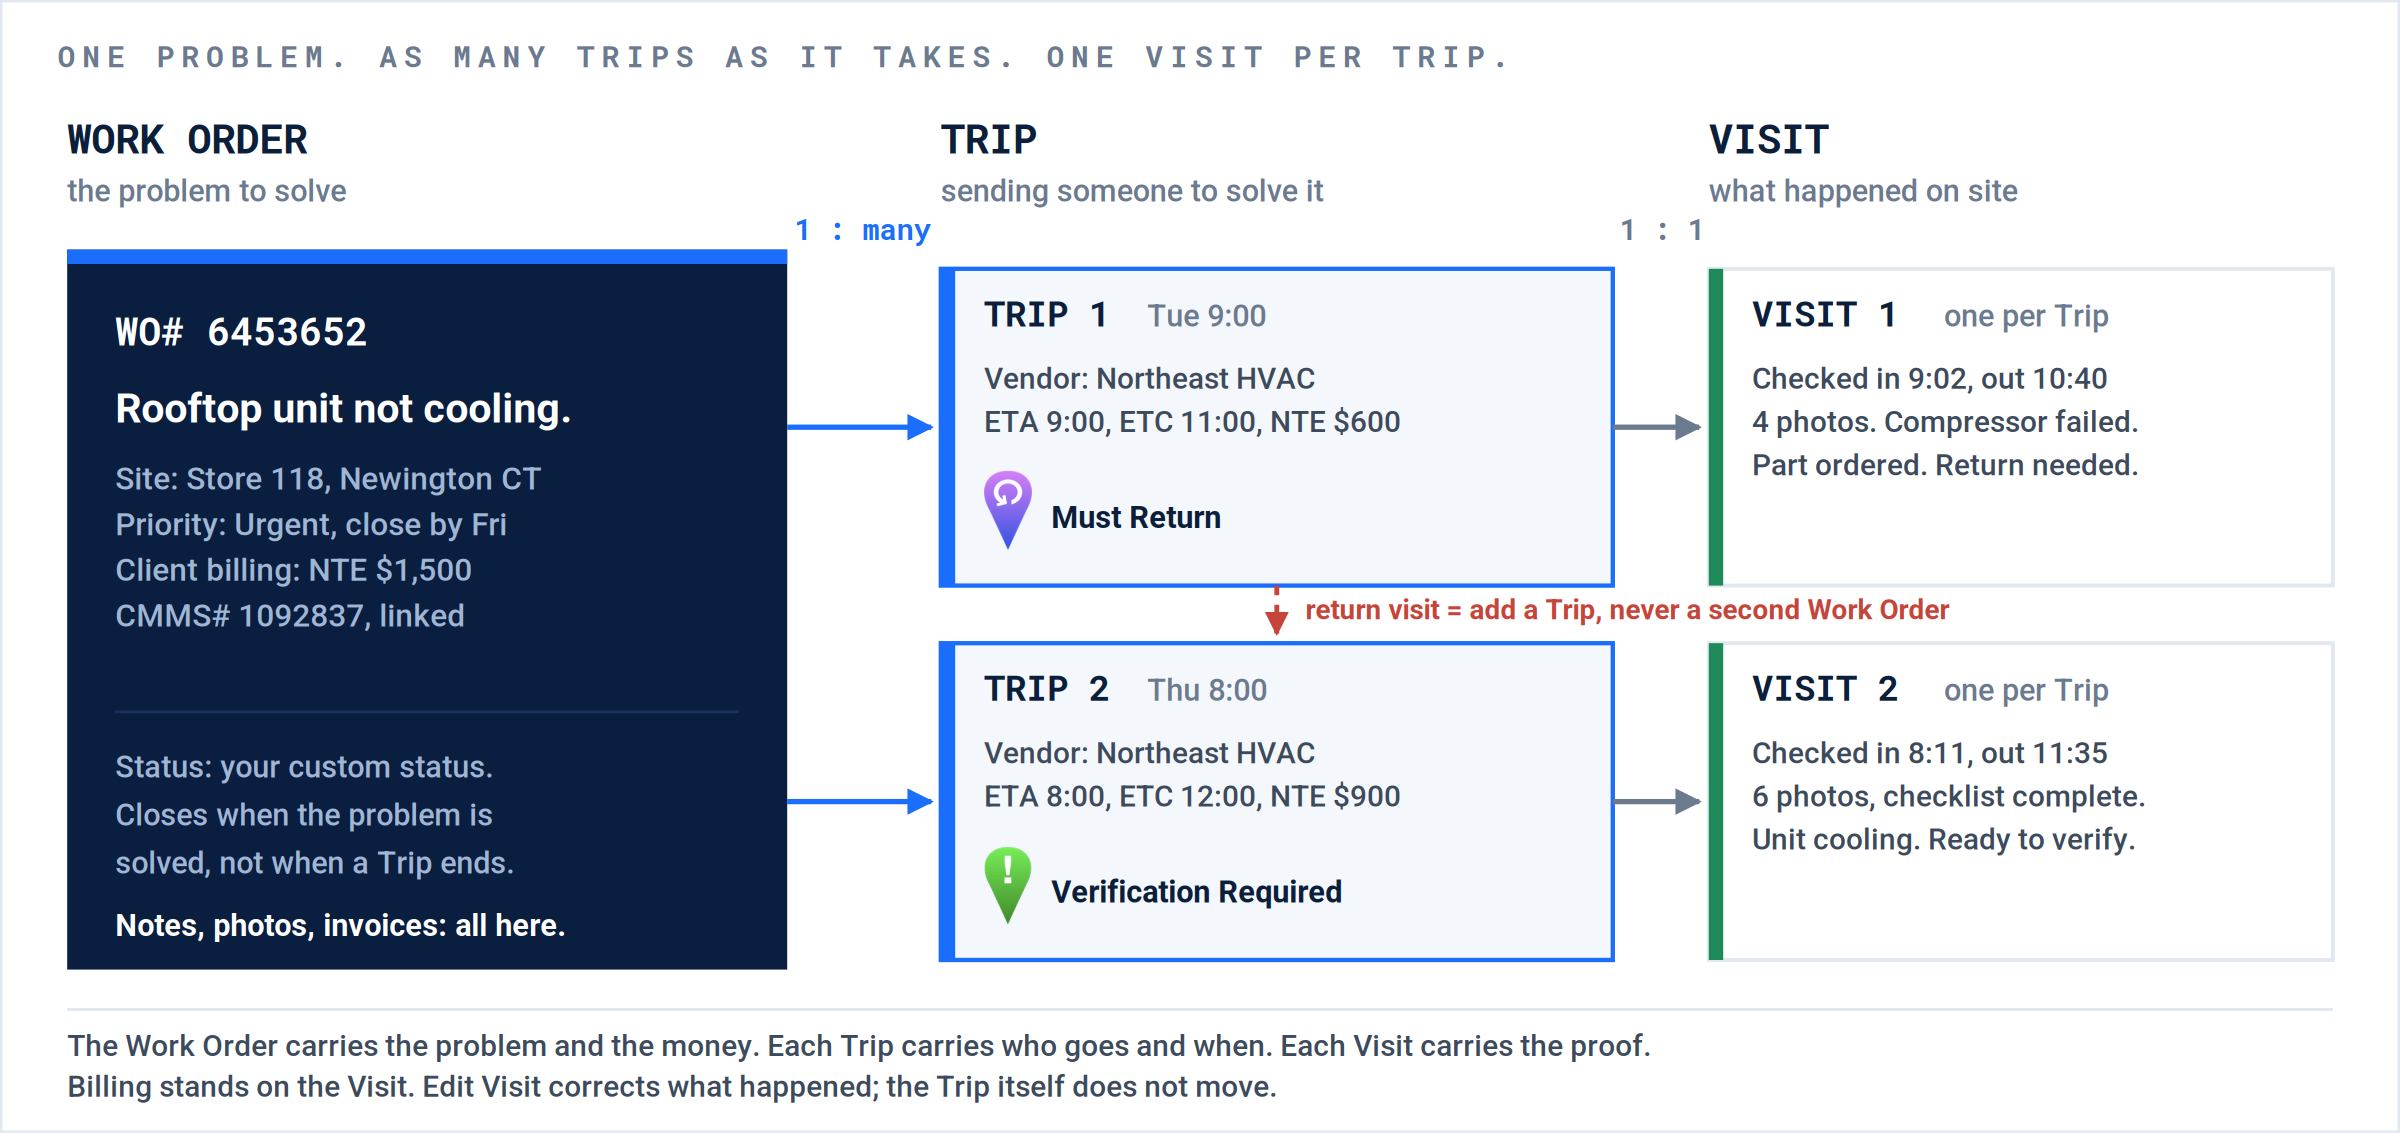
One problem, two Trips, one Visit per Trip. The Work Order carries the problem and the money. Each Trip carries who goes and when. Each Visit carries the proof of what happened on site.
The dispatch board, if you have ever run one. Picture the whiteboard in a snow or HVAC shop. The call that comes in, “no heat at Store 118”, goes on the board and stays there until the problem is solved. That is the Work Order. Every truck you roll against it is a Trip. The work slip the technician fills in before leaving the site is the Visit. The board does not lose the call because the first truck came back needing a part; it gets a second truck. On the platform the board is the Action Filters, the trucks are Trips, and nothing comes off the board until the problem is solved and the money has moved.
The first half, in one table.
Four phases. Each one has an owner, a question it answers, and a result you can see on the screen before you move on. The rest of this article is those four rows, in full.
| Phase | The question | Owner | Done when you see |
|---|---|---|---|
| P1 Work Initiation | Where did this problem come from, and is it already on the board? | Intake, or the integration | One Work Order per problem, at the right Site, with the CMMS number if it came through one. |
| P2 Qualification and Planning | What exactly is wrong, what does it cost, and what needs to happen before anyone rolls? | Account manager | Asset, Tasks from the Service, priority and dates, NTE set. Nothing typed by hand that a setting could have filled. |
| P3 Assignment and Dispatch | Who goes, and when? | Dispatcher | A Trip with the priority Vendor, dates set from the outside in, and the blue pin: Scheduled On Tech’s Mobile. |
| P4 Service Execution | Did they get there, do the work, and prove it? | Dispatcher and the Service Provider | Check-in and check-out on the Visit, photos in, and either Verification Required or a Must Return with its second Trip already dispatched. |
Run it, phase by phase.
The first half of the lifecycle
Each phase names the screen, the fields that matter, the branch points, and the result you should see before moving on. When the last Trip checks out, the Work Order belongs to the operations lead and the second half begins.
P1 · Work Initiation. Where Work Orders come from.
When do I create a Work Order?. Only when it did not arrive on its own. Four pathways bring work in and a fifth creates it on a schedule. From Phase 2 on, they are all the same.
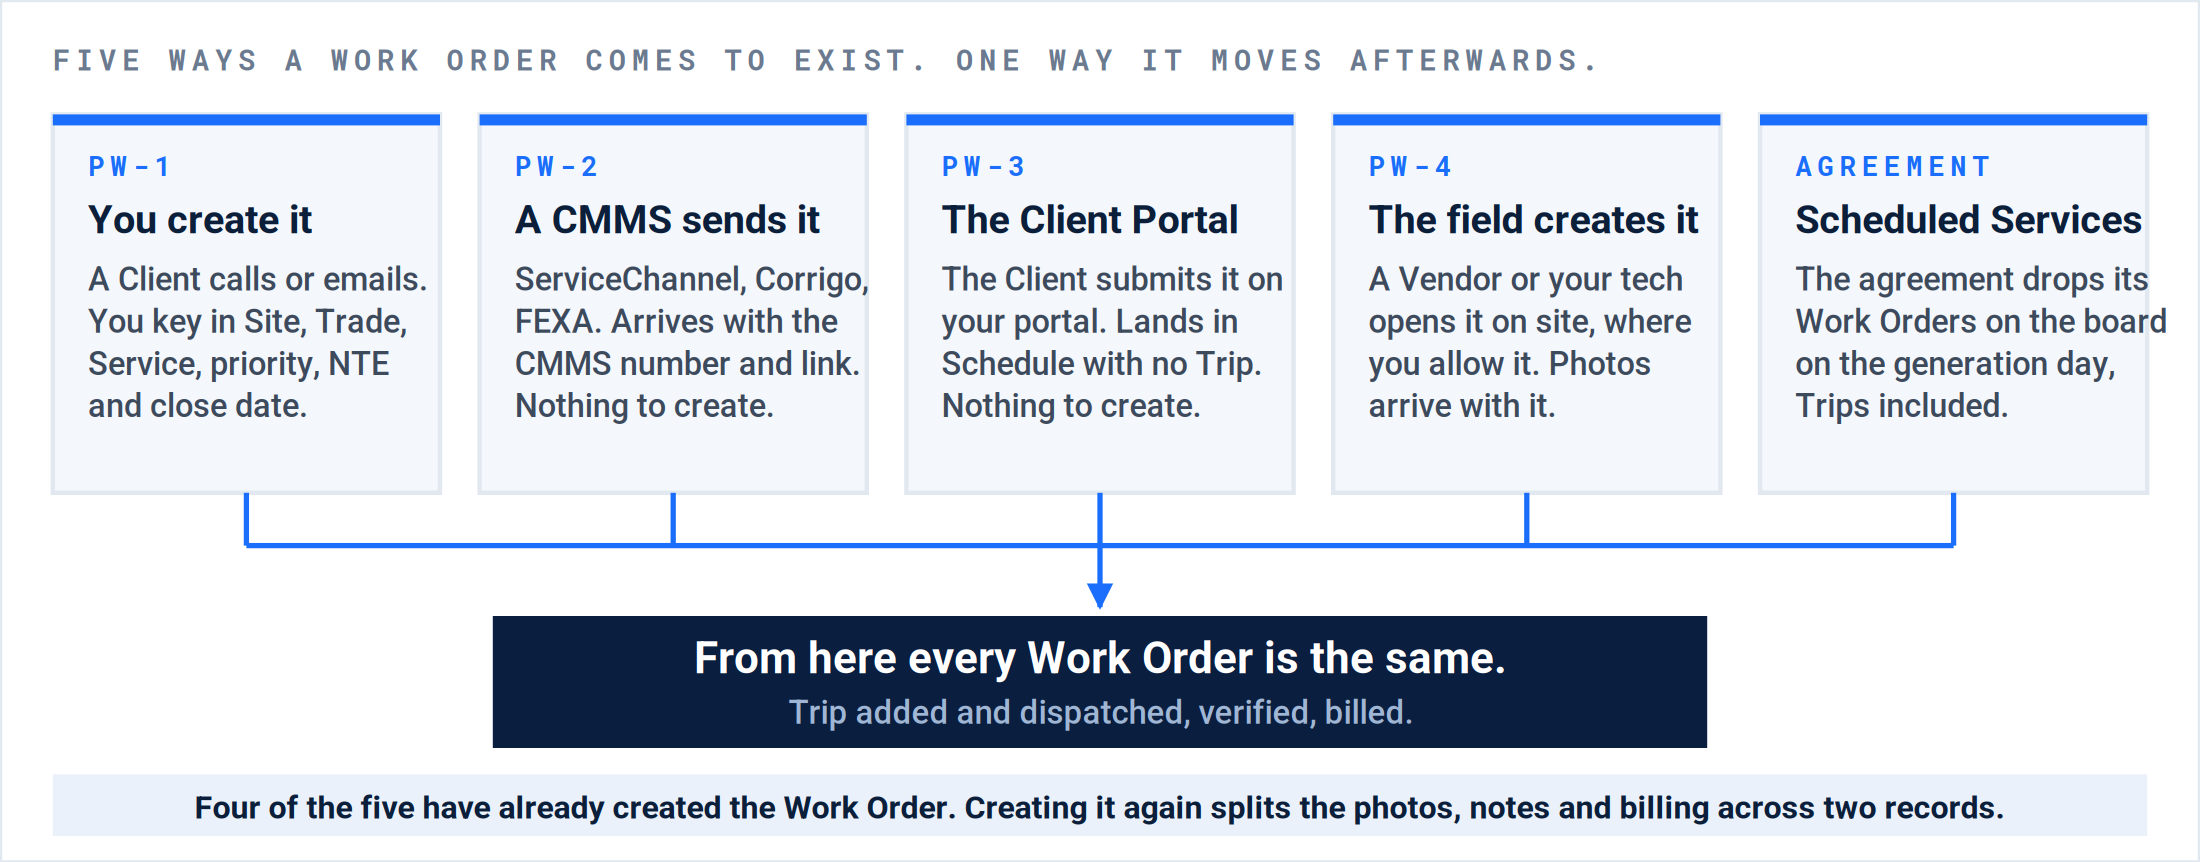
Five ways in, one Work Order. After it is on the board, the pathway no longer matters.
| Pathway | How it arrives | Your first move |
|---|---|---|
| Client’s CMMS (ServiceChannel, Corrigo, FEXA and others) | Created by the integration, with the CMMS number and link under the UtilizeCore number. Statuses sync both ways. | Do not create it. Qualify and dispatch. Once the Client sets Complete Pending Confirmation, that status overrides yours. |
| Client Portal | The Client creates it on your portal with their own Site list. | Read the scope, confirm the Trade and Service, then dispatch. |
| Manual | A call, an email, a walk-in. You create it with the WORK ORDER button. | Phase 2, in full. |
| Vendor-created | A Vendor with permission opens one from the field for work they found. | Qualify it against the contract before anyone dispatches it. |
| Scheduled Services | Recurring agreements drop their Work Orders on the board on the generation day, Trips included. | Confirm the count against the agreement list. Nothing to create. |
Integrated Clients. On a CMMS Work Order the Client’s status is the one that counts. Complete Pending Confirmation, set by you, goes to the CMMS and comes back as Complete Confirmed. Once it is set, it overrides anything else on the Work Order. Treat a Client note that says “proceed with invoice” as a signal to verify the Trip, not as verification.
Result: A Work Order with a number, a Site, and a Trade is on the board. On the Work Orders page it sits in the Schedule Action Filter until it has a dispatched Trip.
P2 · Qualification and Planning. Qualify it, and set it up to succeed.
Qualification. Get three fields right: Site, Service, priority. Everything after runs off them. The Site pulls the Client and its instructions. The Service pulls the Tasks and billing defaults. The priority sets every date.
Manual creation starts with the WORK ORDER button on the Work Orders page.
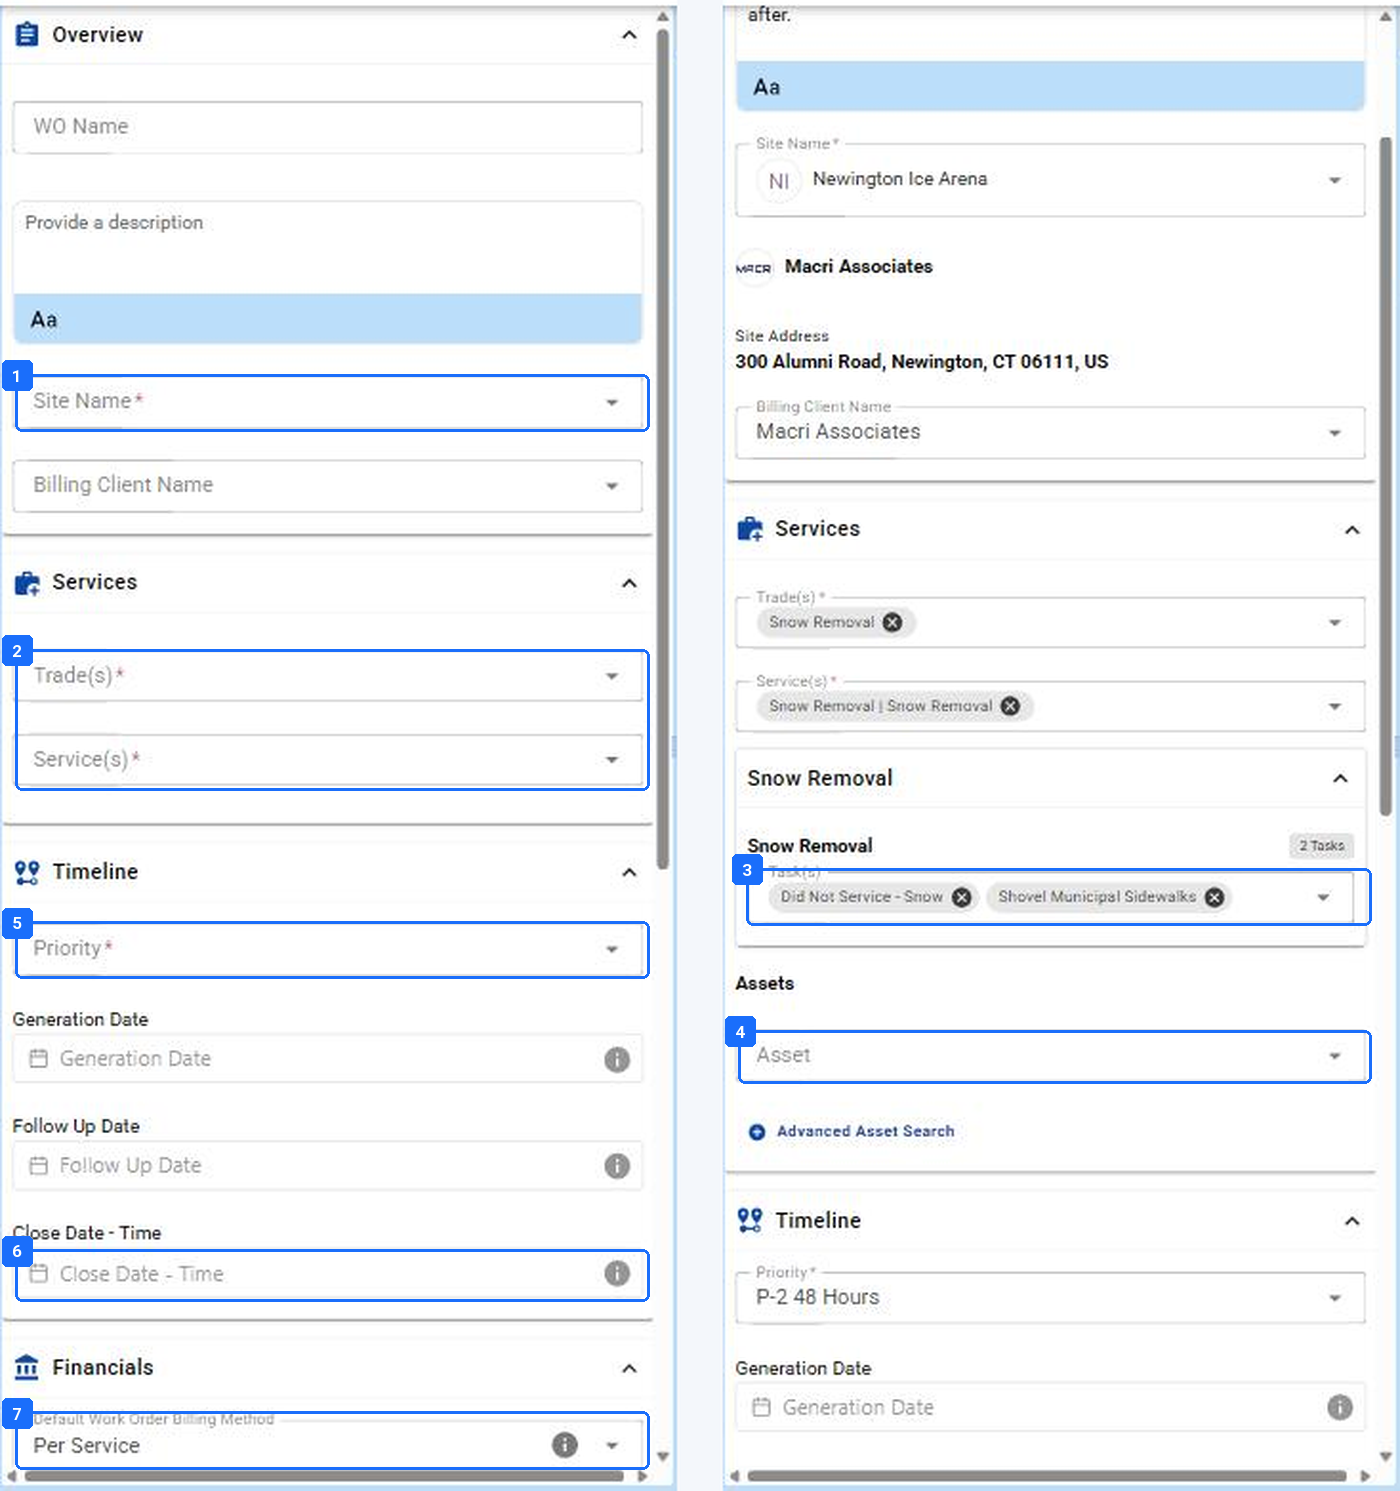
- Site Name. Choosing it fills the Client, the address, and the Billing Client Name.
- Trade(s) and Service(s). These decide which Tasks, photos, and forms the technician sees.
- Task(s). Populated from the Service. Remove the ones that do not apply; add none by hand unless the contract calls for it.
- Asset. Required whenever the Service enforces photos or forms; without it the app cannot enforce them.
- Priority. Sets the ETA, ETC, Trip Expiration, and Work Order Close in one move.
- Close Date – Time. This is the Work Order Close: the Client’s SLA, the finite date everything on the Work Order has to be done by.
- Default Work Order Billing Method. The Client-side billing method every Trip inherits.
The new Work Order form, empty and filled. Left, the fields as they open. Right, the same form after the Site and Service are chosen: the Client, the address, and the Tasks filled themselves in.
| Field | What to enter | Why it matters later |
|---|---|---|
| WO Name | What the Client would call it. Short. | It is the subject line on every email and the label on every list. |
| Description | The scope, written for the technician. Where, what, what done looks like. | It is what the technician reads in the app before knocking on the door. |
| Site Name | Search by name or address. | Pulls Client, billing address, Permanent Site Instructions, and the priority Vendor. |
| Billing Client Name | Defaults from the Site. Change only for a third-party payer. | Decides whose name is on the Receivable. |
| Trade(s), Service(s), Task(s) | One Trade, the Services under it, the Tasks that apply. | Tasks are what the technician ticks and photographs. Billing per task reads this list. |
| Asset | The unit being serviced. Advanced Asset Search finds it by tag. | Photo and form enforcement in the app keys off the Asset. |
| Priority | The Client’s SLA level. | Fills the dates once. Change the priority, not the dates. |
| Follow Up Date | When you want to look at this again. | Your own tickler. Use it on anything waiting on someone else. |
| Close Date – Time | The Work Order Close. The Client’s deadline. | Every Trip Expiration must fall before it. Set it first when the date fields look frozen. |
| Financials | Default billing method, Client NTE, and the invoice generation rule. | Decides how the Receivable is built in Phase 6. Per Hour (T&M) or NTE for on-demand work; Proposal when it was quoted. |
Save, or Save & Add Trip. Save creates the Work Order and leaves it in the Schedule Action Filter with no Trip. Save & Add Trip opens the Trip form with the Site, Trade, and Service already filled in, which is Phase 3. Use it unless you are deliberately parking the Work Order for a quote.
[Screen: The new Work Order form footer with Save and Save & Add Trip.]
Result: The Work Order shows its number and the Site in the Overview panel, the Tasks under Services, and the dates under Timeline. Save & Add Trip has opened the Trip form.
P3 · Assignment and Dispatch. Assign, set the dates, dispatch.
A Trip is the thing that appears on a phone. Phase 3 decides whose phone, when, for how much, and for how long the Trip stays there. The order you fill the date fields in is the single most repeated teaching point on training calls, so it comes first.
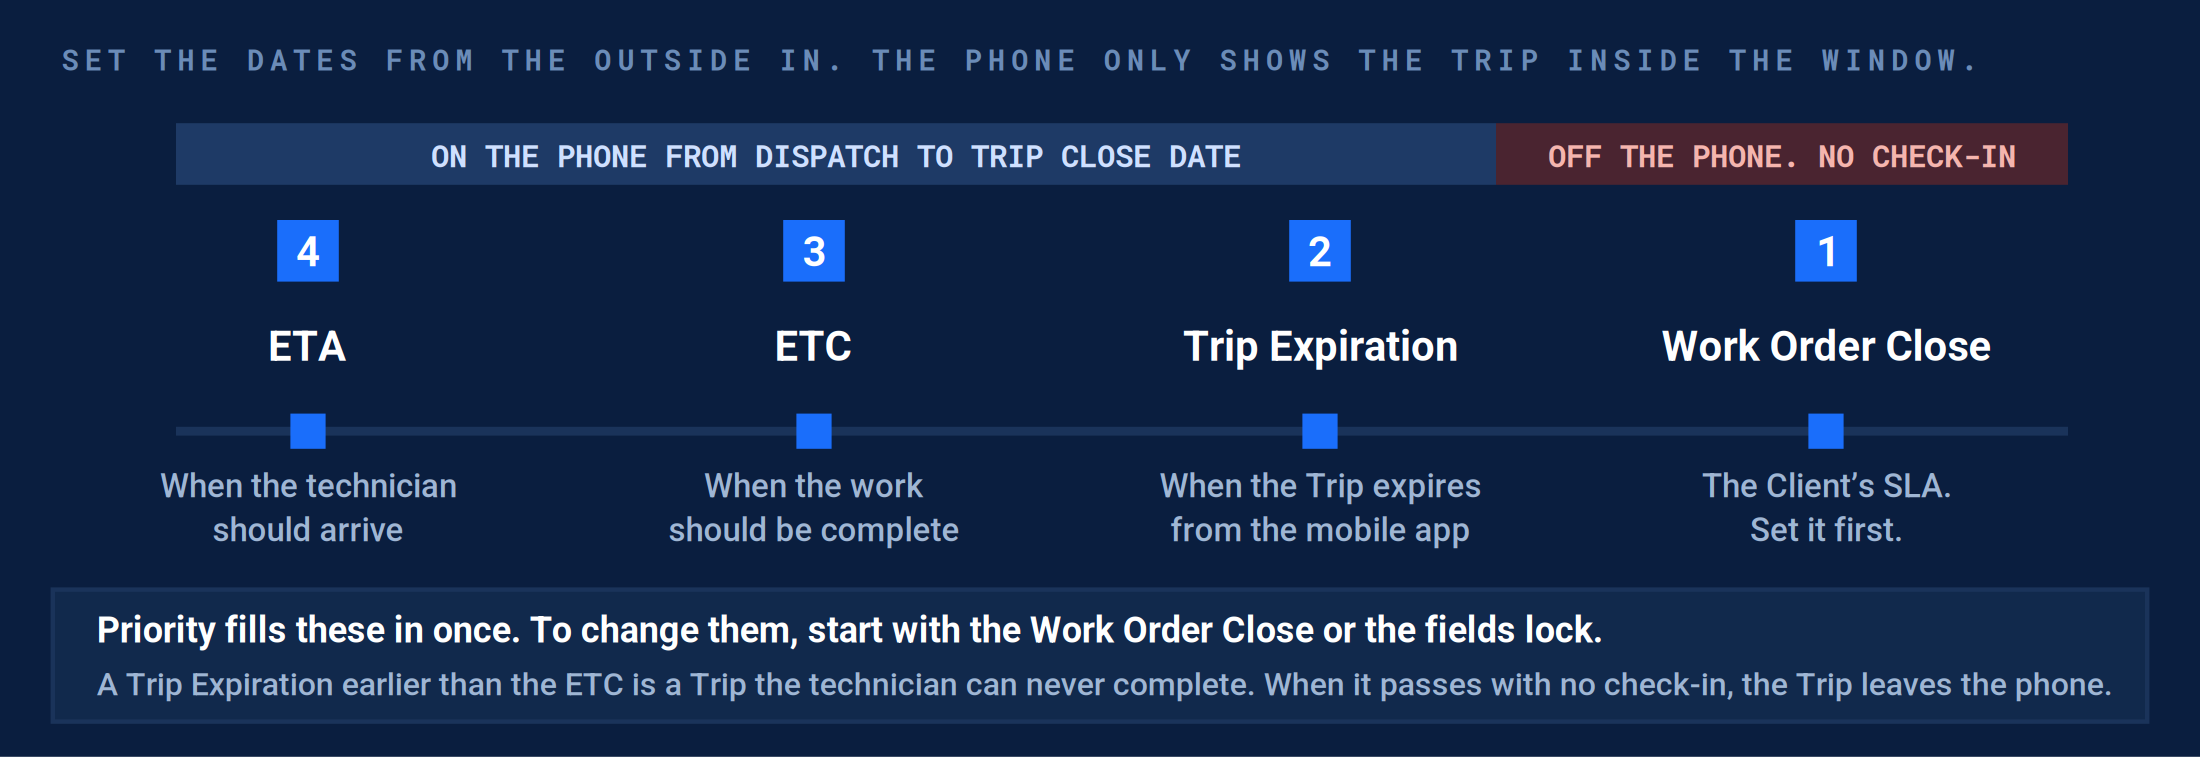
Set dates from the outside in: Work Order Close, Trip Expiration, ETC, then ETA. A field that looks frozen is waiting for the outer date.
Assignment.
Choose a Vendor or one of your own team members. Your priority Vendors for the Site show first, with the number on the avatar. Advanced Vendor Search sorts by distance and does not filter by Trade, so read the row before you pick.

- The priority number on the avatar: this Vendor was assigned to the Site with priority 1 in How a Work Order Moves, Part A.
- Distance from the Site, platform id, compliance chip, active status. A Non-Compliant chip means documents are missing.
- Phone and email, so the call in Phase 4 starts from here.
The Vendor search on the Trip form. The priority Vendor for this Site shows first, with its priority number on the avatar and its distance, platform id, compliance, and active status before you commit.
The Vendor’s money.
Two things get decided here and are hard to change after dispatch: how the Vendor bills, and how much they may bill without asking.

- Vendor Billing Method. NTE, Per Hour (T&M), Per Task, Per Service, Equipment Task T&M, Per Event, Proposal, Non Billable. Billing Methods Explained covers each.
- Vendor NTE. The ceiling. The platform blocks a Vendor invoice above it unless a named user overrides.
- Generate Vendor Invoice. When the Payable is created: on any open billable item, or on completion.
- Purchase Order. Attach one here when your process issues the PO before the work.
Vendor billing on the Trip form. These fields feed the Vendor Payable in Phase 6.
Schedule.
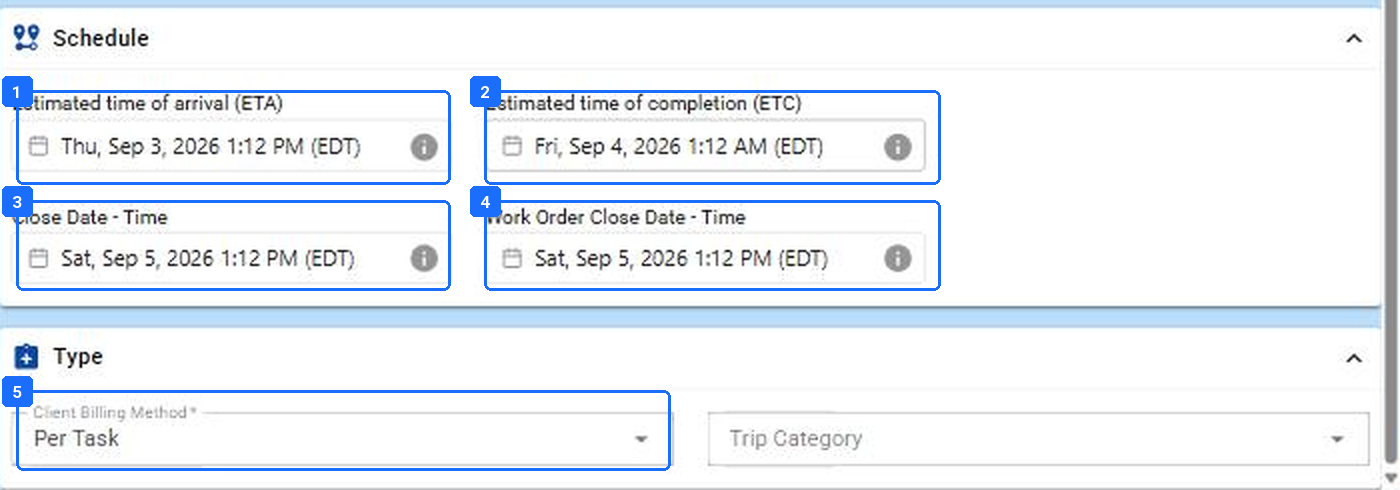
- ETA. When the technician is expected. The late clocks in How a Work Order Moves, Part A count from here.
- ETC. When the work should be done. The check-out clock counts from here.
- Close Date – Time. This is the Trip Expiration: the moment the Trip expires from the mobile app.
- Work Order Close – Time. The Client’s deadline, carried from the Work Order. Set it first.
- Client Billing Method. Inherited from the Work Order; change it here only for this Trip.
The Schedule and Type blocks. Four dates and the Client billing method for this Trip.
Save is not dispatch. Save leaves the Trip at Not Dispatched, on nobody’s phone. Save & Dispatch sends it. If nobody was notified, use Re-send Dispatch Email rather than creating a second Trip.
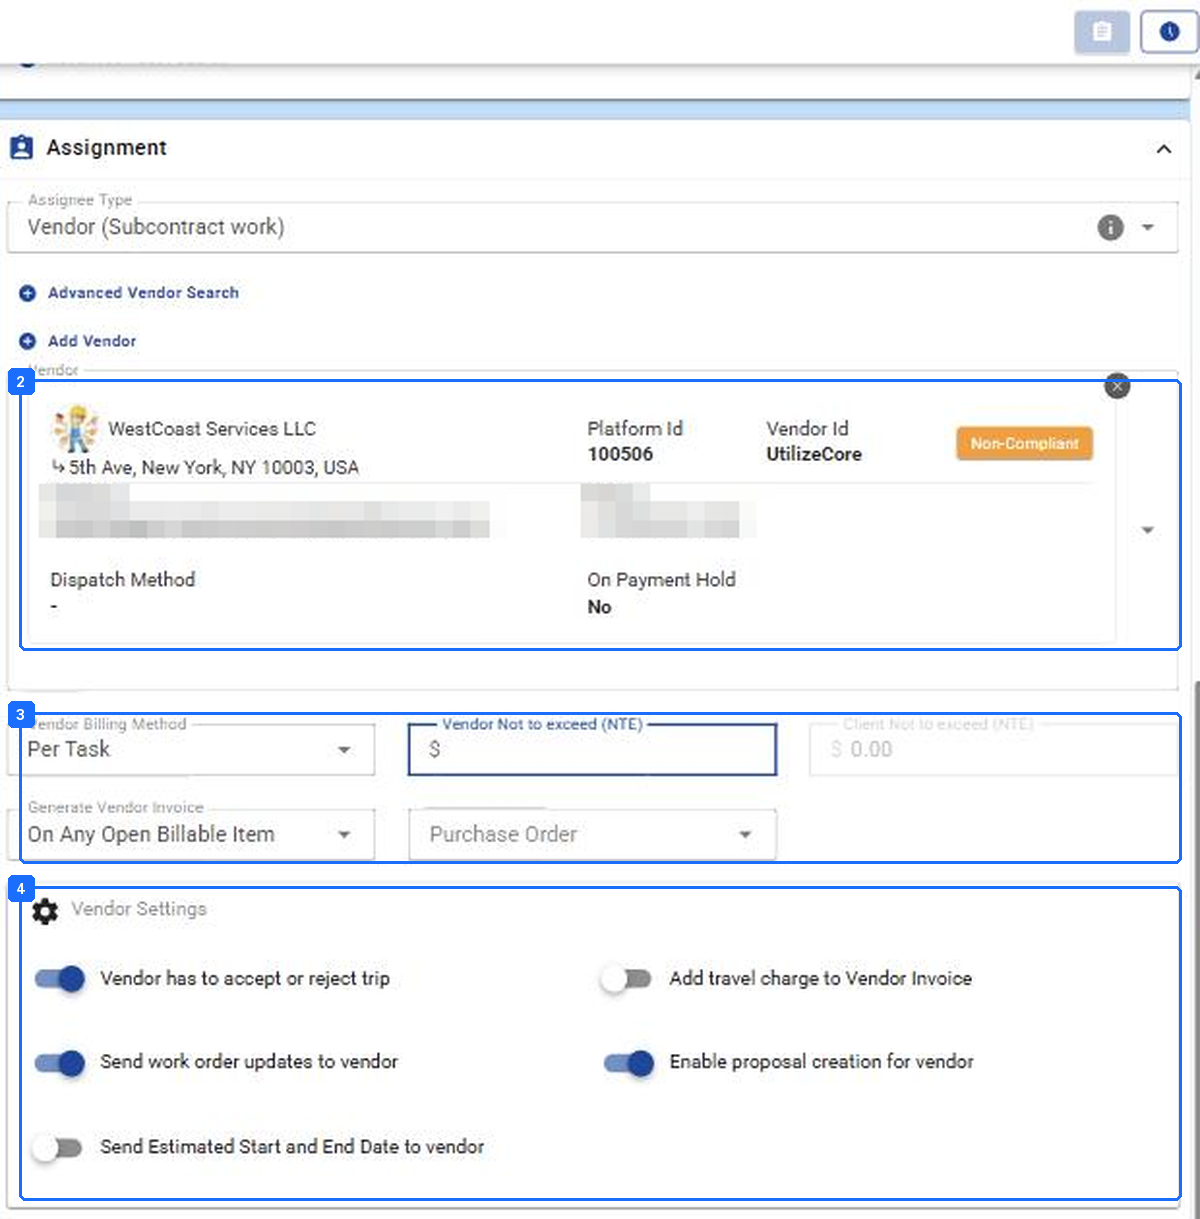
- SAVE keeps the Trip at Not Dispatched. SAVE & DISPATCH sends the email and puts it on the phone.
- The Vendor card once chosen: platform id, phone, email, dispatch method, compliance chip.
- Vendor Billing Method, Vendor Not to exceed (NTE), Generate Vendor Invoice, Purchase Order.
- Vendor Settings: “Vendor has to accept or reject trip” is the toggle behind Waiting For Approval. “Send work order updates to vendor” is what makes notes reach them.
The Trip form with a Vendor chosen. SAVE and SAVE & DISPATCH sit in the header. The Vendor card, the money fields, and the Vendor Settings toggles all live between them and the schedule.
[Screen: The dispatch email dialog that follows Save & Dispatch.]
What you see after dispatch.

- The pin. Tan means Not Dispatched; blue means it is on the phone. The full set is in the Pin Legend.
- The origin icon beside the times: a phone means the technician entered them from the app; a computer means the office did.
- DISPATCH. The suggested action for a Trip that is not on anyone’s phone.
- UNVERIFY. The suggested action once a Trip is verified; the invoice buttons appear in the header at the same time.
The Trips tab on the Work Order, two Trips. The top Trip is waiting to be dispatched; the bottom one is already verified. The pin, the origin icon, and the action button change together.
Waiting for the Vendor to accept. If your company requires Vendor acceptance, a dispatched Trip shows the pink Waiting For Approval pin until the Vendor accepts from the email, the portal, or the app. It sits in no queue. Put a Follow Up Date on it, and reassign if the ETA is close.
Getting a time window after dispatch. There is no field on the Trip for a Vendor to type an arrival window. Teams that need one call the Vendor for a two-hour window and note it, or add “confirm your window by reply” to the Permanent Client Instructions so it rides on every dispatch email.
Result: The Trip shows the blue Scheduled On Tech’s Mobile pin, the dispatch email is in the Work Order activity, and the Work Order has left the Schedule Action Filter.
P4 · Service Execution. In the field, and the exceptions.
On a good day Phase 4 needs nothing from you. The technician opens the Trip in the app, checks in inside the geofence, completes the Tasks, takes the photos the Service asks for, and checks out. The check-out has three choices, and each one moves the Trip somewhere different.
| Check-out choice | What the platform does | What you do |
|---|---|---|
| Complete | Trip moves to Verification Required (green pin). Times, photos, and Tasks are on the Visit. | Phase 5. |
| Must Return, with a reason | This Trip closes as Must Return (purple pin) and a new Trip is created on the same Work Order for the return, inside the window set for that reason. | Dispatch the new Trip. It sits in Schedule as Not Dispatched until you do. |
| Unable to Service | This Trip is done and shows in Operations Failure. The technician’s note says why. | Read the note. Add a new Trip if the Service is still needed. |
Dispatcher work in this phase is exception-only. You do not watch Trips that are on the phone; you watch the Operations Failure Action Filter, and when something lands in it you follow one pattern.
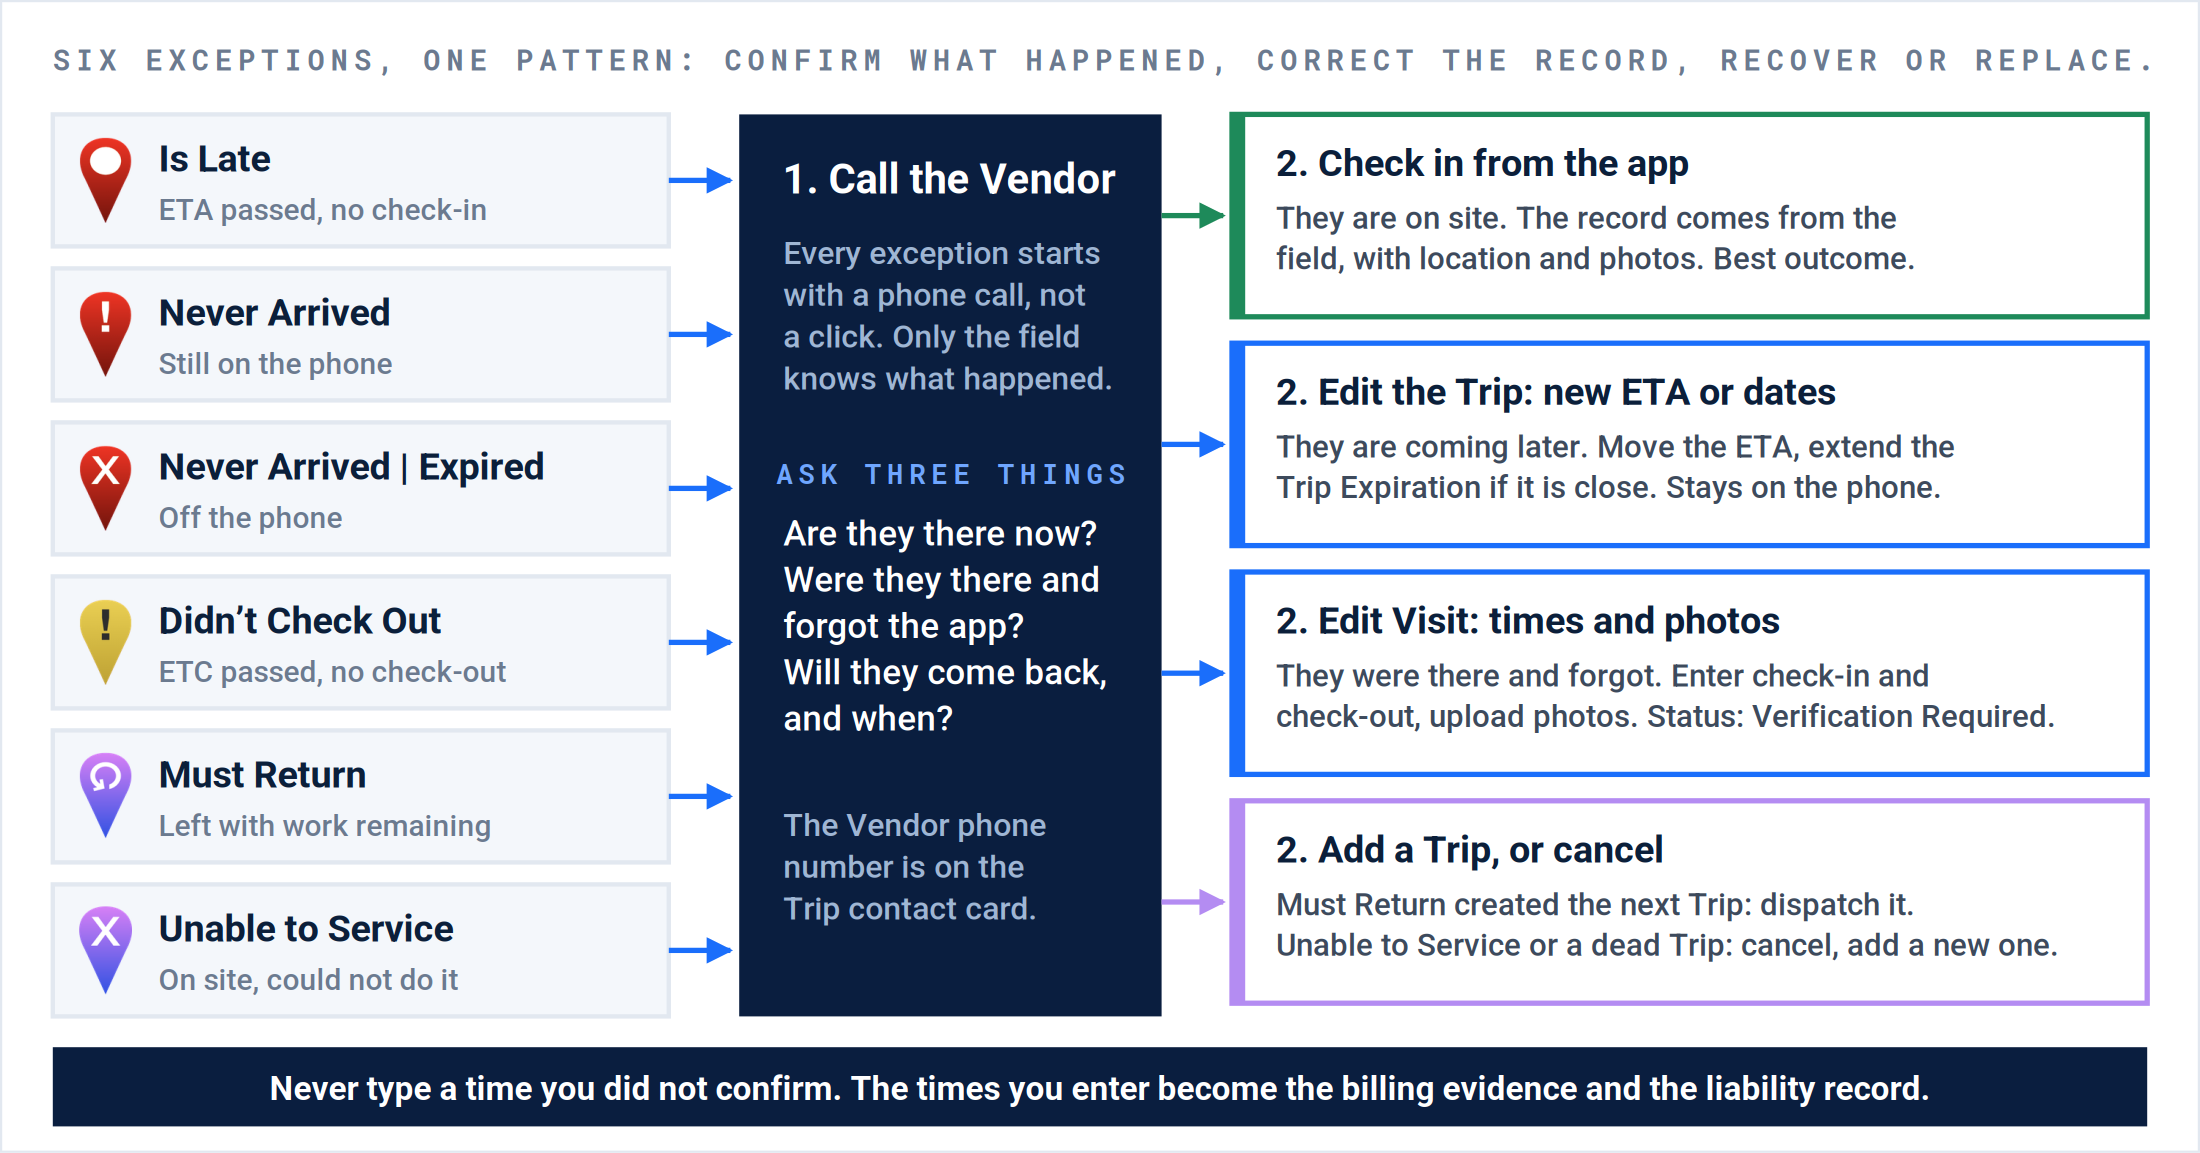
Six exceptions, one pattern. Every fix starts with a call, because only the field knows what happened. Then the record is corrected to match. Cancel-and-recreate is the last resort, not the first.
Edit Visit.
Edit Visit is the tool for correcting the record: a technician who was on site and forgot the app, a check-in from twenty miles away, a check-out that never happened. It changes the Visit, never the Trip: the assignee and the dates stay as they were. Times you enter here are what the invoice and the CMMS will show.
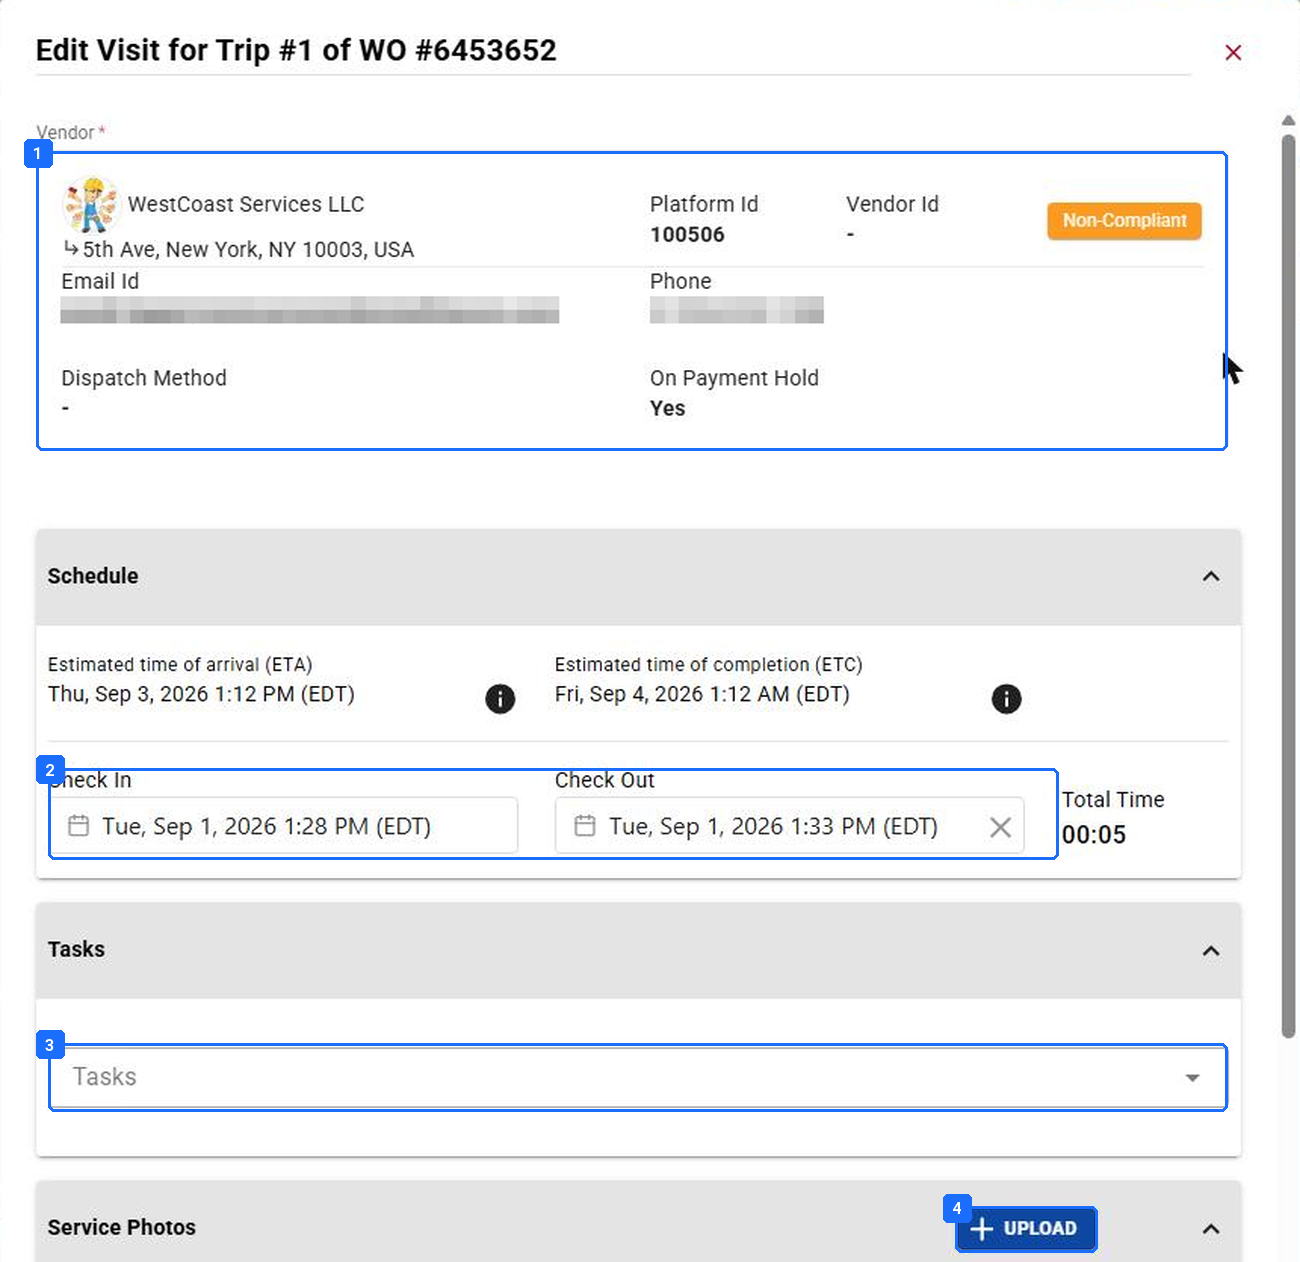
- The Vendor card, with the phone number. This is the number you call before you change anything.
- Check In and Check Out. Enter the times the Vendor confirms. Total Time updates.
- Tasks. Tick what was done.
- Service Photos, UPLOAD. Photos belong here, on the Visit. Photos dropped on the Attachments tab never categorize and never sync to the Client’s CMMS.
Edit Visit for one Trip. Open it from the three-dot menu on the Trip row.
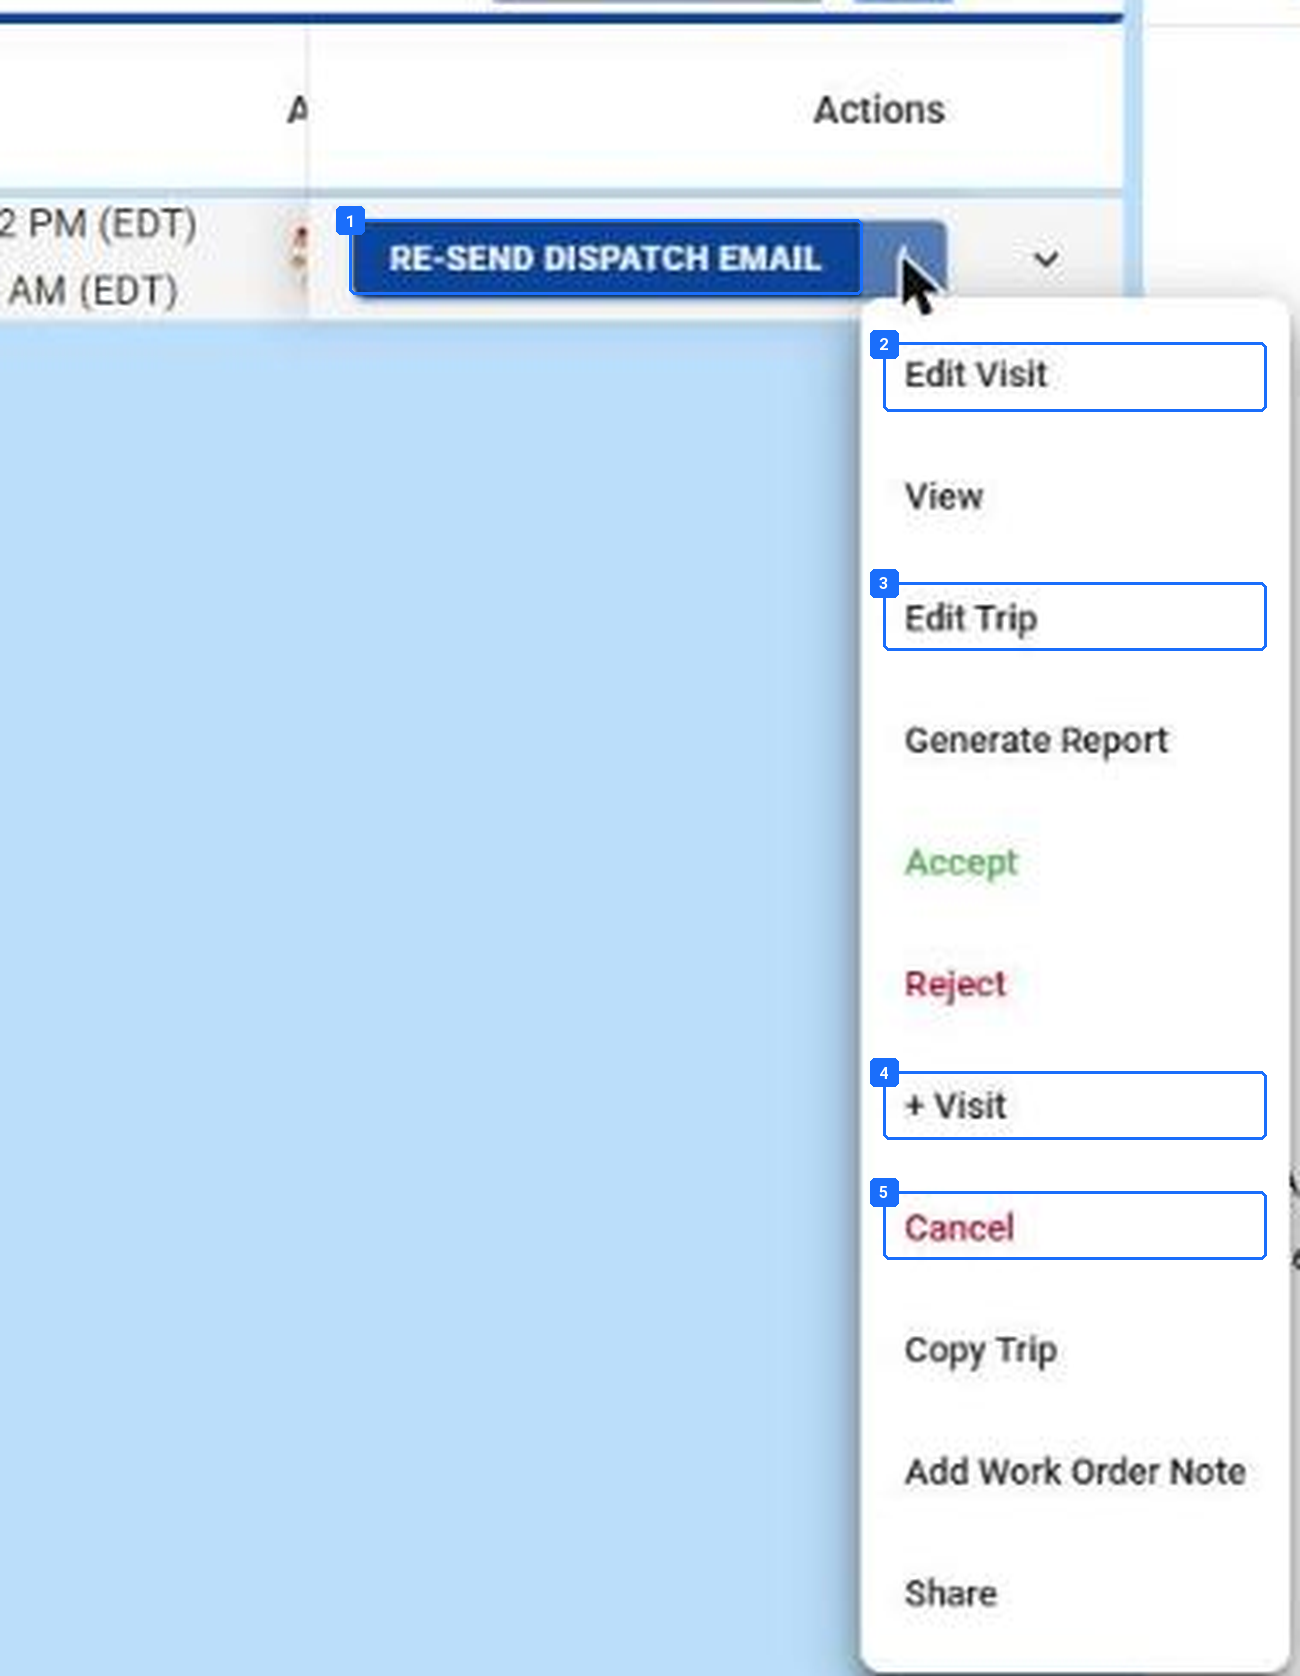
- RE-SEND DISPATCH EMAIL. The suggested action when the Trip is on the phone and the Vendor says they never got it.
- Edit Visit. Times, Tasks, photos.
- Edit Trip. Assignee, ETA, ETC, Trip Expiration. Use it to push the ETA when the Vendor is coming later.
- + Visit. A second check-in and check-out on the same Trip, for a technician who left and came back the same day.
- Cancel. The last resort. An undispatched Trip cancels in one step; a verified one has to be unverified first.
The Trip row menu on an unverified Trip. Everything you can do to a Trip from the Work Order page is here.
Notes, and who hears them. The To chips decide who sees a note. Nothing emails unless a Work Order Manager is set and the sender clicks the email icon. Check that first when a Vendor says they never saw it.
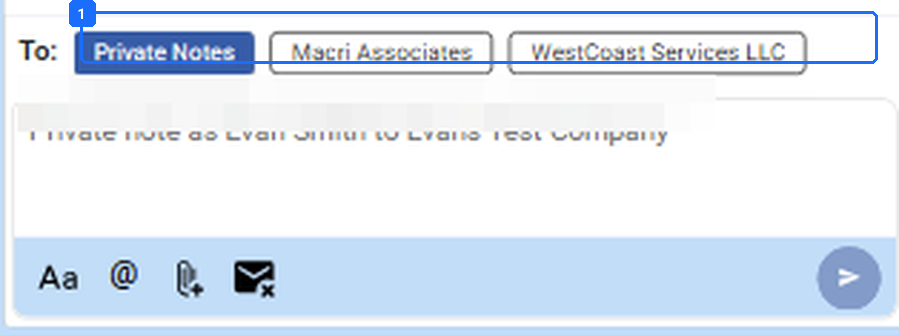
- Private Notes, the Client, or the Vendor. Only the chosen party sees the note.
The notes composer, To row. Pick the chip before you type.
Two open Work Orders at one Site. When a Site has two open Work Orders, a technician can check into the wrong one. The wrong Trip moves to Verification Required and the right one goes to Never Arrived. Fix it with Edit Visit on the right Trip using the real times, then clear the wrong Trip’s Visit, or cancel that Trip if it was never needed.
Result: Every Trip on the Work Order shows the green Verification Required pin, or a purple Must Return whose return Trip has been dispatched. Operations Failure does not list this Work Order.
Where this usually goes wrong.
Ranked by how often it happens, intake through the field.
| # | What you see | What happened | The fix |
|---|---|---|---|
| 1 | “The job disappeared from his phone.” | The Trip Expiration passed, or the Must Return window ran out. Status Never Arrived | Expired, no pin. | Edit Trip: extend the dates and reassign, or add a new Trip. Set Work Order Close first next time. |
| 2 | “He has to come back. New Work Order or new Trip?” | Return visits opened as new Work Orders split the notes, photos, and CMMS number. | + TRIP on the same Work Order. Teach Must Return at check-out so the platform does it. |
| 3 | Checked in from twenty miles away, or never checked out. | Geofence off, or the technician left without the app. | Call, then Edit Visit with the confirmed times. Turn the geofence on (How a Work Order Moves, Part A). |
| 4 | “Nobody was notified.” | The Trip was saved, not dispatched. Or the ETC was set after the Trip Expiration, so no check-in was possible. | Re-send Dispatch Email from the Trip row. Fix the dates from the outside in. |
| 5 | A Work Order sat for days with the technician “still on site”. | Pause Trip was used instead of check-out plus Must Return. | Edit Visit to record the real check-out. Turn Pause Trip off on the Service (card 7). |
| 6 | The right Work Order is still unverified after the visit. | Two open Work Orders at one Site; the technician checked into the other one. | Edit Visit on the right Trip with the real times; clear or cancel the wrong one. |
| 7 | “The date fields are frozen.” | The outer date is empty. | Set Work Order Close, then Trip Expiration, then ETC, then ETA. |
| 8 | “I never saw the note.” | No Work Order Manager, or the email icon was not clicked. Or the wrong To chip. | Set the manager (card 8). Choose the chip, click the icon. |
| 9 | The dispatcher picked the closest Vendor, not the awarded one. | No priority assignment on the Site, so Advanced Vendor Search sorted by distance. | Site › View Service Rates › assignee with priority 1 (card 2). |
What good looks like.
Three things to check before a dispatcher goes live. Each one is the result line of a phase.
| Checkpoint | Evidence |
|---|---|
| A qualified Work Order | An Asset, Tasks from the Service, a priority, and a Follow Up Date. No dates typed by hand. |
| A dispatched Trip | Trip Expiration after the ETC, both before the Work Order Close, the dispatch email in the activity, and the blue pin on the row. |
| One corrected Visit | An Edit Visit with a note that says who confirmed the times. Origin icon shows a computer on that row. |
Questions? Contact your Customer Success team or email support@utilizecore.com.