
Applies to: Dispatchers, account managers | Web
Download the printable guide (PDF)
Before anything else. A Work Order is the problem. A Trip is sending someone to solve it, once or as many times as it takes.
Move 1 · Save your filter templates once.
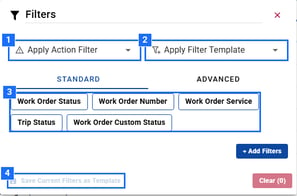
1 Apply Action Filter 2 Apply Filter Template 3 Standard filters 4 Save Current Filters as Template
Filters. The funnel icon above the list.
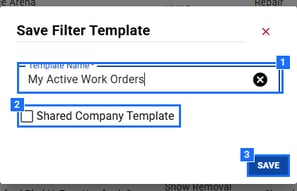
1 Template name 2 Shared Company Template 3 SAVE
Save it. Name it. Tick Shared Company Template to give it to the whole team.
- Click the Filter icon. Pick a filter, tick the values, Apply. Then Save Current Filters as Template and name it.
- Every morning: Filter › Apply Filter Template. Keep one template per Client, plus one for everything Action Required or In Progress.
Move 2 · Start from the Work Order or the Trip line.

1 + TRIP: top of the Work Order 2 The Trip line: right side
Two places to start. + TRIP at the top of the Work Order adds a Trip. The action at the right of the Trip line acts on that Trip.
- Select + TRIP at the top of the Work Order, or the action at the right of the Trip line (Assign when the Trip has no Vendor).
- Choose the Vendor, then Assign.
- Click Dispatch. The Trip goes to the Vendor's phone and email.
- Let the Vendor accept in the app or portal. Accept for them only when they confirm by phone, and add a note saying who confirmed.
What the Trip line is telling you.
The action at the right of each Trip line changes with where the Trip is.
| Button | Where the Work Order is | What to do |
|---|---|---|
| Create Trip | No Trip yet. | Add a Trip and assign a Vendor. |
| Assign Trip | A Trip exists with no Vendor. | Choose the Vendor, then dispatch. |
| Re-send Dispatch Email | Dispatched, not yet accepted. | Wait for the Vendor, or call. Re-sending only repeats the email; it changes nothing on the Trip. |
| Verify Trip | The Vendor has checked out. | Review photos and times, then verify. |
| Gener Inv Trip | Verified, not yet billed. | Generate the invoice. |
Move 3 · No app? You are the app.
When a Vendor reports by phone, email or text, enter what happened on the Visit so the Work Order stays the record.
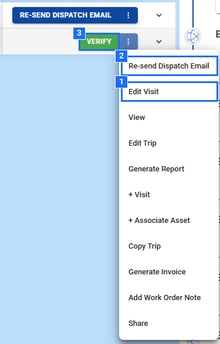
1 Edit Visit 2 Re-send Dispatch Email 3 Verify
Trip menu. The three dots on the Trip row.
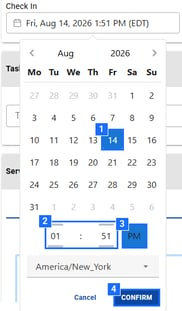
1 Day 2 Hour : minute 3 AM or PM 4 CONFIRM
Date picker.
- On the Trip, click ⋮ › Edit Visit.
- Check In: pick the day, set the hour and minute, check AM or PM, click CONFIRM.
- Check Out: the same way. Then read Total Time.
- Service Photos › UPLOAD the photos the Vendor sent you.
- Click SAVE. You can edit it again later; Activity records every change.
Check AM and PM. A check-out that will not save, or a negative Total Time, almost always means AM or PM is wrong on one side.
Move 4 · Same Work Order, new Trip.
The rule. A return visit is a new Trip on the same Work Order. Never a new Work Order.
| If | Do this | What carries over |
|---|---|---|
| No Proposal | + TRIP in the Work Order header. Choose the Vendor, set the dates, dispatch. | Trade, Service and Tasks from the Work Order. |
| Vendor Proposal approved | Vendor Proposals tab › ⋮ › Create Trip. Review, then dispatch. | The Vendor, and the approved amount as the Vendor NTE. |
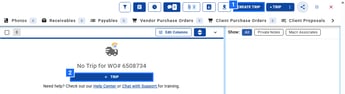
1 Header 2 Trip panel
+ TRIP. On the Work Order header, or in the middle panel when there is no Trip. Both open the same New Trip form.
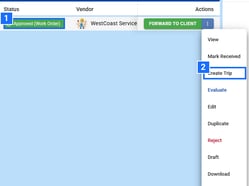
1 Approved 2 Create Trip
Create Trip on an approved Vendor Proposal.
Questions? Contact your Customer Success team or email support@utilizecore.com.