
Overview
Every Trip carries its own checklist, set by whoever sends you the work. This article shows where to complete it and how to run an inspection when the Trip calls for one.
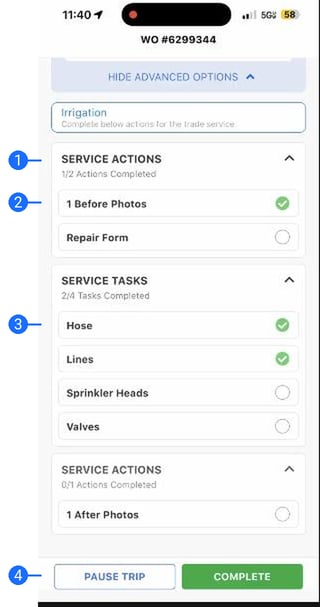
Complete the work
- Service Actions. The required steps for this Trip. A counter (1/2) shows how many are done.
- Photos and forms. Common actions are Before Photos, a Repair Form, and After Photos. Tap one to complete it. It turns green when done.
- Service Tasks. The checklist for the trade (for example, Hose, Lines, Sprinkler Heads, Valves). Check each off as you finish it.
- Pause Trip / Complete. Hold the Trip if you step away, or move to checkout once every action and task is done.
What a Trip may require
- Photos. A set number of before and after photos, each stamped with location and time.
- Materials. The parts you used. The Repair Form captures photos, notes, and materials in one place.
- Signature and mandatory tasks. A store or site-manager signature may be required. You cannot check out until every required item is done.
Run an inspection
- Tap Perform Inspection to open the Site's asset list.
- Select an asset and mark it pass, minor deficiency, or fail, with photos. A fail asks for details.
- Wrong asset type? Open the asset's Attributes tab, tap Edit, choose the right Type, then Save.
- Press Back and pull down to refresh.
Related articles
- Check In to a Trip (Solo or with a Crew)
- Check Out, Pause a Trip, or Mark It Must Return
Need help?
Reach out to your Technical Account Manager or contact support@utilizecore.com.